5
US
Identifying parts and controls
See the pages in parentheses for further details.
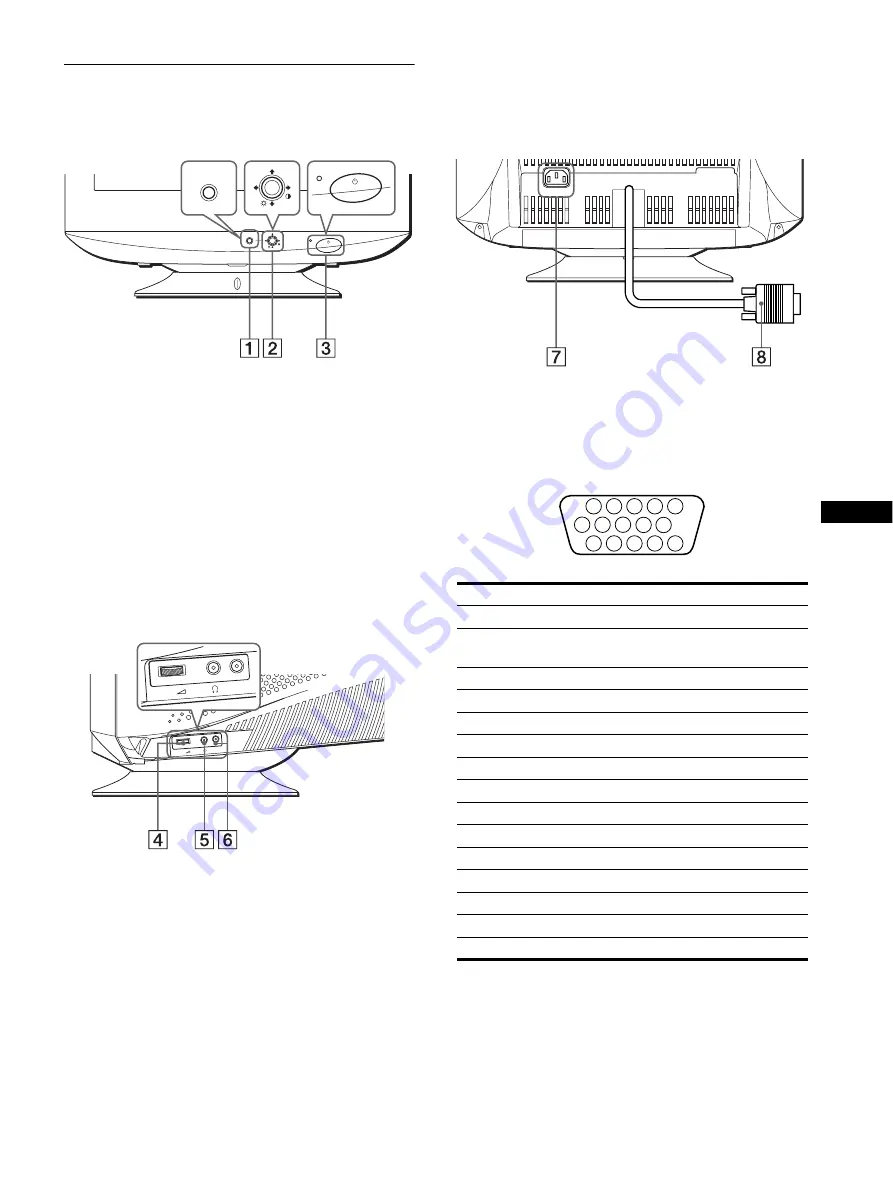
1
MENU/OK button (page 9)
The MENU/OK button is used to display the main MENU on
your screen.
2
Joystick (page 9)
The joystick is used to navigate the menu and make
adjustments to the monitor, including brightness and contrast
adjustments.
3
1
(power) switch and indicator (pages 7, 12, 15)
This button turns the monitor on and off. The power indicator
lights up in green when the monitor is turned on or lights up
in orange when the monitor is in power saving mode.
4
Volume (VOL) control
This control adujster is used to adjust the volume. Move the
adjuster to the right to increase the volume. Move the adjuster
to the left to decrease the volume.
5
Headset output
You can listen to the audio signals from your computer using
headphones (not supplied). The speaker turns off when
headphones are connected to the headphones jack. Adjust the
volume using the volume control.
6
AUDIO IN input
You can listen to music, sounds, and other audio files using
the speaker in your monitor.
Connect the AUDIO IN jack to the audio out jack of your
computer’s sound card using the miniplug cord (supplied).
7
AC IN connector (page 6)
This connector provides AC power to the monitor.
8
Video input connector (HD15) (page 6)
This connector inputs RGB video signals (0.700 Vp-p,
positive) and sync signals.
* DDC (Display Data Channel) is a standard of VESA.
AC IN
MENU
MENU
Rear
Front
VOL
AUDIO IN
VOL
AUDIO IN
Side
For CPD-G220S model only
Pin No.
Signal
1
Red
2
Green
(Sync on Green)
3
Blue
4
ID (Ground)
5
DDC Ground*
6
Red Ground
7
Green Ground
8
Blue Ground
9
DDC Host 5V*
10
Ground
11
ID (Ground)
12
Bi-Directional Data (SDA)*
13
H. Sync
14
V. Sync
15
Data Clock (SCL)*
1 2
3 4 5
8
7
6
11 12 13 14 15
10
9
Summary of Contents for CPD-G220R/W
Page 16: ......


