3.
22.
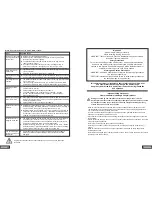
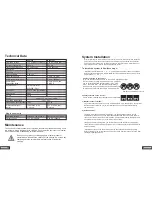
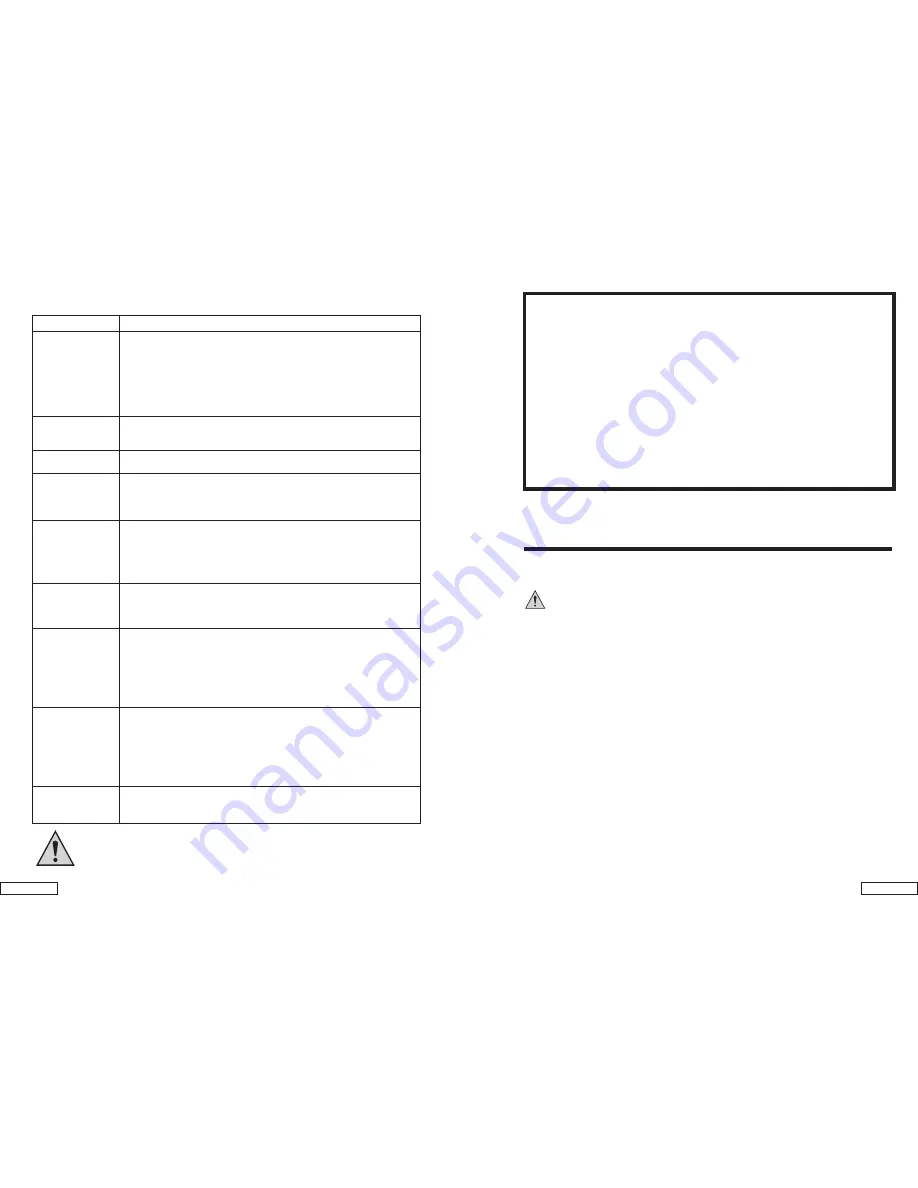
Error
Possible cause
No image or no sound
in Camguard Window
(Pure blank)
Noise screen and
noise sound
Aliasing image or low
resolution
The image/sound is
distorted
Flickering/ running
image
Normal sound, image
is too light or dark
Motion Detection does
not work
Motion Detection is
triggered all the time
Can not access the
system remotely from
the internet
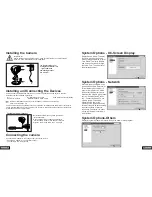
When I connect the receiver to my PC or NB, I found…
The distance between the camera and receiver is too long, relocate
camera closer to receiver.
Strong spotlight in the cover range of the camera.
TV System setting wrong. To solve this, go to "Option"- "Change
Device"- "Device: USB 2861 Video"- "Attribute" - "Video decoder" -
"Video Format: PAL"- OK
Receiver is not supplied with electricity.
USB jack is loss. If the USB jack is plugged in correctly, blue LED in
the front of the receiver will light up.
The distance between the camera and receiver is too long, relocate
camera closer to receiver.
No assigned Video/Audio device driver or device assign wrong. To
solve this, go to "Option"- "Change Device"- "Device Type: USB
Webcam"- "Device: USB 2861 Video" - "Device: USB Audio Device" - OK
The distance between the camera and receiver is too long, relocate camera
closer to receiver.
Camera is not supplied with electricity or battery low.
The converter requires USB 2.0 for best performance quality. Check to see
if your system supports USB 2.0. Lower speed USB 1.1 will cause aliasing.
The distance between the camera and receiver is too long, relocate camera
closer to receiver.
There is a strong interference source (e.g. electric engine, walkie-talkie,
2.4GHz WiFi, Microwave Oven, 2.4GHz cordless phone...Ketc.) nearby.
If the image is too dark in Night Vision mode (Infrared LED on), camera is
aiming at the area that is too far away. The proper lighting distance is within
5 meter. Readjust the camera.
Strong spotlight in the cover range of the camera.
Detection Sensitivity setting too high. To solve this, go to "Option" - "Motion
Detection Setting" - "Detection Sensitivity:"- lower the volume by inputting a
proper number in the input box or using the down arrow - OK
Motion Detection area is checked, but no area is masked. To solve this, go
to "Option" - "Motion Detection Setting" - "Enable Motion Detection Area:
Unchecked or click on "Edit" button to mask the area. While the function is
enabled, only masked area will be detected."- OK
The distance between the camera and receiver is too long; the false alarm
is caused by the interference. Relocate camera closer to receiver or
neutralize the interference source. The possible interference sources are,
2.4GHz WiFi, Microwave Oven, 2.4GHz cordless phone.
Detection Sensitivity setting too low. To solve this, go to "Option" - "Motion
Detection Setting" - "Detection Sensitivity:" - lower the volume by inputting
a proper number in the input box or using the up arrow - OK
If all settings are correct. Then Windows Firewall blocks the software.
Please go to Windows Firewall Manager (in Control Panel) to enable
Camguard.
Important!
Please read this Manual carefully
before installing or using these units.
WARNING- These units should ONLY be disassembled by an authorized
technician if service is required.
Safety Precautions
For correct and safe operation of this system, it is essential that installers,
end-users and service technicians should follow all safety procedures
outlined in this manual. Specific Warning and Caution statements (and/or
symbols) are marked on the units where needed.
Warning and Caution Statements
"WARNING" indicates a situation where failure to follow proper procedures
can cause personal injury.
"CAUTION" indicates a situation where failure to follow proper procedures
can cause damage to the equipment.
This camera is subject to interference from cordless phones, microwaves,
and other wireless devices operating in the 2.4GHz range.
Keep the system AT LEAST 10 ft away from the devices during installation
and operation.
Important Safety Precautions
Please read before installing & using this product
Damages caused by non-compliance with this operating manual void the
warranty! We will not assume any liability for damages to items or persons caused
by improper handling or non-compliance with the safety notices! Any warranty
claim will be null and void in such cases.
• Make sure that all electric connections and connection cables between the devices of the
camera system as well as the devices to be connected meet the pertaining regulations and
are in conformity with the operating instructions.
• In schools, training facilities, hobby and self-help workshops, qualified personnel needs to
supervise the operation of electronic devices.
• Also observe the safety notices and operating instructions of the other appliances connected
to the system.
• Please contact an expert in case you have any doubts about the mode of operation, the safety
or connecting the appliances.
• Never plug-in or unplug the power packs with wet hands.
• Never tug on the power cords of the power packs, use the plug to unplug it from the wall
socket.
• Make sure that the power cables do not get squashed or damaged by sharp edges when
installing the devices.
• Never replace damaged power cables yourself! In such a case, remove them from the net and
take the devices to a workshop.
Repairs other than described as above should only be performed by an authorized
technician.


