background image

15

GB

Naviga

ting thr

o

ugh Home Menu

GB

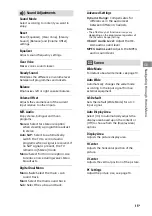
Sound Adjustments

Sound Mode 

Select according to content you want to 
enjoy. 

Reset 

Reset [Equalizer], [Clear Voice], [Steady 
Sound], [Balance] and [Volume Offset] 
settings.

Equalizer 

Adjusts sound frequency settings.

Clear Voice

Makes voices sound clearer. 

Steady Sound

Minimizes the difference in volume level 
between all programmes and adverts. 

Balance 

Emphasises left or right speaker balance. 

Volume Offset 

Adjusts the volume level of the current 
input relative to other inputs.

MTS Audio

Enjoy stereo, bilingual and mono 
programs.

Stereo: 

Select for stereo reception 

when viewing a program broadcast 
in stereo.

Auto SAP: 

Select to automatically 

switch the TV to second audio 
programs when a signal is received. If 
no SAP signal is present, the TV 
remains in [Stereo] mode.

Mono: 

Select for mono reception. Use 

to reduce noise during weak stereo 
broadcasts.

Digital Dual Mono

Main + Sub: 

Select the main + sub 

sound track.

Main: 

Select the main sound track.

Sub: 

Select the sub sound track.

Advanced Settings 

Dynamic Range: 

Compensates for 

differences in the audio level 
between different channels. 

Note 

• The effect may not function or may vary 

depending on the programme regardless of 
the [Dynamic Range] setting. 

HE-AAC Audio Level: 

Adjust the HE-

AAC audio sound level.

MPEG Audio Level: 

Adjusts the MPEG 

audio sound level.

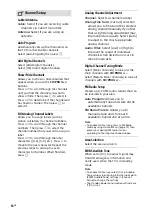
Screen

Wide Mode 

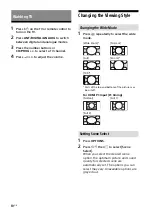
For details about wide mode, see page 10. 

Auto Wide 

Automatically changes the wide mode 
according to the input signal from an 
external equipment.

4:3 Default 

Sets the default [Wide Mode] for a 4:3 
input signal.

Auto Display Area 

Select [On] to automatically adjusts the 
display area based upon the content or 
[Off] to choose from the [Display Area] 
options.

Display Area 

Adjusts the picture display area. 

H Center

Adjusts the horizontal position of the 
picture.

V Center

Adjusts the vertical position of the picture.

PC Settings 

Adjust the picture size, see page 10.

Summary of Contents for BRAVIA KDL- 32R307F

Page 1: ...KDL 40R357F 32R307F 4 742 399 12 1 Television Operating Instructions Parts and Controls Watching TV Navigating through Home Menu Viewing Pictures from Connected Equipment Additional Information ...

Page 2: ...es 11 Digital EPG 11 Applications 11 Using the TV as a Photo Frame Mode 11 Listening to FM Radio 12 Media 12 Playback Photo Music Video via USB 12 Settings 14 Preferences 14 Customer Support 20 Viewing Pictures from Connected Equipment Connection Diagram 21 Using Audio and Video Equipment 22 Additional Information Installing the TV to the Wall 23 Troubleshooting 26 Picture 26 Sound 26 Channels 27 ...

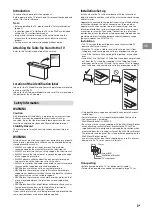
Page 3: ...evision set and supporting furniture NEVER place items that might tempt children to climb such as toys and remote controls on the top of the television or furniture on which the television is placed If your existing television set is being retained and relocated the same considerations as above should be applied Installation Set up Install and use the TV set in accordance with the instructions bel...

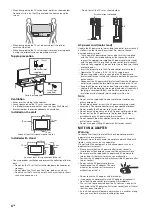
Page 4: ...nd clean it regularly If the plug is covered with dust and it picks up moisture its insulation may deteriorate which could result in a fire Note Do not use the supplied AC power cord mains lead on any other equipment Do not pinch bend or twist the AC power cord mains lead excessively The core conductors may be exposed or broken Do not modify the AC power cord mains lead Do not put anything heavy o...

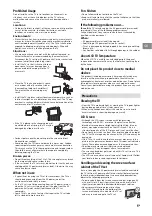
Page 5: ...ccessories out of the reach of children so that they are not mistakenly swallowed If the following problems occur Turn off the TV set and unplug the AC power cord mains lead immediately if any of the following problems occur Ask your dealer or Sony service centre to have it checked by qualified service personnel When AC power cord mains lead is damaged Poor fitting of AC power outlet mains socket ...

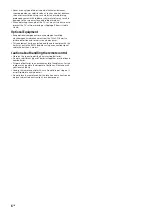
Page 6: ... Otherwise picture distortion and or noisy sound may occur This equipment has been tested and found to comply with the limits set out in the EMC Standards using a connection signal cable shorter than 3 meters Caution about handling the remote control Observe the correct polarity when inserting batteries Do not use different types of batteries together or mix old and new batteries Dispose of batter...

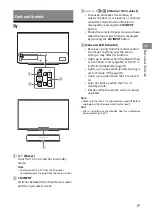
Page 7: ...ayed by pressing the CH INPUT button Sensors LED indicator Receives signals from the remote control Do not put anything over the sensor Doing so may affect its function Lights up in amber when the Sleep Timer or On Timer is set page 18 or the TV is in Photo Frame Mode page 11 Lights up in green when Power Saving is set to Picture Off page 19 Lights up in green when the TV is turned on Does not lig...

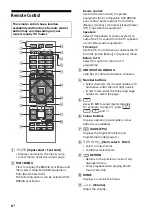
Page 8: ...Options menu Return to TV Select this option to return to TV programme ANT DIGITAL ANALOG Switches to Cable and Antenna channels Number buttons Select channels For channel numbers 10 and above enter the next digit quickly In text mode enter the three digit page number to select the page Use with 0 9 to select digital channels For example to enter 2 1 press and Colour buttons Displays operation gui...

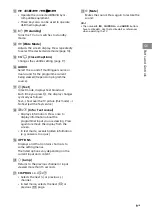
Page 9: ...ws Text Text over the TV picture mix mode No Text exit the Text service Info Text reveal Displays information Press once to display information about the programme input you are viewing Press again to remove the display from the screen In text mode reveals hidden information e g answers to a quiz OPTIONS Displays a list that contains shortcuts to some setting menus The listed options vary dependin...

Page 10: ...dly to select the wide mode For HDMI PC Input PC timing 1 Press OPTIONS 2 Press then to select Scene Select When you select the desired scene option the optimum picture and sound quality for selected scene are automatically set The options you can select may vary Unavailable options are greyed out Watching TV Changing the Wide Mode Wide Zoom Normal Full Zoom 14 9 Parts of the top and bottom of the...

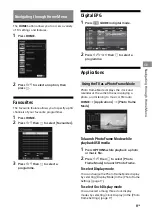
Page 11: ...e Mode displays the clock and calendar at the same time as displaying a photo and listening to music or FM radio HOME Applications Photo Frame Mode To launch Photo Frame Mode while playback USB media 1 Press OPTIONS while playback a photo or music file 2 Press then to select Photo Frame Mode to launch Photo Frame To select Display mode You can change the Photo Frame Mode display by selecting Displ...

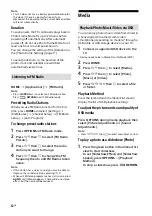
Page 12: ...n to change the FM frequency then to edit FM Radio station name Note If the station has a noisy sound you may be able to improve the sound quality by pressing When an FM stereo programme has static noise press AUDIO until Mono appears There will be no stereo effect but the noise will be reduced Media You can enjoy photo music video files stored in a Sony digital still camera camcorder smartphone d...

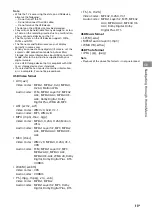
Page 13: ...t container information or is incomplete it cannot be played back USB Video format USB Music format LPCM wav MPEG1 audio layer3 mp3 WMA V8 wma USB Photo format JPEG jpg jpeg Note Playback of the above file formats is not guaranteed AVI avi Video Codec MPEG1 MPEG2 Xvid MPEG4 H 264 Motion JPEG Audio Codec PCM MPEG1 Layer1 2 MPEG2 AAC MPEG4 AAC MPEG4 HE AAC Dolby Digital Dolby Digital Plus WMA v8 MP3...

Page 14: ...duction Reduces the picture noise in MPEG compressed video CineMotion Provides improved picture movement when playing BD Blu ray Disc DVD or VCR images taken on film Select Auto to represent original film based content as it is Note If the image contains irregular signals or too much noise CineMotion is automatically turned off even if Auto is selected Advanced Settings Sets Picture settings in mo...

Page 15: ...ing weak stereo broadcasts Digital Dual Mono Main Sub Select the main sub sound track Main Select the main sound track Sub Select the sub sound track Advanced Settings Dynamic Range Compensates for differences in the audio level between different channels Note The effect may not function or may vary depending on the programme regardless of the Dynamic Range setting HE AAC Audio Level Adjust the HE...

Page 16: ...Analog Fine Tune Custom selection allows you to fine tune the selected analog channel manually if you feel that a slight tuning adjustment may improve picture quality Select Auto to adjust to the most appropriate analog channel Audio Filter Select Low or High to improve the sound of individual channels when distortion occurs in mono broadcasts Digital Channel Tuning Mode Select Major Channels to t...

Page 17: ...how mode or single view photo Music Playback Setting Select from listening to all tracks or a single music track Duration Select the time period after which the TV automatically switches to standby mode First day of the week Sets Sunday or Monday as the first day of the week on the calendar USB Auto Start When USB device is connected to the USB port select On to automatically view the thumbnail of...

Page 18: ...m the input source Video Component Selection Select Auto to have the TV detect and switch between the component video jack or the video jack when component video jack or video jack is connected Note You cannot use the component video jack and the video jack at the same time Speakers Select sound output from the TV speakers or external audio equipment Headphone Audio Out Sets the sound output to he...

Page 19: ...quipment that is compatible with BRAVIA Sync Control Select Enable to update the BRAVIA Sync Device List Device Control Keys Select button functions of the TV s remote control to operate the connected equipment None Deactivates the control by the TV s remote control Normal For basic operations such as navigation buttons up down left or right etc Tuning Keys For basic operations and operation of ch...

Page 20: ...anage the TV and external inputs Picture Check View Sample Image Allows you to check the picture condition on the display Software Update Select to perform system update Factory Settings Resets all settings to factory settings After completing this process the initial set up screen is displayed Note Be sure not to turn the TV off during this period it takes about 30 seconds or press any buttons Pr...

Page 21: ...er connected devices beside it When connecting a large USB device connect only 1 USB jack KDL 40R357F 32R307F Viewing Pictures from Connected Equipment DVD player with component output Home Audio System Optical Input VCR Video game equipment DVD player Camcorder HDMI Device Home Audio System with ARC HDMI Device Headphone Home Audio System Subwoofer 12 mm 21 mm Digital still camera Camcorder USB s...

Page 22: ...n connecting with an HDMI cable be sure to use HighSpeed HDMI Cable with Cable Type Logo Recommended SONY Cable When connecting mono equipment connect the audio cable to the L mono jack Only on limited region country TV model To use BRAVIA Sync devices When connecting the TV to BRAVIA Sync compatible equipment you can control them together Be sure to perform the necessary settings in advance The B...

Page 23: ...llation Guide supplied with the Wall Mount Bracket Note If the Table Top Stand is attached to the TV detach the Table Top Stand beforehand See the Setup Guide and follow in reverse order the steps to detach the Table Top Stand Place the TV with its screen facing down on a level and stable surface covered with a thick and soft cloth when removing the Table Top Stand from the TV to prevent damaging ...

Page 24: ... the table may differ slightly depending on the installation When your TV is installed on the wall the upper side of the TV slightly leans forward 2 Remove screws from the rear of the TV Be sure to store the removed screws in a safe place keeping them away from children Model Name KDL Display dimensions Screen centre dimension Length for mounting Standard mounting 40R357F 924 550 84 201 127 32R307...

Page 25: ...or future reference Standard mounting 4 Connect necessary cables to the TV Note You cannot access to any terminal after installing the TV to the wall 5 Install the TV to the Base Refer to 5 of Installation Guide and Installing the TV to the Wall of Operating Instructions supplied with the Wall Mount Bracket Refer to the instructions supplied with the Wall Mount Bracket for your model to install th...

Page 26: ...hen installing optional equipment leave some space between the optional equipment and the TV Check the antenna aerial cable connection Keep the antenna cable away from other connecting cables Picture or sound noise when viewing a TV channel Adjust AFT Analog Fine Tuning to obtain better picture reception This function is for analogue TV channels only Tiny black points and or bright points appear o...

Page 27: ...page 17 or Photo Frame Settings page 17 Check if the Idle TV Standby is activated page 19 Some input sources cannot be selected Select Manage Inputs and select Always of the input source page 18 The remote control does not function Replace the batteries HDMI equipment does not appear on BRAVIA Sync Device List Check that your equipment is compatible with BRAVIA Sync Control Cannot select Off in BR...

Page 28: ... 1 280 1 024 64 kHz 60 Hz 1 920 1 080 67 5 kHz 60 Hz The 1080p timing when applied to the HDMI input will be treated as a video timing and not PC timing For KDL 32R307F 640 480 31 5 kHz 60 Hz 800 600 37 9 kHz 60 Hz 1 024 768 48 4 kHz 60 Hz 1 280 768 47 4 kHz 60 Hz 1 280 768 47 8 kHz 60 Hz 1 360 768 47 7 kHz 60 Hz Audio Two channel linear PCM 32 44 1 and 48 kHz 16 20 and 24 bits Dolby Digital ARC A...

Page 29: ...nition Multimedia Interface and the HDMI Logo are trademarks or registered trademarks of HDMI Licensing Administrator Inc in the United States and other countries Manufactured under license from Dolby Laboratories Dolby Dolby Audio and the double D symbol are trademarks of Dolby Laboratories BRAVIA and BRAVIA Sync are trademarks or registered marks of Sony Corporation Blu ray Disc Blu ray and Blu ...

Page 30: ......

Page 31: ......

Page 32: ... 2018 Sony Corporation Customer Support and Contact ...

Reviews: