9
GB
GB
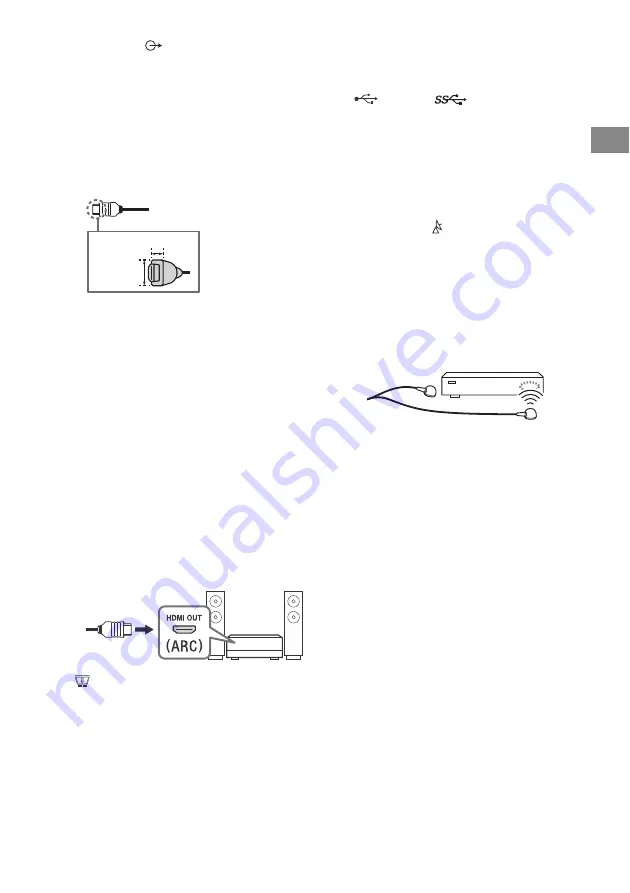
AUDIO OUT
/
• Supports 3-pole stereo mini jack only.
• To listen to the TV’s sound through the
connected equipment, press
HOME
.
Select [Settings]
t
[Sound]
t
[Headphone/Audio out] and then select
the desired item.
HDMI IN 1/2/3/4
• HDMI interface can transfer the digital
video and audio on a single cable.
•
•
HDMI IN 2/3
To enjoy high quality 4K 50p/60p
contents, connect a Premium High Speed
HDMI cable to the HDMI IN 2/3 and set the
[HDMI signal format] to [Enhanced
format].
For details of supported formats, refer to
the “Specifications” in this manual (page
13-15).
•
HDMI IN 3 ARC (Audio Return Channel)
Connect your audio system to the HDMI IN
3 to route TV audio to your audio system.
An audio system that supports HDMI ARC
can send video to the TV, and receive
audio from the TV via the same HDMI
cable. If your audio system does not
support HDMI ARC, an additional
connection with DIGITAL AUDIO OUT
(OPTICAL) is necessary.
CAM (Conditional Access Module)
• Provides access to pay TV services. For
details, refer to the instruction manual
supplied with your CAM.
• Do not insert the smart card directly into
the TV CAM slot. It must be fitted into the
Conditional Access Module provided by
your authorised dealer.
• CAM is not supported in some countries/
areas. Check with your authorised dealer.
• A CAM message may appear when you
switch to a digital programme after using
the Internet video.
USB 1/2,
USB 3 (HDD REC)*
3
• Connecting a large USB device may
interfere with other connected devices
beside it.
• When connecting a large USB device,
connect to the USB 1 port.
• Connect a USB HDD device to the USB 3
port (blue).
(RF input), (Satellite input)
• Connections for terrestrial/cable and
satellite.
6
IR BLASTER*
3
• Use your Sony remote control to control
your External Box (cable/satellite box).
Connect the IR Blaster Cable*
3
to the IR
Blaster port on your TV. Place one or both
of the other two ends as shown below.
• To perform IR Blaster setup, press
HOME
and select [Settings]
t
[External
inputs]
t
[IR Blaster setup].
*1 When connecting mono equipment, connect to the
L (MONO) audio jack (socket).
*2 For an external device which has only SCART AV OUT,
use a SCART-RCA adaptor.
*3 Only on limited region/country/TV model.
< 21 mm
< 12 mm
Summary of Contents for Bravia KD-43XG80 series
Page 5: ...4GB Parts and Controls KD 75XG80xx 65XG80xx KD 65XG81xx Controls and Indicators ȩ ȩ ...
Page 19: ...4FR Pièces et commandes KD 75XG80xx 65XG80xx KD 65XG81xx Commandes et voyants ȩ ȩ ...
Page 32: ......
Page 35: ...4ES Componentes y controles KD 75XG80xx 65XG80xx KD 65XG81xx Controles e indicadores ȩ ȩ ...
Page 48: ......
Page 64: ......
Page 80: ......
Page 83: ...4PT Peças e Controlos KD 75XG80xx 65XG80xx KD 65XG81xx Controlos e Indicadores ȩ ȩ ...
Page 96: ......
Page 99: ...4IT Parti e comandi KD 75XG80xx 65XG80xx KD 65XG81xx Comandi e indicatori ȩ ȩ ...
Page 112: ......
Page 115: ...4SE Delar och reglage KD 75XG80xx 65XG80xx KD 65XG81xx Kontroller och indikatorer ȩ ȩ ...
Page 128: ......
Page 131: ...4DK Dele og knapper KD 75XG80xx 65XG80xx KD 65XG81xx Knapper og indikatorer ȩ ȩ ...
Page 145: ...4FI Osat ja säätimet KD 75XG80xx 65XG80xx KD 65XG81xx Säätimet ja ilmaisimet ȩ ȩ ...
Page 158: ......
Page 161: ...4NO Deler og kontroller KD 75XG80xx 65XG80xx KD 65XG81xx Kontroller og indikatorer ȩ ȩ ...
Page 174: ......
Page 190: ......
Page 193: ...4CZ Součásti a ovládací prvky KD 75XG80xx 65XG80xx KD 65XG81xx Ovládací prvky a kontrolky ȩ ȩ ...
Page 206: ......
Page 222: ......
Page 225: ...4HU Alkatrészek és vezérlőelemek KD 75XG80xx 65XG80xx KD 65XG81xx Vezérlők és szimbólumok ȩ ȩ ...
Page 238: ......
Page 241: ...4RO Părți componente și comenzi KD 75XG80xx 65XG80xx KD 65XG81xx Comenzi şi indicatoare ȩ ȩ ...
Page 254: ......
Page 270: ......
Page 273: ...4GR Εξαρτήματα και χειριστήρια KD 75XG80xx 65XG80xx KD 65XG81xx Χειριστήρια και ενδείξεις ȩ ȩ ...
Page 289: ...4TR Parçalar ve Kumandalar KD 75XG80xx 65XG80xx KD 65XG81xx Kumandalar ve Işıklar ȩ ȩ ...
Page 302: ......
Page 303: ......
Page 304: ......


