background image

SUBWOOFER

SUR L

SUR R

FRONT R

CENTER

FRONT L

Main unit/ 
Unidad principal

Surround amplifier/ 
Amplificador de sonido envolvente

4-178-250-

11

(1)

©2010 Sony Corporation   Printed in Malaysia

(1)

Quick Setup Guide/Guía de ajuste rápido

BDV-E770W/T77

1


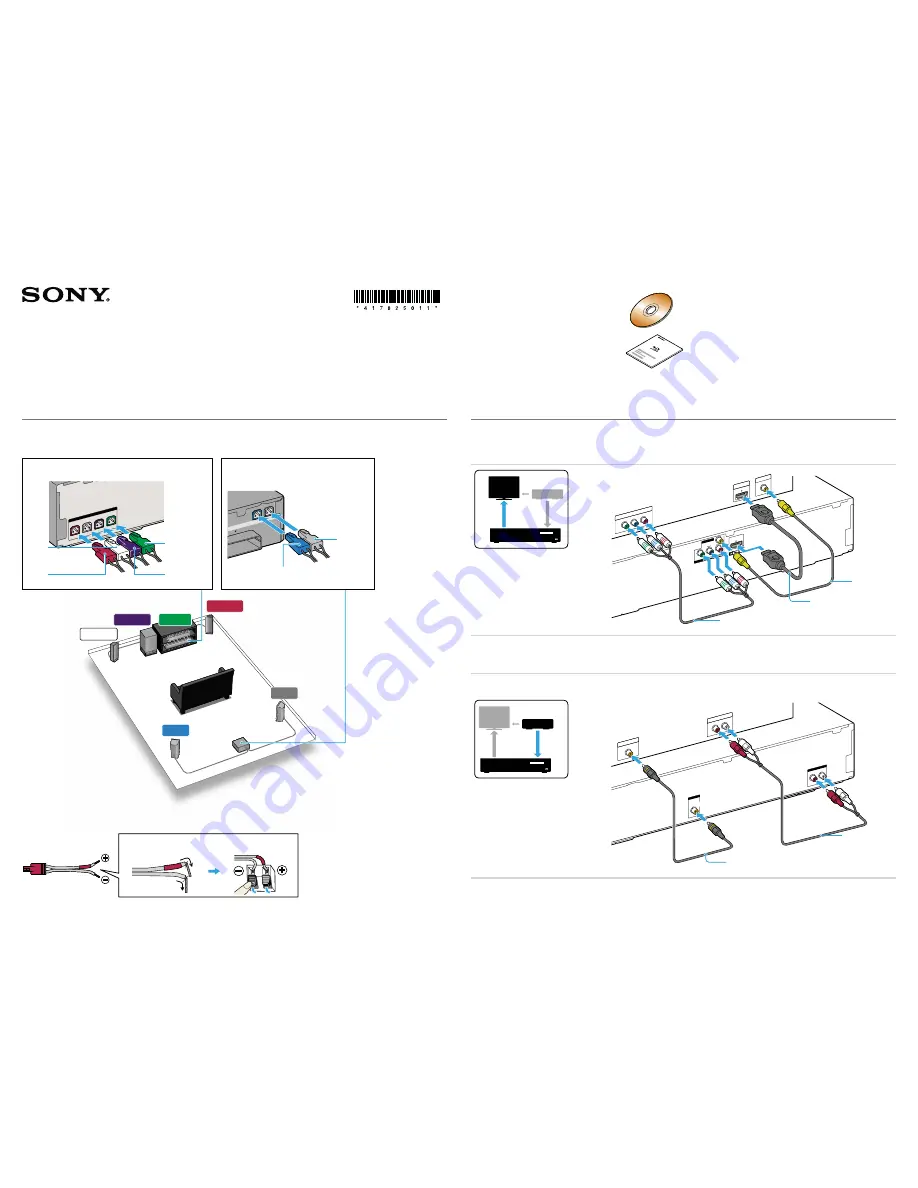
Connect the speakers/Conexión de los altavoces

Connect the speaker cords to match the color of the SPEAKERS jacks of the unit.

Conecte los cables de altavoz de modo que coincidan con el color de las tomas SPEAKERS de la unidad.

Rear panel of the main unit/ 
Panel posterior de la unidad principal

FRONT R

FRONT L

SUBW

OOFER

CENTER

SPEAKERS

Red 
Rojo

White 
Blanco

Green 
Verde

Purple 
Púrpura

Rear panel of the surround amplifier/ 
Panel posterior del amplificador de sonido 
envolvente

T10

L

ROUND BA

CK

IMPED

ANCE USE

3-16

ELECT

OR

R

SPEAKERS

Blue 
Azul

Gray 
Gris

To connect speaker cords to the speaker/Para conectar los cables de altavoz al altavoz

Rear or bottom of the speaker/ 

Parte posterior o inferior del altavoz

2


Connect your TV/cable box/Conexión del televisor/descodificador de cable

Depending on the jacks on your TV or cable box, select the video and audio connection method.

En función de las tomas del televisor o descodificador de cable, seleccione el método de conexión de audio y vídeo.

Connecting the video to your TV/Conexión del vídeo al televisor

VIDEO
VÍDEO

DIGIT

AL IN

COAXIAL

SAT/CABLE

EZW

-RT10

AUDIO IN

R

L

AUDIO

A

B

C

S-AIR ID

ECM-A

C2

A. CAL MIC

COAXIAL

FM

75

ANTENNA

DIGIT

AL IN

OPTICAL

TV

LAN(100)

Y

P

B

/ C

B

P

R

/ C

R

COMPONENT VIDEO 

OUT

VIDEO OUT

OUT

ARC

DIGIT

AL OUT

COAXIAL

OPTICAL

TV

AUDIO OUT

L

R

TV/VIDEO

P

B

/C

B

P

R

/C

R

Y

COMPONENT VIDEO 

IN

HDMI IN

VIDEO IN

Method 3/
Método 3

Method 1**/
Método 1**

Method 2*/
Método 2*

*Not supplied/*No suministrado

**Supplied with BDV-T77 only./**Suministrado únicamente con BDV-T77.

Connecting the audio from your cable box/Conexión del audio desde el descodificador de cable

If you do not use a cable box, refer to “Connecting the TV (Audio connection)” in the Operating Instructions.

Si no utiliza un descodificador de cable, consulte “Conexión del televisor (conexión de audio)” en el Manual de instrucciones.

AUDIO
AUDIO

DIGIT

AL IN

OPTICAL

TV

AUDIO IN

R

L

AUDIO

DIGIT

AL IN

COAXIAL

SAT/CABLE

OPTICAL

DIGIT

AL OUT

L

R

AUDIO OUT

COAXIAL

DIGIT

AL OUT

Method 1*/
Método 1*

*Not supplied/*No suministrado

You can confirm that the System and TV are connected correctly 
using the Easy Setup Disc.

Puede confirmar que el sistema y el televisor están conectados 
correctamente mediante el uso de Ajuste fácil del disco.

For details, refer to the Operating Instructions.

Si desea obtener más información, consulte el Manual de 
instrucciones.

Continued/Continúa 

E

Method 2*/
Método 2*

Summary of Contents for BDV-E770W (UWA-BR100)

Page 1: ...SONY TM S u ragD sc Blu ray Disc DVD Home Theatre System Operating Instructions BDV E770W T77 2010 Sony Corporation 4 178 242 12 1 ...

Page 2: ...lity in the unit disconnect the main plug from the AC outlet immediately These following indications are located on the rear exterior This symbol is intended to ili alert the user to the presence of ulllnsulated dangerous voltage within the product s enclosure that may be of sufficient magnitude to constitute a ri k of electric shock to persons JI This symbol is intended to ill alert the user to t...

Page 3: ...damaged in any way such as power supply cord or plug is damaged liquid has been spilled or objects have fallen into the apparatus the apparatus has been exposed to rain or moisture does not operate normally or has been dropped For the wireless transceiver EZW RT1 O EZW RT1 OA This equipment must not be co located or operated in conjunction with any other antenna or transmitter This equipment compl...

Page 4: ...USVIEW arc trademarks of Blu ray Disc Association Blu ray Disc is a trademark Blu ray Disc DVD RW DVD RW DVD R DVD R DVD VIDEO and CD logos are trademarks BRA VIA is a tradcmark of Sony Corporation AVCHD and the AVCHD logo are trademarks of Matsushita Electric Industrial Co Ltd and Sony Corporation S AIR and its logo are trademarks of Sony Corporation XMB and xross media bar are trademarks of Sony...

Page 5: ...0W is the model used for illustration purposes Any difference in operation is clearly indicated in the text for example BOV E770W The items displayed on the TY screen may vary depending on the area The default setting is underlined The system is compatible with the S AIR function which allows transmission of sound between S AIR products wirelessly For details on the S AIR function see Using an S A...

Page 6: ...the Radio 37 External Audio Device Using an S AIR Product 39 Other Operations Using the Control for HDMI Function for BRAVIA Sync 43 Calibrating the Appropriate Settings Automatically 45 Setting the Speakers 46 Using the Sleep Timer 4x Deactivating the Buttons on the Unit 48 Controlling Your TV with the Supplied Remote 4X Saving Power in Standby Mode 49 Settings and Adjustments Using the Setup Dis...

Page 7: ...DD ooooCijl R6 size AA batteries 2 Calibration mic 1 Surround amplifier 1 Wireless transceivers 2 Operating Instructions Quick Setup Guide To stabilize S AIR reception End user license agreement Easy Setup Disc DVD USB Wireless LAN Adapter UWA BRlOO UWA BRIOO External cable For BDV T77 HDMI cable 1 Insert two R6 size AA batteries supplied by matching the and 8 ends on the batteries to the markings...

Page 8: ...re starts playback resume play Plays a slideshow when a disc containing JPEG image files is inserted stop Stops playback and remembers the stop point resume point The resume point for a title track is the last point you played or the last photo for a photo folder FUNCTION Selects the playback source VOLUME Adjusts the system s volume USB port page 30 Used for connecting a USB device Front panel di...

Page 9: ...to On and the system is in jack standby mode while wireless Lights up when the HDMI OUT jack is transmission between the unit and correctly connected to an HDCP High S AIR receiver is not activated page bandwidth Digital Content Protection 39 compliant device with HDMI or DVI rnJ Displays system s status such as Digital Visual Interface input chapter title or track number time ID Lights up when a ...

Page 10: ... jack pages 25 45 COMPONENT VIDEO OUT jacks page 11m ANTENNA FM COAXIAL 7511 jack 18 page 21 J VIDEO OUT jack page 18 11J TV DIGITAL IN OPTICAL jack page J HDMI OUT jack page 18 19 EZW RT10 slot page 22 1g SAT CABLE DIGITAL IN COAXIAL I AUDIO AUDIO IN UR jacks page 20 jack page 20 SPEAKERS jacks page 17 ...

Page 11: ...on is activated but surround signals are not transmitting The system is turned on and wireless transmission is deactivated The surround amplifier is in standby mode while the system is in standby mode or wireless transmission is deactivated The surround amplifier is turned off S AIR ID switch Selects the S AIR ID PAIRING button Starts pairing PAIRING indicator Indicates the pairing status SURROUND...

Page 12: ... title chapter numbers radio frequencies etc AUDIO pages 34 35 Selects the audio format track SUBTITLE page 52 Selects the subtitle language when multilingual subtitles are recorded on a BD ROM DVD VIDEO D TUNING page 37 Selects the radio frequencies Color buttons YELLOW BLUEIRED GREEN Short cut keys for selecting items on some BD menus can also be used for Java interactive operations on BDs TOP M...

Page 13: ...back and remembers the stop point resume point The resume point for a title track is the last point you played or the last photo for a photo folder Radio operation buttons See Tuner page 37 PRESET TUNING I MUTING Turns off the sound temporarily VOL page 37 Adjusts the volume TV VOL em Adjusts the TV volume TV INPUT em Switches the TV s input source between the TV and other input sources lID DISPLA...

Page 14: ...et 0 0 to 7 0 meters If you cannot place the center speaker and surround speakers at the same distance as 0 place them within 23 feet 7 0 meters of the listening position Place the surround speakers to the rear of the listening position 0 The subwoofer can be placed anywhere in the room Use caution when placing the speakers and or speaker stands attached to the speakers on a specially treated waxe...

Page 15: ...duct lineup differs depending on the area Caution Contact a screw shop or installer regarding the wall material or screws to be used Use screws that are suitable for the wall material and strength As a plaster board wall is especially fragile attach the screws securely to a beam and fasten them to the wall Install the speakers ona vertical and flat wall where reinforcement is applied Sony is not r...

Page 16: ... inches For the center speaker 16US To install the speakers on a wall Before installing the speakers on a wall connect the speaker cord to the speaker Be sure to match the speaker cords to th appropriate terminals on the speakers the speaker cord with the color tube to and the speaker cord without the color tube to e 1 Prepare screws not supplied that are suitable for the hole on the back of each ...

Page 17: ...color tube are color coded depending on the type of speaker Connect the speaker cords to match the color of the SPEAKERS jacks of the unit Be sure to match the speaker cords to the appropriate terminals on the speakers the speaker cord with the color tube to ffi and the speaker cord without the color tube to 8 Do not catch the speaker cord insulation rubber covering in the speaker terminals To con...

Page 18: ...ity will be improved compared to using the component video cable connection or the video cord connection When connecting with the HDMI cable you need to select the type of output signal page 51 Method 2 Component video cable 0 connection If your TV does not have an HDMI jack but has component video input jacks connect to the TV with a component video cable Picture quality will be improved compared...

Page 19: ...signal and you can enjoy multiplex broadcast sound When you connect the TV and the unit with an audio cord see Connecting the other components page 20 About Audio Return Channel If your TV is compatible with the Audio Return Channel function an HDMI cable connection also sends a digital audio signal from the TV You do not need to make a separate audio connection for listening to TV sound For detai...

Page 20: ...satellite receiver etc not supplied which has a digital coaxial output jack e VCR digital satellite receiver PlayStation or portable audio source etc not supplied G To the audio out jacks of the VCR digital satellite receiver PlayStation or portable audio source etc Audio signal Signal flow Video signal 4 Digital coaxial cord not supplied To the digital coaxial out jack of the VCR or digital satel...

Page 21: ...lly extend the FM wire antenna aerial After connecting the FM wire antenna aerial keep it as horizontal as possible IIr I If you have poor FM reception use a 75 ohm coaxial cable not supplied to connect the unit to an outdoor FM antenna aerial as shown below Outdoor FM antenna aerial lIl I fIH Unit 21 us ...

Page 22: ... S AIR receiver To transmit sound from the unit you need to insert the wireless transceivers into the unit and S AIR product For details of S AIR products see Using an S AIR Product page 39 Wireless transceiver Rear panel of the surround amplifier Wireless transceiver Rear panel of the unit ...

Page 23: ...chnology developed to correct for the deficiencies of WEP TKIP assures a higher security level than WEP WPA PSK AES WPA2 PSK AES AES is a security technology that uses an advanced security method that is distinct from WEP and TKIP AES assures a higher security level than WEP or TKIP Internet ADSL modem cable modem LAN cable not supplied Broadband router Tum the unit off before connecting the exten...

Page 24: ...d on and wireless transmission is activated L ABC SURROUND SELECTOR 1 S UR RQ U N01 SURROUNO BACK 24US S AIR 10 Step 3 Setting up the S AIR Wireless System Make sure that S AIR light up in the front panel display When S AIR does not light up make sure that the wireless transceiver is inserted into the unit correctly 2 Set the SURROUND SELECTOR switch of the surround amplifier to SURROUND Before pe...

Page 25: ...the A CAL MIC jack on the rear panel Set up the calibration mic at ear level using a tripod etc not supplied The front of each speaker should face the calibration mic and there should be no obstruction between the speakers and the calibration mic 3 Press IIC on the unit and IIC on the surround amplifier 4 Switch the input selector on your TV so that the signal from the system appears on the TV scr...

Page 26: ...l page 20 O o0 i o0 Q l o0 oCJ _ 0 0 7 0 r 1 7 Ci o ti io FUNCTION z 0 88 88 Step 5 Selecting the Source Press FUNCTION repeatedly until the desired function appears in the front panel display Each time you press FUNCTION the function changes as follows Function D MEDIA TV TUNERFM BDIDVD SAT CABLE AUDIO 26US 5 Perform the Easy Setup Follow the on screen instructions to make the basic settings usil...

Page 27: ...theaters into your home i o CJ0 Cl SYSTEM MENU t 0 ClCJ Cl Gcn r Cl 1 CD SErGS fEJCE JEl OGJm i erARoi _i J l J Depending on the source 1 Press SYSTEM MENU 2 Press t oJ repeatedly until SUR SETTING appears in the front panel display then press e or 3 Press t oJ repeatedly until the surround setting you want appears in the front panel display See the table below for surround sound setting descripti...

Page 28: ...uts the sound from the front speakers and subwoofer regardless of sound format or number ofchannels Multi channel surround formats are downmixed to 2 channels Surround setting A F D MULTI AUTO FORMAT DIRECT MULTI PRO LOGIC PLU MOVIE NE06 CIN NE06MUS 2CH STEREO Sound from iiII The system memorizes the last surround setting selected for each function Whenever you select a function such as BDIDVD or ...

Page 29: ...selected angle 2 Title number or name The currently selected audio setting Available functions 6 angle 0 audio o subtitle ID Playback information Displays disc type play mode repeat type video codec bit rate playing status bar playing time total time lID Chapter number Z Output resolutionNideo frequency 3 Press to close the disc tray o appears on the home menu and playback starts If playback does ...

Page 30: ...ating instructions of the USB device before connecting 1 Connect the iPod to the front USB port on the unit with the iPod s USB cable 2 Press H to select n Music 3 Press 1 to select B iPod front then press D The sound from the iPod is played on the system Yau can operate the iPod using the buttons on the remote For operation details refer to the operating instructions of the iPod iPod nanD 2nd gen...

Page 31: ...AVIA Internet Video Connect the unit to a network page 23 2 Press 1 to select 1 1 Video n Music or Photo 3 Press 1 to select an Internet content provider icon then press e When the Internet content list has not been retrieved it will be represented by an unacquired icon or a new icon Playing via a Network To use the control panel The control panel appears when the video file starts playing The dis...

Page 32: ...deshow Slideshow Speed Rotate Left Rotate Right View Image Switches to other viewing angles when multi angles are recorded on BD ROMsIDVD VIDEOs Adjusts the video quality for Internet content Details Starts a slideshow Changes the slideshow speed Rotates the photo counterclockwise by 90 degrees Rotates the photo clockwise by 90 degrees Displays the selected picture 32US Items Details AN SYNC Video...

Page 33: ...5 Press SYSTEM MENU The system menu turns off mil Depending on the input stream A V SYNC may not be effective 33US ...

Page 34: ...ut stream the sound mode may not be effective When changing the sound mode while using the S AIR receiver sound from the S AIR receiver may skip When you playa Super Audio CD this function does not work Selecting the Audio Format Multilingual Tracks or Channel When the system is playing a BD DVD VIDEO recorded in multiple audio formats PCM Dolby Digital MPEG audio or DTS or multilingual tracks you...

Page 35: ... the unit with a digital coaxial or optical cord pages 19 20 If your TV is compatible with the Audio Return Channel function page 45 you can receive a Dolby Digital signal via an HDMI cable do L _ r oGOG 00 o0 o o AUDIO fi CJ cJ Cll J eD o o o t 0 88GB Elc EJEJ 0 GJ ill o J l F1 j l J v i Press AUDIO repeatedly until the desired signal appears in the front panel display MAIN Sound of the main lang...

Page 36: ...nter speaker this effect is more pronounced as speech movie dialog etc is easy to hear When sound is not output from the center speaker the system optimally adjusts the volume 3 Press t repeatedly until D BASS appears in the front panel display then press e or Press t to select a setting D BASS ON On D BASS OFF Off 4 Press SYSTEM MENU You can reinforce bass frequencies 1 Press SYSTEM MENU 2 The sy...

Page 37: ...e radio Press 1 9 88 00MHz11 _ 1 1 Press FUNCTION repeatedly until TUNER FM appears in the front panel display 2 Select the radio station Automatic tuning Press and hold TUNING until the auto scanning starts Auto Tuning appears on the TV screen Scanning stops when the system tunes in a station To stop the automatic tuning manually press TUNING or Manual tuning Press TUNING repeatedly You can prese...

Page 38: ...ou know the frequencies you can select radio stations by inputting the frequencies directly 1 L_ TUNED ST _ _ __I Ii Hn Hif i 1 _ To change the preset number Select the desired preset number by pressing PRESET then perform the procedure from Step 3 1 Press FUNCTION repeatedly until TUNER FM appears in the front panel display The last received station is tuned in 2 Press PRESET repeatedly to select...

Page 39: ...en For details of the S AIRISTANDBY indicator see Surround amplifier page 11 S AIR main unit S AIR sub unit surround amplifier Room A S AIR sub unit S AIR receiver not supplied RoomS About S AIR products There are two types of S AIR product S AIR main unit this unit This is for transmitting sound You can use up to three S AIR main units The number of usable S AIR main units depends on the use envi...

Page 40: ... Step 6 press S AIR CH on the S AIR receiver to select the function The S AIR receiver s function changes as follows MAIN UNIT TUNER FM AUDIO To enjoy the same function as the unit select MAIN UNIT 9 Adjust the volume on the S AIR receiver For the S AIR receiver You can enjoy the S AIR receiver while the unit is in standby mode by setting Standby to On 1 Press HOME The home menu appears on the TV ...

Page 41: ...s I C on the surround amplifier to turn on the surround amplifier and press PAIRING on the rear panel of the surround amplifier To press PAIRING a slim instrument such as a paper clip can be used For the S AIR receiver Refer to the operating instructions of the S AIR receiver 9 Press 1 to select Start then press G The unit starts pairing The PAIRING indicator of the surround amplifier flashes when...

Page 42: ...e to On or Off automatically OnL The system transmits sound by searchIng for the better channel for transmitting Off The system transmits sound by fixing the channel for transmitting 7 Press 0 The setting is made 8 When you set RF Change to Off select the 10 so that wireless transmission is most stable page 39 In most cases you will not need to change this setting If RF Change is set to Off transm...

Page 43: ...to the operating instructions supplied with the component The Control for HOM function may not work if you connect other than a Sony component even if the component is compatible with the Control for HOMI function Control for HDMI Easy Setting If your TV is compatible with the Control for HOMI Easy Setting function you can set the system s Control for HOMI function automatically by setting the TV ...

Page 44: ...em Audio Control function is activated automatically System Audio Control You can simplify operation to enjoy TV sound via this system To use this function connect the system and the TV with an audio cord and an HDMI cable pages 18 19 You can use the System Audio Control function as follows When the system is turned on TV sound can be output from the speakers of the system When TV sound is output ...

Page 45: ...ating the Appropriate Settings Automatically Auto Calibration D C A C Digital Cinema Auto Calibration can set the appropriate surround sound automatically The system outputs a loud test sound when Auto Calibration starts You cannot tum the volume down Give consideration to children and neighbors 1 Press HOME The home menu appears on the TV screen 2 Press 1 to select Ii Setup 3 Press to select Audi...

Page 46: ...retry While the Auto Calibration function works do not tum off the power do not press any button do not change the volume do not change the function do not change the disc do not insert a disc do not disconnect the calibration mic Setting the Speakers Speaker Settings To obtain the best possible surround sound set connection of the speakers and their distance from your listening position Then use ...

Page 47: ...utton RED Level You can adjust the sound level of the speakers You can set the parameters from 6 0 dB to 6 0 dB Be sure to set Test Tone to On for easy adjustment Front Left Right 0 0 dB Set the front speaker level Center 0 0 dB Set the center speaker level Surround LeftlRightJ 0 0 dB Set the surround speaker level Surround Back Left Right 0 0 dB Set the surround back speaker level Subwoofer 0 0 d...

Page 48: ...nufacturer TOSHIBA SHARP Press and hold TV 1tc9 while entering your TV s manufacturer s code see the table using the number buttons Then release TV 1tc9 If the setting is unsuccessful the currently registered code is not changed Re enter the code number SONY Deactivating the Buttons on the Unit Press SLEEP Each time you press SLEEP the minutes display the remaining time changes by 10 minutes When ...

Page 49: ...dby Mode Check that the following settings are made Control for HDMI in HDMI Settings is set to Off page 43 Standby in S AIR Settings is set to Off page 40 Quick Start Mode is set to Off page 54 g r CD o 0 CD a c j tJ 49US ...

Page 50: ...stem related settings Network Settings page 55 Makes detailed settings for Internet and network Easy Setup page 55 Re runs the Easy Setup to make the basic settings Resetting page 55 Resets the system to the factory settings 3 Press to oJ to select the setup category icon to change then press e Example Screen Settings sa Sotup l I ITVT 16 W 0 Set tfle screen aspect ratio of your TV Screen Format O...

Page 51: ...ther video output jacks at the same time select Component Video If no picture appears when setting HDMI or Component Video resolution try another resolution setting BDIDVD ROM 1080 24p Output Auto Outputs 1920 X 1080p 24 Hz video signals only when connecting a 1080 24p compatible TV using the HDMI OUT jack Off Select this when your TV is not compatible with 1080124p video signals YCbCr RGB HDMI Au...

Page 52: ...is setting may change automatically Sound Effect You can set the system s sound effects SOUND MODE D BASS NIGHT MODE and SUR SETTING to on off On Enables all of the system s sound effects The upper limit of sampling frequency is set to 48 kHz Off The sound effects are disabled Select this when you do not want to set the upper limit of sampling frequency Speaker Settings To obtain the best possible...

Page 53: ...ck of some BD ROMs can be limited according to the age of the users Scenes may be blocked or replaced with different scenes Follow the on screen instructions and enter your four digit password OVO Parental Control Playback of some DVD VIDEOs can be limited according to a predetennined level such as the age of the users Scenes may be blocked or replaced with different scenes Follow the on screen in...

Page 54: ...mit When the System Audio Control page 44 is activated loud sound may be output depending on the volume level of the system You can prevent this by limiting the maximum level of the volume when the System Audio Control function activates Leve13 Maximum volume level is set to 10 LeveI2 Maximum volume level is set to 15 Levell Maximum volume level is set to 20 Off Off This function is available only...

Page 55: ...information go to http www sony com bluraysupport Network Connection Diagnostics You can run the network diagnostic to check if the network connection has been made properly BD Remote Device Registration Registers your BD remote device Registered BD Remote Devices Displays a list of your registered BD remote devices Easy Setup Re runs the Easy Setup to make the basic settings Follow the on screen ...

Page 56: ... loudspeakers Do not place heavy objects on the system Do not place metal objects in front of the front panel They may limit reception of radio waves Do not place the system in a place where medical equipment is in use It may cause a malfunction of medical equipment If you use a pacemaker or other medical device consult your physician or the manufacturer of your medical device before using the wir...

Page 57: ...cy of the other wireless system s For details refer to the operating instructions of the other wireless system s The transmission distance differs depending on the usage environment Find locations where transmission between the S AIR main unit and sub unit is most effective and install the S AIR main unit and sub unit there Place the S AIR products on a stable surface Poor transmission may occur a...

Page 58: ...ified speakers Is anything blocking the ventilation holes of the system After checking the above items and fi ing any problems tum on the system If the cause of the problem cannot be found even after checking all the above items consult your nearest Sony dealer Problems and solutions The distance between the remote and the unit is too far The batteries in the remote are weak When you cannot perfor...

Page 59: ...tput settings in Screen Settings page 51 The disc is dirty or flawed If the picture output from your system goes through your VCR to get to your TV the copy protection signal applied to some BDIDVD programs could affect picture quality If you still experience problems even when you connect your unit directly to your TV try connecting your unit to the other input jacks The aspect ratio on the disc ...

Page 60: ...Settings to Off page 45 Check that the connecting cords are away from a transformer or motor and at least 10 feet 3 meters away from your TV set or a fluorescent light Move your TV away from the audio components Clean the disc Select stereo sound by pressing AUDIO page 34 Check the surround setting page 27 Check the speaker connections and settings pages 17 46 Depending on the BDIDVD the output si...

Page 61: ...hes green slowly or turns red Confirm the S AIR IDs of the unit and S AIR sub unit page 39 Confirm the pairing setting page 41 See If wireless transmission is unstable page 42 Sound transmission is poor Move the surround amplifier so that the S AIRI STANDBY indicator turns green Move the system away from other wireless devices Avoid using any other wireless devices Turns green The speaker cord is ...

Page 62: ...y using the BD s or DVD s menu subtitle or angles cannot be Multi lingual tracks subtitles or multi angles are not recorded on the BD or changed DVDbeing played The BD or DVD prohibits the changing of the language for the sound track subtitle or angles 62US The disc tray does not open and you cannot remove the disc even after you press A disc cannot be ejected and LOCKED appears in the front panel...

Page 63: ...SB port Check if the USB device or a cable is damaged Check if the USB device is on If the USB device is connected via a USB hub disconnect it and connect the USB device directly to the unit Problems and solutions Check that the wireless transceiver is inserted correctly into the unit and S AIR sub unit page 22 Confirm the S AIR IDs of the unit and S AIR sub unit page 39 Confirm the pairing settin...

Page 64: ...accordingly Check if the wireless LAN router is on Depending on the usage environment including the wall material radio wave reception conditions or obstacles between the system and the wireless LAN router the possible communication distance may be shortened Move the system and the wireless LAN router closer to each other Devices that use a 2 4 GHz frequency band such as a microwave Bluetooth or d...

Page 65: ...o the NTSC color system Notes on discs This product is designed to playback discs that conform to the Compact Disc CD standard DualDiscs and some music discs encoded with copyright protection technologies do not conform to the Compact Disc CD standard Therefore these discs may not be compatible with this product J 0 3 D ci J Note on playback operations of a BD DVD Some playback operations ofa BD D...

Page 66: ...h AVCHD format files the disc with AVCHD format files on it must be finalized 3 The system does not play files encoded with Lossless etc Some files may not play depending on the format the encoding or recording condition Some files edited on a PC may not play The system can recognize the following files or folders in BDs DVDs CDs and USB devices up to folders in the 5th tree up to 500 files in a s...

Page 67: ...ge 50 When Output Video Format is set to When Output Video Format is set to Resolution HDMI Component Video setting VIDEO OUT COMPONENT HDMIOUT VIDEO OUT COMPONENT HDMIOUT jack VIDEO OUT jack jack VIDEO OUT jack jacks jacks 480i 480i 480i 480i 480i 480i 480i 480p 480i 480p 480p 480i 480p 480p 720p 480i nop nop 480i nop nop 1080i 480i 1080i I080i 480i I080i 1080i 1080p 480i I080i 1080p unselectable...

Page 68: ...0 mm x 85 mm x 365 mm 17 in x 3 3 8 in x 14 3 8 in w hld inc wireless transceiver Mass approx 4 7 kg 10 Ib 6 oz Surround amplifier TA SA200WR Amplifier Section POWER OUTPUT AND TOTAL HARMONIC DISTORTION FfC Sensitivity 450 250 mV Type A For connecting USB memory memory card reader digital still camera and digital video camera 500 rnA 100BASE TX Terminal PLL quartz locked digital synthesizer Amplif...

Page 69: ...3W surround amplifier Halogenated flame retardants are not used in the certain printed wiring boards Over 85 power efficiency of amplifier block is achieved with the full digital amplifier S Master Frequency band Modulation method Power requirements Dimensions approx General Power requirements 120 V AC 60 Hz Power consumption On 50 W Standby power consumption 0 9 W standby mode 0 13 W turned off 2...

Page 70: ...83 Javanese 1436 Portuguese 1538 Turkish 1103 Welsh 1287 Georgian 1463 Quechua 1539 Tsonga 1105 Danish 1297 Kazakh 1481 Rhaeto 1540 Tatar 1109 German 1298 Greenlandic Romance 1543 Twi 1130 Bhutani 1299 Cambodian 1482 Kirundi 1557 Ukrainian 1142 Greek 1300 Kannada 1483 Romanian 1564 Urdu 1144 English 1301 Korean 1489 Russian 1572 Uzbek 1145 Esperanto 1305 Kashmiri 1491 Kinyarwanda 1581 Vietnamese 1...

Page 71: ...The re recordable feature makes extensive editing and time shifting applications possible BD ROM BD ROMs BIu ray Disc Read Only Memory are commercially produced discs and are available in the same capacities as the BD below Other than conventional movie and video contents these discs have enhanced features such as interactive content menu operations using pop up menus selection of subtitle display...

Page 72: ... Surround format It supports a maximum sampling frequency of 96 kHz and 7 1 multi channel surround DTS HD High Resolution Audio has a maximum transmission rate of 6 Mbps with lossy compression DTS HD Master Audio DTS HD Master Audio has a maximum transmission rate of 24 5 Mbps and uses lossless compression and DTS HD Master Audio corresponds to a maximum sampling frequency of 192 kHz and maximum o...

Page 73: ...le nuances of these high quality media are transmitted with no deterioration Sony has developed a technology called S AIR for the radio transmission of digital audio signals with no compression and has incorporated this technology into the EZW RTIOIEZW RT IOAlEZW TI 00 This technology transfers digital audio signals with no compression using the 2 4 GHz band range of ISM band Industrial Scientific...

Page 74: ...mote control 12 Registration 55 Reset to Factory Default BDIDVD Menu 52 Settings 55 BDIDVD Viewing Settings 52 Initialize Personal Information Resetting 55 BDIDVD ROM 1080 24p 55 Output 51 Interlace format 72 S BD LiVE 29 Internal memory 29 S AIR 39 73 BD R 71 Internet content 31 Mode 40 BD RE 71 Internet Settings 55 Pairing 41 Blu ray Disc 71 Internet Video Parental Control RF Change 42 BONUSVIEW...

Page 75: ...Surround amplifier 11 39 System Information 55 SYSTEM MENU 27 32 35 36 T Test Tone 47 TV Type 50 u Update 50 USB 30 W WEP23 WPA2 PSK AES 23 WPA2 PSK TKIP 23 WPA PSK AES 23 WPA PSK TKIP 23 75US ...

Page 76: ...future To find out details on any available updates please visit http www sony com bluraysupportl Hi lml BD 1 t LIVETM VIDEO 6C illJo III DOLBY db Hri Java SUPER AUDIO CD DIGITAL AUDIO TRUEm I Master Audio POWERED http www sony neV Printed in Malaysia ...

Page 77: ...ón de audio y vídeo Connecting the video to your TV Conexión del vídeo al televisor VIDEO VÍDEO DIGITAL IN COAXIAL SAT CABLE EZW RT10 AUDIO IN R L AUDIO A B C S AIR ID ECM AC2 A CAL MIC COAXIAL FM 75 ANTENNA DIGITAL IN OPTICAL TV LAN 100 Y PB CB PR CR COM PONENT VIDE O OUT VIDE O OUT OUT ARC DIGITAL OUT COAXIAL OPTICAL TV AUDIO OUT L R TV VIDEO PB CB PR CR Y COMPONENT VIDEO IN HDMI IN VIDEO IN Met...

Page 78: ...ación encienda la alimentación ʔ ʓ S AIR STANDBY S AIR STANDBY ʔ ʓ ʔ ʓ ʔ 4Perform Easy Setup Realizacióndela Configuraciónfácil Do not insert a disc before performing the Easy Setup No inserte ningún disco antes de llevar a cabo la Configuración fácil 1 Insert batteries into the remote Inserte las pilas en el mando a distancia 2 Switch the input selector on your TV so that system screens like the ...

Page 79: ...e transmitter built into the TV and come supplied with 3D active glasses Why we recommend this hookup This connection is required in order to view 3D content on a 3D television You will need to make sure you have a High Speed HDMI cable because a standard HDMI cable will only produce 2D results To enjoy 3D content playback you will also need to have a Blu ray Disc media encoded in 3D Standard Blu ...

Page 80: ...ert a 3D Blu ray Disc movie into the Blu ray Disc player 6 Press the Play button on the Blu ray Disc player remote control If there is picture and sound from the Blu ray Disc player on the TV you have connected the Blu ray Disc player correctly Note It may be necessary to activate the 3D feature in the TV and Blu ray Disc player via the menu systems Please refer to the instruction manual for your ...

Page 81: ...eless Audio I Connecting to the Internet Blu ray ITlOClels only 151 Channel Media Gallery 1n8llc are SONY Easy Setup Disc Sony Home Theatre System D ID lXII I 010 Dle TAL MENU I Speaker setup I Connecting to Other Components I 5 AIR Wireless Audio I Connecting to the Internet Blu ray ITlOClels only 151 Channel Media Gallery 1n8llc are ...

Page 82: ......

Page 83: ...TILIZADO EN ESTE PRODUCTO HINWEISE UNO LIZENZEN FOR IN DIESEM PRODUKT VERWENDETE SOFTWARE NOTE E LICENZE PER IL SOFTWARE UTILIZZATO IN QUESTO PRODOTTO OPMERKINGEN EN LICENTIES VOOR SOFTWARE GEBRUIKT IN DIT PRODUCT np MElIAH R J1 UEH3 AIlR nporPAMMHoro 06EcnElIEH R Cn0J1b3YEMOrOB AAHHOM 3 QEIl ifdiJ PHm fX a q iiI Qft n jA j t J1 U uQ z j J l 2010 Sony Corporation ...

Page 84: ...ica http esupport sony com Para los clientes de Europa http support sony europe comJ German Weitere Informationen Inoffizielle Ubersetzungen dieses Dokuments finden Sie auf der folgenden Website http support sony europe comJ Italian Fare riferimento a Traduzioni non ufficiali del presente documento sono disponibili suI seguente sito Web http support sony europe comJ Nederlands Raadpleeg het volgen...

Page 85: ...D OR OTHER THIRD PARTIES TO COLLECT DATA FROM CONTROL AND OR MONITOR THE SONY PRODUCT AND OTHER DEVICES RUNNING OR INTERACTING WITH THE SONY SOFTWARE YOU HEREBY CONSENT TO SUCH ACTIVITIES YOU ALSO AGREE TO SONY S CURRENT PRIVACY POLICY THAT IS AVAILABLE AT HTTP PRODUCTS SEL SONY COMISELILEGAL PRIVACY HTML SUCH PRIVACY POLICY MAY CHANGE FROM TIME TO TIME PLEASE CONSULT THE ABOVEMENTIONED LINK FOR A...

Page 86: ...t Third Party Provider or its Content You understand and agree that the Services and or Content may include advertisements Advertisements and that these Advertisements are necessary in order for the Services to be provided You also understand and agree that the use of the BRAVIA Internet Video feature may include certain communications from Sony or Third Party Providers such as service announcemen...

Page 87: ...ental or consequential damages exclusions or limitations of implied warranties or conditions or allow limitations on how long an implied warranty lasts so the above limitations or exclusions may not apply to you LIMITED WARRANTY ON MEDIA In situations where the Sony Software or any part thereof is furnished on media Sony warrants that fora period of ninety 90 days from the date of its delivery to ...

Page 88: ...nd against any and all liability and costs including without limitation attorneys fees and costs incurred by the Indemnified Parties in connection with any claim arising out of i any breach or alleged breach by you of this EULA in any manner ii any information you submit to Sony hereunder iii any breach or alleged breach by you of a third party s rights iv any damage caused by or alleged to have b...

Page 89: ...Sony Product Sony s then current privacy policy and any additional terms and conditions posted on the Services together constitute the entire agreement between you and Sony with respect to the Sony Product the Sony Software the Services and the Content Any notice by Sony hereunder may be made by letter e mail or posting on the Services The failure of Sony to exercise or enforce any right or provis...

Page 90: ... to all code found in this distribution be it the RC4 RSA Ihash DES etc code not just the SSL code The SSL documentation included with this distribution is covered by the same copyright terms except that the holder is Tim Hudson tj h cryptsoft com Copyright remains Eric Young s and as such any Copyright notices in the code are not to be removed If this package is used in a product Eric Young shoul...

Page 91: ...product an acknowledgment in the product documentation would be appreciated but is not required 2 Altered source versions must be plainly marked as such and must not be misrepresented as being the original software 3 This notice may not be removed or altered from any source distribution INDEPENDENT JPEG GROUP SOFTWARE The modules libjpeg and ijgjpeg are the work of the Independent lPEG Group copyr...

Page 92: ...ing documentation THE SOFTWARE IS PROVIDED AS IS WITHOUT WARRANTY OF ANY KIND EXPRESS OR IMPLIED INCLUDING BUT NOT LIMITED TO THE WARRANT ES OF MERCHANTABILITY FITNESS FOR A PARTICULAR PURPOSE AND NONINFRINGEMENT OF THIRD PARTY RIGHTS IN NO EVENT SHALL THE COPYRIGHT HOLDER OR HOLDERS INCLUDED IN THIS NOTICE BE LIABLE FOR ANY CLAIM OR ANY SPECIAL INDIRECT OR CONSEQUENTIAL DAMAGES OR ANY DAMAGES WHA...

Page 93: ... payment to you for any information that you provide You agree that Gracenote Inc may enforce its rights under this Agreement against you directly in its own name The Gracenote service uses a unique identifier to track queries for statistical purposes The purpose of arandomly assigned numeric identifier is to allow the Gracenote service to count queries without knowing anything about who you are F...

Page 94: ...Printed in Malaysia 4 178 257 12 1 II1111111111111111111111111111111111111111111111111111I 4 1 7 8 2 5 7 1 2 1 ...

Page 95: ...xchange for parts determined to be defective This Limited Warranty covers only the hardware components packaged with the Product It does not cover technical assistance for hardware or software usage and it does not cover any software products whether or not contained in the Product any such software is provided AS IS unless expressly provided for in any enclosed software Limited Warranty Please re...

Reviews: