background image

99

Per
for

m

ing
 w

ith

 a co

m

put
er

10

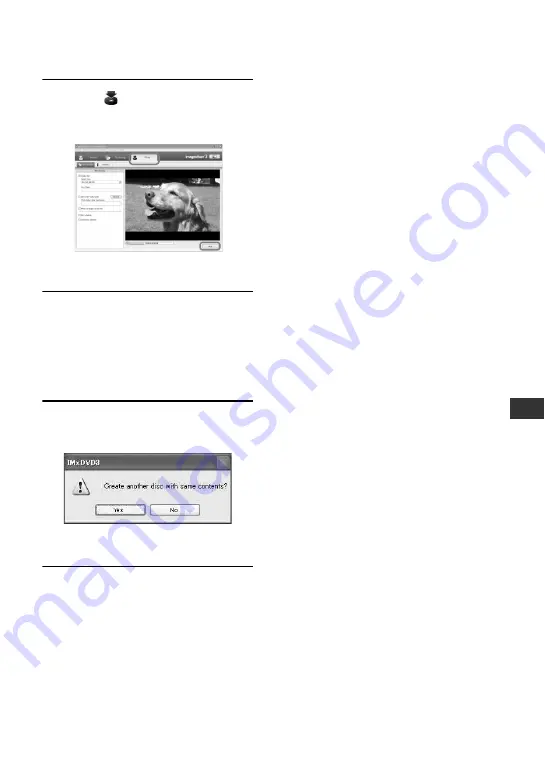
Click [

 Write] tab 

t

 [Write] on 

the ImageMixer3 DVD Authoring 
screen.

[Write settings] screen appears.

11

Click [OK].

DVD creation starts up.

• When you insert a burned DVD-RW/

DVD+RW in the disc drive in step 

3

a message appears, asking if you want to 
delete images saved on a DVD.

12

Once the completion dialog for 
DVD creation appears, click [No].

• To create another DVD, click [Yes].

• See page 86 to remove the USB cable from the 

Handycam Station and your computer.

Summary of Contents for 1070

Page 1: ...ation Enjoying with your Hard Disk Drive Handycam 13 Getting Started 16 Easy Handycam 27 Recording Playback 32 Using the Setup items 47 Dubbing Printing 70 Performing with a computer 77 Troubleshooting 101 Additional Information 117 Editing images 66 Glossary Index 124 ...

Page 2: ...esence of uninsulated dangerous voltage within the product s enclosure that may be of sufficient magnitude to constitute a risk of electric shock to persons This symbol is intended to alert the user to the presence of important operating and maintenance servicing instructions in the literature accompanying the appliance WARNING ...

Page 3: ...id of any kind on the set Attachments Do not use attachments not recommended by the manufacturer as they may cause hazards Cleaning Unplug the set from the wall outlet before cleaning or polishing it Do not use liquid cleaners or aerosol cleaners Use a cloth lightly dampened with water for cleaning the exterior of the set Water and Moisture Do not use power line operated sets near water for exampl...

Page 4: ... that are specified in the operating instructions Improper adjustment of other controls may result in damage and will often require extensive work by a qualified technician to restore the set to normal operation When the set exhibits a distinct change in performance this indicates a need for service Servicing Do not attempt to service the set yourself as opening or removing covers may expose you t...

Page 5: ...ion Model DCRA C162 and AC Adaptor Model AC L25A L25B CAUTION You are cautioned that any changes or modifications not expressly approved in this manual could void your authority to operate this equipment Read this first CAUTION For customers in the U S A and CANADA Model No DCR SR Serial No Model No AC Serial No For customers in the U S A Declaration of Conformity Trade Name SONY Model No DCR SR40...

Page 6: ...IS SUBJECT TO THE FOLLOWING TWO CONDITIONS 1 THIS DEVICE MAY NOT CAUSE HARMFUL INTERFERENCE AND 2 THIS DEVICE MUST ACCEPT ANY INTERFERENCE RECEIVED INCLUDING INTERFERENCE THAT MAY CAUSE UNDESIRED OPERATION Battery pack THIS CLASS B DIGITAL APPARATUS COMPLIES WITH CANADIAN ICES 003 Your camcorder is supplied with two kinds of operations guides For operating and handling the camcorder refer to Opera...

Page 7: ...based TV Television programs films video tapes and other materials may be copyrighted Unauthorized recording of such materials may be contrary to the copyright laws You cannotdubcopyrightprotectedsoftwareon your camcorder Compatibility of images You cannot play back both movies and still imagesotherthantheimagesrecordedwith your camcorder You also cannot play back images recorded with other DCR SR...

Page 8: ...ptor Be sure to remove the battery pack or the AC Adaptor after turning off the POWER switch Note on operational temperatures When the temperature of the camcorder becomes extremely high or extremely low you may not record or playback the camcorder to provide protection to the camcorder In case of this a message appears on the LCD screen p 114 Note on connecting the camcorder to a computer Do not ...

Page 9: ...en 23 Step 5 Using the touch panel 24 Step 6 Setting the date and time 25 Step 7 Selecting the aspect ratio 16 9 or 4 3 of the recording image DCR SR60 SR80 26 Using Easy Handycam operation 27 Recording with ease 28 Playback with ease 30 Recording 32 Playback 33 Searching for desired images by date Date Index 34 Functions used for recording playback etc 35 Recording To use zoom To record in dark p...

Page 10: ... last scene Review Review deleting 38 Indicators displayed during recording playback 39 Remote Commander DCR SR60 SR80 41 Playing the image on a TV 42 Saving images 44 Deleting images 45 Using the Setup items 47 Setup items 49 CAMERA SET 51 Settings to adjust your camcorder to the recording conditions EXPOSURE WHITE BAL STEADYSHOT etc STILL SET 56 Settings for still images BURST QUALITY IMAGE SIZE...

Page 11: ...uter 77 System requirements 78 Installing software 80 Creating a DVD with One Touch 83 Copying images to a computer 87 Viewing copied images on a computer 92 Editing images 94 Creating a DVD with selected images 96 Saving images in the Playlist to a DVD 98 Deleting image data from a computer 100 Troubleshooting 101 Warning indicators and messages 113 Using your camcorder abroad 117 Files on the ca...

Page 12: ...12 Maintenance and precautions 121 Glossary 124 Index 126 Glossary Index ...

Page 13: ...ges onto your favorite images by mistake Also youdonotneedtorewindorfast forwardyour movie and you can start recording whenever you are ready You can record more than 14 hours when you use DCR SR80 If you change the image quality of a movie you can record images for longer hours You can find a scene quickly by using the VISUAL INDEX screen p 30 33 The VISUAL INDEX screen allows you to check record...

Page 14: ...automatically be saved The quality of a recorded image remains even when it is saved on a DVD Edit images and create a DVD with selected images p 94 96 You can copy images to your computer You can also edit images and create a DVD with selected images The quality of a recorded image remains even when it is copied from a computer or when it is edited or saved on a DVD Connecting Hard Disk Drive Han...

Page 15: ...e again Using your Hard Disk Drive Handycam Preparing p 16 Recording p 28 32 Viewing on your Hard Disk Drive Handycam Viewing on the LCD screen p 30 33 Viewing on a TV p 42 Saving Save recorded images on a DVD etc Saving images on a DVD using a computer p 83 96 Copying images to a computer p 87 Dubbing on VCR DVD devices p 70 Deleting images Deletetheimagedatathathasbeensavedonyourcamcorder If you...

Page 16: ...le 1 p 42 70 72 USB cable 1 p 74 76 84 Wireless Remote Commander 1 p 41 DCR SR60 SR80 A button type lithium battery is already installed Rechargeable battery pack NP FP50 1 p 19 Lens cap 1 p 21 DCR SR40 To attach the lens cap Thread the grip beltthrough the lens cap ring CD ROM 1 p 77 ImageMixer for HDD Camcorder Software Handycam Handbook PDF this Handbook Operating Guide 1 Getting Started Step 1...

Page 17: ...ttery pack performance or difficulty in removing the battery pack 1 Slide the battery pack in the direction of the arrow until it clicks 2 Slide the POWER switch in the direction of the arrow to set it to OFF CHG The default setting 3 Connect the AC Adaptor to the DC IN jack on the Handycam Station Be sure that the v mark on the DC plug is facing up 4 Connect the power cord to the AC Adaptor and t...

Page 18: ...ry pack using only the AC Adaptor Slide the POWER switch up to OFF CHG then connect the AC Adaptor directly to the DC IN jack on the camcorder To remove the battery pack Slide the POWER switch to OFF CHG Slide the BATT battery release lever and remove the battery pack When you remove the battery pack make sure that none of the respective lamps of the POWER switch p 21 is on DC IN jack CHG lamp Ope...

Page 19: ...ailablewhenyou use a fully charged battery pack DCR SR40 DCR SR60 SR80 Typical recording time shows the time when you repeat recording start stop turning the power on off and zooming Times shown vary according to the following conditions when REC MODE is set to HQ Top When the LCD backlight turns on Bottom When the LCD backlight turns off Battery pack Charging time NP FP50 supplied 125 NP FP60 135...

Page 20: ...ured with the camcorder at 25 C 77 F 10 30 C 50 86 F is recommended Available recording and playback time will be shorter when you use your camcorder in low temperatures The available recording and playback time will be shorter depending on the conditions under which you use your camcorder On the AC Adaptor Connect the AC Adaptor to an easily accessible wall outlet close by If any trouble occurs w...

Page 21: ...de by sliding the POWER switch in the direction of the arrow until the respective lamp lights up Movie To record movies Still To record still images PLAY EDIT To play back images on your camcorder or to edit delete them When you set thePOWER switch to Movie or Still the lens cover opens up DCR SR60 SR80 After you have set the date and time CLOCK SET p 25 the next time you turn on the power of your...

Page 22: ... OFF CHG Put the lens cap back after turning off the power DCR SR40 At the time of purchase the power will be set to turnoffautomaticallyifyouleaveyourcamcorder without any operation for approximately five minutes to save battery power A SHUT OFF p 63 ...

Page 23: ...ent during playback operations To turn off the LCD backlight to make the battery last longer DCR SR60 SR80 Press and hold DISP BATT INFO for a few seconds until appears This setting is practical when you use your camcorder in bright conditions or when you want to save battery power The recorded image will not be affected by this setting To cancel press and hold DISP BATT INFO until disappears See ...

Page 24: ...eful not to press the buttons on the LCD frame accidentally while using the touch panel If the buttons on the touch panel do not work correctly adjust the LCD screen CALIBRATION p 122 To hide the screen indicators Press DISP BATT INFO to hide or show the screen indicators counter etc You can change the on screen displays to show messages in a specified language Selectthescreenlanguagein LANGUAGE o...

Page 25: ...5 Set DST to ON with if necessary then touch 6 Set Y year with then touch You can set any year up to the year 2079 7 Set M month D day hour and minute then touch The clock starts For midnight set it to 12 00 AM For midday set it to 12 00 PM Refer to page 118 for information concerning World time difference The recording date and time are not displayed during recording but are automatically recorde...

Page 26: ...4 3 vary depending on the zoom position To play back images after connecting your camcorder to a TV Set TV TYPE to 16 9 or 4 3 according to your TV 16 9 4 3 p 42 When viewing 16 9 wide images with TV TYPE set to 4 3 images may appear rough depending on subjects 1 Slide the POWER switch to light up the Still lamp The image size ratio changes to 4 3 2 Press WIDE SELECT repeatedly to select the desir...

Page 27: ...SY button The settings of your camcorder during Easy Handycam operation Touch SETUP to display the available setup items For details on setup See page 48 Nearly all setup items are automatically fixed is not displayed during Easy Handycam operation To perform settings such as focusing manually and adding special effects cancel Easy Handycam operation SETUP 60min STBY EASY CLOCK SET HDD FORMAT BEEP...

Page 28: ...e time is approximately 13 hours To record the next movies Perform step 3 Recording with ease Movies ACCESS To record movies To record still images Slide the POWER switch in the direction of the arrow while pressingthegreenbuttononlywhen the POWER switch is in the OFF CHG position ACCESS lamp The ACCESS lamp either lights or flashes when image data is written to the hard disk drive of the camcorde...

Page 29: ...s PHOTO D lightly to adjust the focus A then press it fully B A shutter sound is heard When disappears the image has been recorded QUALITY is set to FINE default settings p 56 To record the next still images Perform step 3 To cancel Easy Handycam Press EASY again disappears on the LCD screen Still images Easy Handycam operation ON 60min SETUP 112 EASY Flashing bLights up 112 min SETUP min SETUP EA...

Page 30: ...epressing the green button only when the POWERswitchisintheOFF CHG position To play back images POWER switch ACCESS lamp The ACCESS lamp either lights or flashes when image data is read from the hard disk drive of the camcorder 12 34 01 DEC 21 2006 DATE EDIT 60min 60min EASY SETUP Previous 6 images The last recorded played back movie is marked with i Also whenyoutouchi you can play back the movie ...

Page 31: ...played back It may take some time to display the VISUAL INDEX screen When you touch EDIT on the VISUAL INDEX screen you can delete images See Deleting images on page 45 To cancel Easy Handycam Press EASY again disappears on the LCD screen Movies Still Images 001 0001 100 112 01 12 34 JAN 1 2006 12 00 00 AM 60min SETUP EASY Beginning of the scene previous scene Toggles Play or Pause as you touch Ne...

Page 32: ...next file is created automatically For image quality of movies see REC MODE p 60 of still images see IMAGE SIZE p 56 Recording Playback Recording Movies Still Images Press START STOP A or B To stop recording press START STOP again Press PHOTO lightly to adjust the focus A then press it fully B A shutter sound is heard When disappears the image has been recorded PHOTO POWER switch START STOP B STAR...

Page 33: ...uch of makes the reverse fast forward approximately five times faster two touches make it approximately 10 times faster three touches make it approximately 30 times faster four touches make it approximately 60 times faster The ACCESS lamp either lights or flashes when image data is read from the hard disk drive of the camcorder To adjust the volume Touch t VOLUME then adjust it with If you cannot ...

Page 34: ...e of the desired image 5 Touch while the selected date of the desired image is highlighted The images for selected date are displayed on the VISUAL INDEX screen Searching for desired images by date Date Index 12 34 01 DEC 21 2006 DATE EDIT P MENU 60min 12 34 21 12 2006 P MENU 60min DATE OK END MAY 1 2006 JUN 10 2006 JUL 20 2006 AUG 30 2006 SEP 1 2006 MAY 5 2006 JUN 15 2006 JUL 25 2006 Previous Nex...

Page 35: ... useSuper NightShot plus function p 54 To record an image brighter in dim light use Color Slow Shutter function p 54 TheNightShot plusand SuperNightShotplususe infraredlight Therefore donotcovertheinfrared port 3 with your fingers or other objects Remove the conversion lens optional Adjustthefocusmanually FOCUS p 53 when it is hard to focus automatically Do not use these functions in bright places...

Page 36: ... p 33 The slide show begins from the selected image Touch to stop the slide show To restart touch again You can touch to set continuous slide show playback Thedefault setting is ON continuous playback You cannot operate playback zoom during slide show To use Playback zoom 16 You can magnify images from about 1 1 to 5 times the original size Magnificationcanbeadjustedwiththepower zoom lever 1 or th...

Page 37: ...ing settings for date and time Setup items customized on Personal Menu are not initialized Other part names and functions 7 Built in stereo microphone When an external microphone optional is connected ittakesprecedenceoverthe internal microphone DCR SR60 SR80 8 Remote sensor DCR SR60 SR80 Point the Remote Commander p 41 towards the remote sensor to operate your camcorder 9 Recording lamp DCR SR60 ...

Page 38: ...orded image in a succession with Review deleting You can only delete the last recorded image in order with Review To delete the desired image see page 45 When the recorded images are deleted in order with Review deleting you cannot continue to delete them if a protected image appears on the screen When you delete still images that were recorded continuously p 56 all the images are deleted at the s...

Page 39: ...7 8 Image size 56 DCR SR60 SR80 9 Quality FINE STD 56 q Number of recordable still images 60min P MENU REC 00 01 00 60min 60min P MENU 112 Viewing movies Viewing still images qa Playback mode qs Number of played back movies Total number of recorded movies qd Previous Next button 31 33 qf Recording folders files 119 qg Video operation buttons 31 33 qh Numberofplayedbackstillimages Total number of r...

Page 40: ...s photo recording Bracket recording 56 Flash light 53 MICREF LEVEL low 60 Indicator Meaning Repeat of Slide show 36 Indicator Meaning Fader 57 LCD backlight off 23 Drop sensor off 59 Drop sensor 59 60min 00 01 00 60min P MENU STBY Upper left Upper center Upper right Bottom Center Indicator Meaning NightShot plus 35 Super NightShot plus 54 Color Slow Shutter 54 PictBridgeconnecting 74 E Warning 113...

Page 41: ...p 35 36 qa PAUSE p 31 33 qs VISUAL INDEX p 30 33 Displays a VISUAL INDEX screen when you press this while playing back qd b B v V ENTER When you press any button the orange frame appears on the LCD screen Select a desired button or an item with b B v V then press ENTER to enter PointtheRemoteCommandertowardstheremote sensor to operate your camcorder p 37 When no commands have been sent from the Re...

Page 42: ...with an S VIDEO cable optional The yellow plug connection is not necessary S VIDEO connection only will not output audio You can display the counter on the TV screen by setting DISP OUTPUT to V OUT PANEL p 63 Do not connect A V connecting cables to both your camcorder and the Handycam Station at the same time The image might get disturbed When your TV is connected to a VCR Connect your camcorder t...

Page 43: ...iomay notbe displayedfullscreen This is not a malfunction When you play back an image recorded in 16 9 wide aspect ratio on a 4 3 TV not compatible with the 16 9 wide signal set TV TYPE to 4 3 When your TV is monaural When your TV has only one audio input jack Connect the yellow plug of the A V connecting cable to the video input jack and connect the white left channel or the red right channel plu...

Page 44: ...to other VCR DVD devices Saving images Saving images on DVD using your computer Saving images by connecting the camcorder to other VCR DVD devices Create DVD with One Touch You can save images recorded on the camcorder directly to a DVD with ease See Creating a DVD with One Touch on page 83 Create DVD with the desired images You can save images copied to your computeronaDVD Youcanalsoedit the imag...

Page 45: ...cted image is marked with Press and hold the movie on the LCD screen to check the movie Preview Touch to return to the previous screen The Preview screen buttons have the same functions as the ones on the Review screen p 38 You can select multiple images at the same time 5 Touch t YES You cannot recover an image once you delete it If you delete an original movie that is listed in a Playlist p 66 i...

Page 46: ...EDIT then touch DELETE DATE t YES Deletemovies orstillimagesrecordedon the selected date at once You cannot delete movies and still images recorded on the same date at the same time You cannot delete protected images p 68 When the multiple number of the same date is displayed in step 3 only the image data in the selected date folder can be deleted Deleting images by date 12 34 01 DEC 21 2006 DATE ...

Page 47: ...l it is displayed 3 Select the desired setting then touch x To change the setup items You can customize setup items that are not added to Personal Menu Using the Setup items Using the Setup items 1 2 3 4 Settings for movies Settings for still images Slide the POWER switch while pressing the green button in the center only when the POWER switch is in the OFF CHG position Settings for PLAY EDIT STBY...

Page 48: ...f you decide not to change the setting touch to return to the previous screen x To change the setup items during Easy Handycam operation does not appear during Easy Handycam operation p 27 1 Touch SETUP Available setup items appear 2 Select the desired item 3 Customize the item Touch after finishing the setting If you decide not to change the settings touch to return to the previous screen Cancel ...

Page 49: ... z z AUTO WHITE BAL z z AUTO AUTO SHUTTER z ON SPOT FOCUS z z AUTO FOCUS z z AUTO FLASH SET 2 z 1 OFF SUPER NSPLUS z OFF NS LIGHT z z OFF COLOR SLOW S z OFF SELF TIMER z OFF SELF TIMER z OFF DIGITAL ZOOM z OFF WIDE SELECT 3 z 4 3 STEADYSHOT z ON STILL SET p 56 BURST 2 z OFF QUALITY z FINE IMAGE SIZE 2 z z PICT APPLI p 57 FADER z OFF D EFFECT z OFF PICT EFFECT z OFF REC CTRL 2 z USB SELECT 4 z z z ...

Page 50: ...Still PLAY EDIT Easy Handycam STANDARD SET p 60 REC MODE z HQ VOLUME z z 1 MULTI SOUND z STEREO MICREF LEVEL 2 z NORMAL LCD SET z z z NORMAL 1 TV TYPE 2 z z z USB SPEED z z z 1 DATA CODE z DATE TIME DISPLAY z 1 REMAINING z AUTO REMOTE CTRL 2 z z z ON REC LAMP 2 z z ON BEEP z z z z 1 DISP OUTPUT z z z LCD PANEL SETUP ROTATE z z z A SHUT OFF z z z 5min CALIBRATION z TIME LANGU p 63 CLOCK SET z z z z...

Page 51: ...elect to maintain the atmosphere of situations such as sunsets general night views or fireworks LANDSCAPE Select to shoot distant subjects clearly This setting also prevents your camcorder from focusing on glass or metal mesh in windows that comes in between the camcorder and the subject Items with one asterisk can be adjusted so as nottofocusonsubjectsonlyashortdistanceaway Items with two asteris...

Page 52: ...ndescent like color lamps ONE PUSH The white balance will be adjusted according to the ambient light 1 Touch ONE PUSH 2 Frame a white object such as a piece of paper to fill the screen under the same lighting conditions as you will shoot the subject 3 Touch flashes quickly When the white balance has been adjusted and stored in the memory the indicator stops flashing Keep framing white object while...

Page 53: ...ds T telephoto to adjust the focus then towards W wide angle to adjust the zoom for recording When you want to record a subject at close range move the power zoom lever to W wide angle then adjust the focus The minimum distance required between your camcorder and the subject to get a sharp focus is about 1 cm about 1 2 inch for wide angle and about 80 cm about 2 5 8 feet for telephoto The setting ...

Page 54: ...ng distance using NS LIGHT is about 3 m 10 feet You can record an image brighter in color even in dark places Set COLOR SLOW S to ON and COLOR SLOW SHUTTER flash on the screen To cancel COLOR SLOW S touch OFF Adjust the focus manually FOCUS p 53 when it is hard to focus automatically The shutter speed of your camcorder changes depending on the brightness The motion of the image may slow down at th...

Page 55: ...y back an image on a standard 4 3 TV screen the image is vertically displayed When the TV is set to the wide mode the image is displayed just like the image displayed on the LCD screen You cannot switch the screen aspect ratio in the following cases while recording movies when D EFFECT is set to OLD MOVIE p 57 When you connect your camcorder to a TV compatible with the ID 1 ID 2 system or via an S...

Page 56: ...aximum number depending on the image size and the remaining hard disk space of the camcorder EXP BRKTG doesnot function iftheharddisk space is only available for less than three still images It takes longer to record continuous images to the hard disk compared to normal recording Record the next still image after the scroll bar indicator and the ACCESS lamp turns off STILL SET Settings for still i...

Page 57: ...fade in only PICT APPLI Special effectson images oradditional functions on recording playback PICT EFFECT D EFFECT etc FADER Fading out Fading in You can add digital effects to your recordings appears 1 Touch the desired effect 2 When you select LUMI KEY adjust the effect with then touch The image displayed when you touch is saved as a still image 3 Touch appears To cancel D EFFECT touch OFF in st...

Page 58: ...CR SR60 SR80 USB SELECT DEMO MODE See page 47 for details on selecting setup items You can deleteallthe imageson the hard disk of the camcorder to recover recordable free space to allow you to write in Toavoidthelossofimportantimages theyshould be saved p 44 before performing HDD FORMAT 1 To perform HDD FORMAT touch YES t YES 2 When Completed is displayed touch Protected images are also deleted Wh...

Page 59: ...orm EMPTY HDD Connect your camcorder to the wall outlet using the supplied AC Adaptor for this operation p 17 If you perform EMPTY HDD all the images aredeleted Toavoidthelossofimportantimages they should be saved p 44 before performing EMPTY HDD 1 Be sure the AC Adaptor is connected While pressing DISP BATT INFO slide the POWER switch to turn on You can perform this operation whichever position o...

Page 60: ... LCD SET USB SPEED etc REC MODE Recording mode DCR SR40 SR60 DCR SR80 HQ approx 7 hours 20 min approx 14 hours 40 min SP approx 10 hours 50 min approx 21 hours 40 min LP approx 20 hours 50 min approx 41 hours 50 min See page 33 You can select whether to play back audio recordedusing RECCTRL p 72 with dual sound or stereo sound BSTEREO Plays back with main and sub sound or stereo sound 1 Plays back...

Page 61: ...s on the LCD screen BLETTER BOX Normal setting standard type of screen SQUEZE Squeeze Expands the image vertically if black bands at the top and bottom in 16 9 wide aspect ratio are undesirable See page 42 You can select data transfer speed used to transfer data to your computer BAUTO Sends data by switching automatically between the Hi Speed USB USB 2 0 and the speed corresponding to USB1 1 full ...

Page 62: ...0 SR80 BAUTO Displays the remaining hard disk free space for about eight seconds as described below Whenyourcamcorderrecognizesthefree hard disk space with the POWER switch is set to Movie When you press DISP BATT INFO to switch the screen display from off to on with the POWER switch is set to Movie When you start recording from the line input DCR SR60 SR80 ON Always displays the remaining hard di...

Page 63: ...ect your camcorder to a wall outlet A SHUT OFF is automatically set to NEVER See page 122 BEEP DISP OUTPUT SETUP ROTATE A SHUT OFF Auto shut off CALIBRATION See page 47 for details on selecting setup items See page 25 You can adjust a time difference without stopping the clock Setyourlocalareawithv Vwhenusingyour camcorder overseas Refer to World time difference on page 118 You can change this set...

Page 64: ...S t The setup item is added to the end of list 1 Touch t P MENU SET UP t DELETE If the desired setup item is not displayed touch 2 Touch the setup item that you want to delete 3 Touch YES t You cannot delete SETUP and P MENU SET UP Customizing Personal Menu Adding a setup item Select the category CAMERA SET PICT APPLI HDD SET STANDARD SET TIME LANGU STBY END OK 60min PROGRAM AE SPOT METER EXPOSURE...

Page 65: ...etup item you want to move 3 Touch to move the setup item to the desired place 4 Touch To sort more items repeat step 2 to 4 5 Touch END t You cannot move P MENU SET UP Touch t P MENU SET UP t RESET t YES t YES t Arranging the order of setup items displayed on Personal Menu Initializing the Personal Menu settings Reset ...

Page 66: ...with If you press and hold the thumbnail of the image you can check the image Touch to return to the previous screen You can select several images at once 5 Touch t YES To add all the images selected by date on the Playlist Touch ADD DATE in step 3 1 Slide the POWER switch to light up the PLAY EDIT lamp The VISUAL INDEX screen appears 2 Touch Playlist tab t EDIT t ERASE 3 Select the scene to be de...

Page 67: ...scene to be moved The selected scene is marked with If you press and hold the thumbnail of the image you can check the image Touch to return to the previous screen You can select several images at once 4 Touch 5 Select the designated position with T t 6 Touch t YES When you have selected several images the scenes are moved following the order appeared in the Playlist Changing the order within the ...

Page 68: ...t your images from being deleted by mistake Youcan setprotection toanindividualimage 1 Slide the POWER switch to light up the PLAY EDIT lamp The VISUAL INDEX screen appears on the LCD screen 2 Touch EDIT t PROTECT 3 Touch the desired image you want to protect The selected image is marked with You can select several images at once If you press and hold the thumbnail of the image you can check the i...

Page 69: ...Date button then touch Return to the VISUAL INDEX screen 4 Touch EDIT t PROTCT DATE t ON Set protection for all the images in the selected folder by date Protected images are marked with on VISUAL INDEX screen To cancel protection from the desired image by date Touch EDIT t PROTCT DATE t OFF in step 4 does not appear on the images that are cancelled for protection Protecting images by date 12 34 2...

Page 70: ...ack byusingan A Vconnecting cable with an S VIDEO cable optional higher quality images can be produced than with an A V connecting cable Connect the white and red plug left right audio and the S VIDEO plug S VIDEOchannel oftheA Vconnecting cable with an S VIDEO cable optional The yellow plug connection is not necessary S VIDEO connection only will not output audio To hide the screen indicators suc...

Page 71: ... the A V connecting cable supplied 1 or the A V connecting cable with S VIDEO optional 2 Connect your camcorder to the input jacks of a VCR or DVD device 4 Start the playback on your camcorder and record it on the recording device Refer to the instruction manuals supplied with your recording devices for details 5 When dubbing is finished stop your camcorder and the recording device After dubbing y...

Page 72: ...ting cable with an S VIDEO cable optional higher quality images can be produced than with an A V connecting cable Connect the white and red plug left right audio and the S VIDEO plug S VIDEOchannel oftheA Vconnecting cable with an S VIDEO cable optional The yellow plug connection is not necessary S VIDEO connection only will not output audio You cannot record images from a TV with no output jacks ...

Page 73: ...O jack touch SET t VIDEO INPUT t S VIDEO t Touch SET to change the recording mode or adjust the volume Touch SET t REMAIN t ON to display the remaining hard disk free space indicator all the time 5 Start playing the cassette or the DVD on the play back device or select a TV program The image played on the connected deviceappearsontheLCDscreenofyour camcorder 6 Touch REC at the point you want to st...

Page 74: ...r of the Handycam Station p 76 You can perform this operation when whichever position of the Movie Still PLAY EDIT is lit 4 Connect the USB jack of the Handycam Station to the printer using the supplied USB cable USB SELECT screen appears on the LCD screen 5 Touch PictBridge PRINT The still image appears You can also display USB SELECT screen by touching t SETUP t PICT APPLI t USB SELECT We cannot...

Page 75: ...SB cable supplied from the Handycam Station If the printer stops working remove the USB cable supplied turn the printer off and on again and restart the operation from the beginning Depending on the type of printer you have all four edges of an image may not be printed Especially the left and right ends ofa 16 9 wide image may not be printed due to its aspect ratio Some printer models may not supp...

Page 76: ...ing the installed accessory securely To connect an accessory press down and push it to the end and then tighten the screw To remove an accessory loosen the screw and then press down and pull out the accessory When you are recording with the external flash optional turn off the power of the external flash to prevent charging noisebeing recorded When an external microphone optional is connected it t...

Page 77: ... One Touch p 83 BypressingtheDVDBURNbutton ontheHandycam Station youcansave images recorded on the camcorder to a DVD automatically You can use easy DVD creation x Copying and viewing images on the computer p 87 92 You can view images recorded on the camcorder by copying them to your computer You can print still images on a computer x Creating a DVD with edited images p 94 96 You can edit copied m...

Page 78: ...6 bitcolor 65 000 colors This product will not operate correctly at less than 800 600 dots and 256 colors or less USB port As standard equipment USB 2 0 recommended The camcorder is compatible with Hi Speed USB USB2 0 You can transfer data at a faster rate using a computer compatible with Hi Speed USB USB2 0 Whenyouconnect a USB interface not compatible with Hi Speed USB USB2 0 the data transfer r...

Page 79: ...r camcorder with the USB cable or other cable make sure you insert the connector in the correct direction Do not insert the connector forcibly as it may damage the cable or your camcorder Do not delete files on the camcorder through the computer it may cause a malfunction On screenshots The screenshots are from Windows XP The scenes may vary depending on the operating system of the computer On scr...

Page 80: ...d on the disc drive of your computer The select screen for installation appears 4 Click ImageMixer for HDD Camcorder The installation screen appears If the screen does not appear follow the steps below 1 Click start then click My Computer For Windows 2000 double click My Computer on the desktop 2 Double click CAMCORDERSOFT E CD ROM Drive names such as E vary depending on the computer 3 Double clic...

Page 81: ...e the software then click Next 10Select NTSC then click Next 11Click Install on the Ready to Install the Program screen The installation for ImageMixer for HDD Camcorder starts 12If the Installing Microsoft R DirectX R screen is displayed follow the steps below to install DirectX 9 0c If not skip to step 13 1 Read License Agreement then click Next 2 Click Next ...

Page 82: ...inish The computer turns off once then starts up again automatically Restart When you complete the installation the short cut icons for ImageMixer for HDD Camcorder and ImageMixer destination folder appear on the desktop ofyourcomputer 14Remove the CD ROM from the disc drive of your computer ...

Page 83: ... compatibility information DVD compatible with the supplied software Only the 12cm DVD can be used The 8cm DVD cannot be used WhencreatingaDVDwithOneTouchDVDBurn function thereisnooperationaldifferenceamong DVD types except that DVD RW DVD RW are both reusable WhenyoucreateaDVDbyeditingimagescopied to your computer some of the operations may differ depending on the DVD type When saving data on a D...

Page 84: ... outlet using the supplied AC Adaptor 5 Set the camcorder onto the Handycam Station then slide the POWER switch to turn on When you set the camcorder onto the Handycam Station connect securely onto the interface connector of the Handycam Station p 76 You can perform this operation when whichever position of the Movie Still PLAY EDIT is lit 6 Press the DVD BURN button on the Handycam Station Checkt...

Page 85: ...m the camcorder using the functionsonthecamcorderbyfollowingthesteps on page 45 In this way you can increase the free hard disk space of your camcorder To copy a created DVD use the DVD creation software installed on your computer You cannot copy created DVDs with the supplied software You cannot record image data on the hard disk of your computer in this operation You cannot delete image data on ...

Page 86: ...box for Seamless playback then click OK Whenyoumakethissetting itwilltakemoretime for creating a DVD Even when you make this setting the ending of each title pauses for a few seconds 1 Click Unplug or eject hardware icon on the task tray then click when Safely Remove USB Mass Storage Device appears Safe to Remove Hardware appears 2 Remove the USB cable from the Handycam Station and the computer Do...

Page 87: ...py images a new folder is created Each folder name becomes YY_MM_DD copy date Number of copies sub numbers Example Ifyou copied images on March 1 2006 First Copy 06_03_01_01 Second Copy 06_03_01_02 Third Copy 06_03_01_03 Folder names created by copying selected images Each day you copy images a new folder is created Each folder name becomes YY_MM_DD Copydate 00 Whenyou copy images a few times on t...

Page 88: ...e see page 84 Make sure no other USB devices are connected to your computer If your computer has a USB keyboard and a USB mouse as standard equipment leave them connected and connect the Handycam StationtoanavailableUSBjackwiththeUSB cable 6 Touch HDD on the LCD screen of the camcorder ImageMixer Menu appears on the screen of the computer IfthescreenotherthantheImageMixerMenu appears close the scr...

Page 89: ... user account the image that has already been imported is copied to the computer again Data copy is cancelled when the free hard disk spaceofthecomputerbecomeslessthan500 MB In this case increase free hard disk space by deleting some of the unnecessary files then perform Easy PC Back up again If the operation ends unexpectedly including an indication of insufficient free hard disk space the last c...

Page 90: ...creen of the computer IfthescreenotherthantheImageMixerMenu appears close the screen During the operation do not apply vibration on the camcorder The operation may be terminated 7 Click Viewing and Editing on the screen of the computer Browser starts up 8 Click Handycam tab You can view images on the hard disk of the camcorder 9 To copy movies click Movies or to copy still images click Still Image...

Page 91: ... You can also click the checkbox on the preview screen You can select both the movies and still images at the same time To change the destination click Options then select the desired folder 11Click Import to computer The selected images are copied to the hard disk of your computer See page 86 to remove the USB cable from the Handycam Station and your computer ...

Page 92: ...r 2 Click Viewing and Editing Browser starts up 3 Click the Computer tab 4 Click the folder containing the desired image When you right click the thumbnail you can view the information of the movie or still image 5 Double click the desired image The preview screen appears Movie You can play stop and pause using the buttons at the top of the screen Depending on the computer you use the played back ...

Page 93: ...e You can print and expand images using the buttons at the top of the screen For data compatible with Exif click Exif to display the recording conditions such as shutter speed exposure aperture etc Click Print in step 5 Printing still images ...

Page 94: ...n also start up ImageMixer Menu by clicking start t All Programs t PIXELA t ImageMixer for HDD Camcorder t ImageMixer for HDD Camcorder 3 Click Viewing and Editing Browser starts up 4 Click the Computer tab 5 Clickthefolderincludingthemovie you want to edit 6 Double click the movie you want to edit The preview screen appears 7 Click Edit ImageMixer MPEG Cutter starts up Editing images ...

Page 95: ...enter frame by clicking or then drag and drop the frame to End 12Click Cut When you want to delete more of the frames repeat the steps from step 9 to step 12 13Click Compile Thenewfileexceptfor deleted scenesare created on the computer The image data selected as editing materials is saved on the computer 14When Save as appears on the screen specify the destination and file name then click Save For...

Page 96: ...omputer automatically 3 Double click ImageMixer for HDD Camcorder on the desktop ImageMixer Menu appears You can also start up ImageMixer Menu by clicking start t All Programs t PIXELA t ImageMixer for HDD Camcorder t ImageMixer for HDD Camcorder 4 Click Viewing and Editing By clicking Options you can change the settings for the DVD Drive Writing speed or Temporary folder Browser starts up 5 Click...

Page 97: ...rs click No To create another DVD click Yes After creating a DVD check that the DVD can be played back properly on a DVD player or other devices If you check that the DVD can be played back it is recommended that you delete the image data fromthecamcorderbyfollowingthestepsonpage 45 Inthisway youcan increasethe free harddisk space of your camcorder To copy a created DVD use the DVD creation softwa...

Page 98: ...DIT is lit 6 Connect the USB jack of the Handycam Station to a computer using the supplied USB cable USB SELECT appears on the LCD screen of the camcorder For connecting with the USB cable see page 84 7 Touch HDD on the LCD screen of the camcorder ImageMixer Menu appears on the screen of the computer 8 Click Playlist DVD creation on the screen of the computer Project Settings screen appears You do...

Page 99: ...OK DVD creation starts up When you insert a burned DVD RW DVD RW in the disc drive in step 3 a message appears asking if you want to delete images saved on a DVD 12Once the completion dialog for DVD creation appears click No To create another DVD click Yes See page 86 to remove the USB cable from the Handycam Station and your computer ...

Page 100: ...ures if you do not change the destination folders for your image data Whenyouhavechangedadestinationfolder delete the images from the last destination folder Do not delete the image data on the hard disk of the camcorder with your computer 1 When using Windows XP click start t My Pictures The contents of My Pictures are displayed For Windows 2000 double click My Document t My Pictures on the deskt...

Page 101: ...pt the Personal Menu items The temperature of your camcorder is extremely high Turn off your camcorder and leave it for a while in a cool place The temperature of your camcorder is extremely low With POWER switch turned on leave the camcorder for a while If you still cannot operate the camcorder turn it off taking it to a warm place Leave the camcorder there for a while then turn on the camcorder ...

Page 102: ...tly p 17 Connect the power cord to the wall outlet properly The battery charge is completed p 17 Set the camcorder onto the Handycam Station securely p 18 The CHG charge lamp flashes while the battery pack is being charged Attach the battery pack to the camcorder correctly p 17 If the problem persists remove the AC Adaptor from the wall outlet and contact your Sony dealer The battery pack may be d...

Page 103: ... 113 The image remains on the LCD screen This occurs if you remove the AC Adaptor from the wall outlet or remove the battery pack without turning off the power first This is not a malfunction You cannot turn the LCD backlight off During Easy Handycam operation p 27 you cannot turn the LCD backlight on off pressing and holding DISP BATT INFO Cancel Easy Handycam operation p 29 The buttons do not ap...

Page 104: ...enumbershows9 999 Deleteimages p 45 orperform HDD FORMAT p 58 While activating DROP SENSOR p 59 you may not record movies still images The ACCESS lamp lights up even when you stop recording Your camcorder is recording the image you have just shot on the hard disk of the camcorder Do not remove the AC Adaptor or the battery pack while the lamp is turned on The recording angle differs depending on t...

Page 105: ...e difference between the point where you press START STOP and the actual point that recording movie starts stops This is not a malfunction Refer also to Setup items p 107 The auto focus does not function Set FOCUS to AUTO p 53 The recording conditions are not suitable for auto focus Adjust the focus manually p 53 STEADYSHOT does not function Set STEADYSHOT to ON p 55 STEADYSHOT may not work for an...

Page 106: ...ium lamp or mercury lamp with PORTRAIT or SPORTS Cancel PROGRAM AE in this case p 51 Black bands appear when you record a TV screen or computer screen Set STEADYSHOT to OFF p 55 The supplied Remote Commander does not function Set REMOTE CTRL to ON p 62 Insert a battery into the battery holder with the polarities correctly matching the marks p 123 Remove any obstructions between the Remote Commande...

Page 107: ... screen is closed Open the LCD screen When you record sound with MICREF LEVEL p 60 set to LOW the recorded sound may be difficult to hear Images cannot be deleted Protected images cannot be deleted Cancel the image protection p 69 The data file name is not indicated correctly Only the file name is displayed if the directory structure does not conform to the camcorder standard The file is damaged T...

Page 108: ...AM AE SPOT METER is automatically set to AUTO You cannot use EXPOSURE You cannot use EXPOSURE together with NightShot plus SUPER NSPLUS COLOR SLOW S If you set PROGRAM AE EXPOSURE is automatically set to AUTO You cannot use WHITE BAL You cannot use WHITE BAL together with NightShot plus SUPER NSPLUS You cannot use SPOT FOCUS You cannot use SPOT FOCUS together with PROGRAM AE You cannot use SUPER N...

Page 109: ...R SLOW S D EFFECT You cannot use D EFFECT You cannot use D EFFECT together with SUPER NSPLUS COLOR SLOW S FADER You cannot use OLD MOVIE together with PROGRAM AE PICT EFFECT You cannot use PICT EFFECT You cannot use PICT EFFECT together with OLD MOVIE You cannot adjust LCD BL LEVEL You cannot adjust LCD BL LEVEL when power is supplied from the AC Adaptor Scenes cannot be added in the Playlist The ...

Page 110: ...mcorder p 70 72 The computer does not recognize your camcorder Install the supplied software ImageMixer for HDD Camcorder p 80 Set the camcorder onto the Handycam Station securely p 18 Remove the USB cable from the Handycam Station and the computer then connect it again firmly Remove USB device other than the keyboard the mouse and the Handycam Station from the computer Remove the USB cable from t...

Page 111: ...ble to be played back correctly However it does not affect the images or sounds copied to your computer When you set USB SPEED to FULL SPEED p 61 it may not be able to be played back correctly However it does not affect the images or sounds copied to your computer Depending on the computer you use the played back image or sound may stop temporarily but this does not affect the images or sound copi...

Page 112: ...mputer screen Delete unnecessary files from your computer to provide free hard disk space p 100 You cannot change the lit status of the power lamps on the camcorder When using the USB connection you cannot change the lit status of the power lamps on the camcorder Cancel the USB connection The beep sounds for five seconds The temperature of your camcorder is extremely high Turn off your camcorder a...

Page 113: ... unreadable Warning on the hard disk of the camcorder Fast flashing Anerrormayhaveoccurredwiththehard disk drive in your camcorder Warning on the hard disk of the camcorder Fast flashing The hard disk of the camcorder is fully recorded Anerrormayhaveoccurredwiththehard disk drive in your camcorder E Battery level warning Slow flashing The battery pack is nearly used up Depending on the operating e...

Page 114: ...ecord movies Delete unnecessary images p 45 or perform HDD FORMAT Still scene number is full Cannot record Delete unnecessary images p 45 Still pic folder full Cannot record stills Delete unnecessary images p 45 or perform HDD FORMAT Movie recording disabled Movies cannot be recorded due to some limitations of the hard disk of the camcorder However you maybe able to record still images Still recor...

Page 115: ...r the data but they were unsuccessful x PictBridge compliant printer Check the connected device Turn off the printer and on again then remove the USB cable supplied and reconnect it Connect the camcorder to a PictBridge compatible printer Turn off the printer and on again then remove the USB cable supplied and reconnect it Error Cancel the task Check the printer Cannot print Check the printer Turn...

Page 116: ...Playback prohibited You can only play back the images recorded by the camcorder Playlist full You cannot create the playlist exceeding 99 scenes Data protected The data is protected p 68 Copy Inhibit The copyright protected images cannot be dubbed on the camcorder Alreadyadded to mode s P MENU Drop sensor activated USB function ended Press END button and end USB connection During USB connection yo...

Page 117: ...sed TV with an AUDIO VIDEO input jack Additional Information Using your camcorder abroad System Used in PAL Australia Austria Belgium China Czech Republic Denmark Finland Germany Holland Hong Kong Hungary Italy Kuwait Malaysia New Zealand Norway Poland Portugal Singapore Slovak Republic Spain Sweden Switzerland Thailand United Kingdom etc PAL M Brazil PAL N Argentina Paraguay Uruguay NTSC Bahama I...

Page 118: ... 00 Abu Dhabi Baku 7 04 30 Kabul 8 05 00 Karachi Islamabad 9 05 30 Calcutta New Delhi 10 06 00 Almaty Dhaka 11 06 30 Rangoon 12 07 00 Bangkok Jakarta 13 08 00 HongKong Singapore 14 09 00 Seoul Tokyo 15 09 30 Adelaide Darwin 16 10 00 Melbourne Sydney 17 11 00 Solomon Is 18 12 00 Fiji Wellington 19 12 00 Eniwetok Kwajalein 20 11 00 Midway Is Samoa 21 10 00 Hawaii 22 09 00 Alaska 23 08 00 LosAngeles ...

Page 119: ... 999 another folder is created to store new image files The folder name goes higher as shown here 100MSDCF t 101MSDCF When you set USB SELECT to HDD p 58 you can access the hard disk of the camcorder from the computer through USB connection Do not modify the files or folders on the camcorder through the computer without using the supplied computer application The image files may be destroyed or ma...

Page 120: ...corder The battery pack is also consumed when your camcorder is in the standby mode or playback is paused Have spare battery packs ready for two or three times the expected recording time and make trial recordings before making the actual recording Do not expose the battery pack to water The battery pack is not water resistant Remaining battery time indicator If the power goes off even though the ...

Page 121: ... Whenremovingthepowercord pullitbytheplug and not the cord Do not damage the power cord such as by placing anything heavy on it Keep metal contacts clean Keep the Remote Commander and button type battery out of children s reach If the battery is accidentally swallowed consult with a doctor immediately DCR SR60 SR80 If the battery electrolytic liquid has leaked consultwithyourlocalauthorizedSonyser...

Page 122: ...you have rotated it orifyou haveset itwiththeLCDscreen side facing out On handling the casing If the casing is soiled clean the camcorder body withasoft clothlightly moistenedwithwater and then wipe the casing with a dry soft cloth Avoid the following to prevent damage to the finish Using chemicals such as thinner benzine alcohol chemical cloths repellent and insecticide and sunscreen Handling wit...

Page 123: ...ks of Sony Corporation InfoLITHIUM is a trademark of Sony Corporation MemoryStick Duo is a trademark of Sony Corporation ImageMixer for HDD Camcorder is a trademark of Pixela Corporation Dolby and the double D symbol are trademarks of Dolby Laboratories Dolby Digital Stereo Creator is a trademark of Dolby Laboratories DVD R DVD RW and DVD RW logo are trademarks Microsoft Windows and Windows Media ...

Page 124: ...tomovie to view still images on a DVD device that does not support JPEG playback Still images converted to a Photomovie are played back continuously like a slide show Resolution is slightly reduced x PictBridge PictBridge is a standard created for direct printingfrom digitalcamerasto printers By connectingaPictBridge compatibleprinter you can print out still images without using a computer p 74 x ...

Page 125: ...125 Glossary Index x VISUAL INDEX Thisfunctiondisplaysimagesofmoviesand still images you have recorded so that you can select those scenes you want to play back ...

Page 126: ... 109 Computer 77 87 92 100 System requirements 78 Connect Computer 84 Printer 74 TV 42 VCR DVD device 70 72 Copy 87 89 Copyright 7 Counter 39 CPU 78 D DATA CODE 25 40 61 Date Index 34 DATE TIME 61 DC IN jack 17 18 76 DC plug 17 18 Delete 15 38 45 100 DEMO MODE 58 Destination Folder 87 91 DIGITAL ZOOM 54 DirectX 78 Disc drive 78 80 84 96 98 DISP OUTPUT 63 DISP BATT INFO 23 24 37 DISPLAY 62 Display ...

Page 127: ...ce 121 Memory 78 MICREF LEVEL 60 Mirror mode 36 Moisture condensation 121 MOSAIC 58 Movie REC MODE Recording mode 60 Recording 28 32 Movie files 119 MPEG2 119 124 MULTI SOUND 60 My Computer 80 My Pictures 100 N NightShot plus 35 NIGHT SHOT PLUS switch 35 NORMAL 56 NS LIGHT NightShot Light 54 NTSC 117 Number of recordable still images 39 O OLD MOVIE 57 ONE PUSH 52 One Touch DVD Burn 83 Operation co...

Page 128: ...SET 56 TIME LANGU 63 Using the Setup items 47 SETUP ROTATE 63 Shoe cover 76 Shoulder belt 36 Slide show 36 Slide show button 31 33 36 Software 80 Sound card 78 SP 60 Speaker 37 SPORTS Sports lesson 51 SPOTLIGHT 51 SPOT FOCUS 53 108 SPOT METER Flexible spot meter 51 108 SQUEZE Squeeze 61 STANDARD 56 STANDARD SET 60 START STOP 28 32 STEADYSHOT 55 105 Still image IMAGE SIZE 56 QUALITY 56 Recording 29...

Page 129: ...WHITE BAL White balance 52 108 WHITE FADER 57 Wide angle 35 WIDE DISPLAY 61 WIDE SELECT 26 55 Windows 2000 78 Windows XP 78 WIPE 57 Wireless Remote Commander See Remote Commander World time difference 118 Z Zoom 35 Zoom lever 35 ZOOM LINK 62 ...

Page 130: ...130 ...

Page 131: ...131 ...

Page 132: ...Printed in Japan Additional information on this product and answers to frequently asked questions can be found at our Customer Support Website ...

Reviews: