background image

Installation

11

Installation

The Wireless Manager CD-ROM contains the software required to operate your GC89. 

You will also need to make sure that the GSM services you require are included on your SIM card 
subscription. For an explanation of the services that are available see 

Network and Subscription

 on 

page 9. Contact the organization that supplied you with your SIM card and request that the specific 
services (EDGE, GPRS, CSD or SMS) you require are added to your subscription. If you are 
intending to use WLAN, you will need to have access rights to corporate networks and hotspots you 
intend to use.

Note:

If you are installing onto a Windows 98SE operating system, make sure you have your 
Windows

®

 installation CD-ROM as it may be required.

The CD-ROM contains the following software:

Wireless Manager

User Documentation

On-line Help

ReadMe text file containing the latest information about the GC89.

GC89 Hardware Set Up

1.

Remove your GC89 card from its protective cover. 

2.

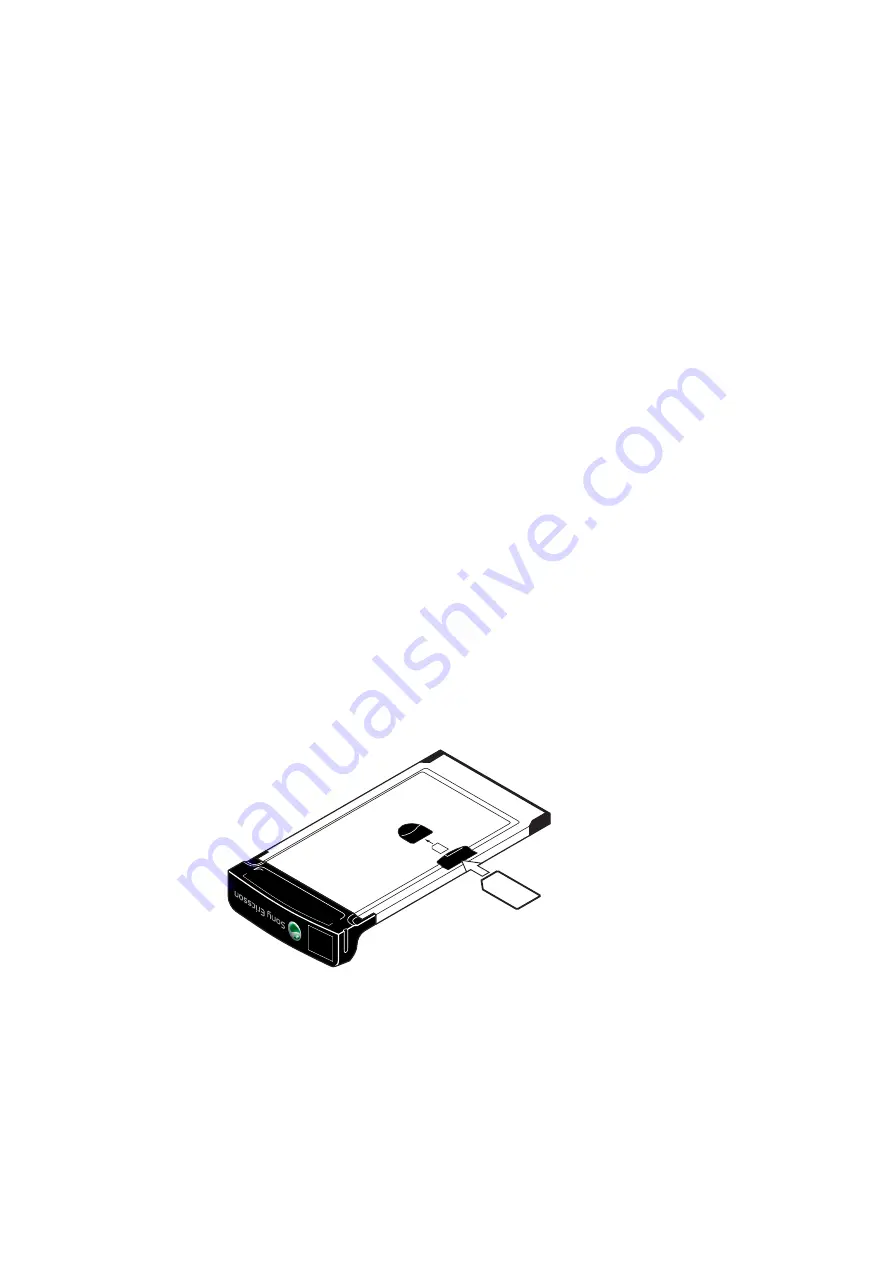
Insert your SIM card into the slot on the back of GC89, with the gold contacts facing downwards.

Note:

The cut corner of the SIM card must be placed into the PC card as demonstrated below. The 
gold contacts should face downwards.

To use the PCMCIA slot for another device, remove the GC89 card as instructed in 

Safe Removal of 

the GC89

 on page 57, then insert the other device.

564464

8695

89034

SIM

Card

Summary of Contents for GC89 - Ericsson EDGE/Wireless LAN PC Card

Page 1: ...GC89 Sony Ericsson GC89 User Guide ...

Page 2: ...eate a Wireless LAN Connection 18 Making a Basic Network Connection Windows 2000 XP 18 Making a Basic Network Connection in Windows Millennium 28 Making a Basic Network Connection in Windows 98SE 33 Using the Sony Ericsson Wireless Utility 38 Advanced Wireless LAN Features 44 Setting up an Ad Hoc Group Network 44 Configuring Your Ad Hoc Network with No Security 45 Configuring Your Ad Hoc Network w...

Page 3: ...reen 74 The Phone Book Screen 74 Phone Book Functionality 75 Wireless Manager Online Services Screen 78 Troubleshooting 79 Status Information 79 Status Log 79 Wireless Manager Icon Errors 80 Software Errors 80 GSM EDGE GPRS Error Messages 80 SIM Card Errors 81 Wireless LAN Error Messages 81 Wireless LAN Performance and Connectivity Problems 82 Windows Error Codes 83 Additional Information 87 Sony ...

Page 4: ...x A Connection Parameters 103 General Connection Parameters for CSD and GPRS 103 CSD Specific Parameters 104 TCP IP Optimisation 104 Appendix B Changing the GC89 Wireless LAN Adapter Properties 107 Glossary 109 Index 112 ...

Page 5: ...nual This manual is copyrighted work of Sony Ericsson Mobile Communications AB Sweden The programs referred to herein are copyrighted and trademarked works of Sony Ericsson Mobile Communications AB Sweden Reproduction in whole or in part including utilization in machines capable of reproduction or retrieval without the express written permission of the copyright holders is prohibited Reverse engin...

Page 6: ...ess LAN provides the same functionality of a wired network without the need to install networking cables and other networking equipment Not only is a wireless LAN easier to deploy but it also allows for roaming For example when using the GC89 wireless LAN facility it is possible to roam from one room in the house to another or from a conference room to an office without being disconnected from the...

Page 7: ...ernet connectivity for a wide range of applications Documentation The GC89 s documentation is designed to enhance your understanding of its capabilities The following guides are provided A printed Quick Start Guide aimed at getting you operational as quickly as possible An online User s Guide this document containing a comprehensive description of the GC89 functionality You can read the guide on t...

Page 8: ...ct to WEP Wired Equivalent Privacy wireless network key information network key for any WEP enabled networks you want to connect to An IP address if not using a DHCP server Networks connected to an authentication server if any Note If you require access to a network account you will also require the accounts domain name a user name and a password In order to use your GC89 as a wireless LAN adapter...

Page 9: ...tworks have this capability at 9 6 kbps It is possible for the network to upgrade the speed to 14 4 kbps The GC89 operates at this higher speed where available General Packet Radio Service GPRS GPRS is a type of network connection which provides always on mobility The connection set up is fast and once connected applications may send and receive data whenever required In today s GPRS networks the ...

Page 10: ...r CD ROM Note The Wireless Manager can be downloaded from the Sony Ericsson website details are given below Services Available Over the Internet The Sony Ericsson website contains support to facilitate easy communications and rapid information retrieval wherever you are It gives you access to on line customer services on line user manuals software downloads and useful information The address is ht...

Page 11: ...nd to use Note If you are installing onto a Windows 98SE operating system make sure you have your Windows installation CD ROM as it may be required The CD ROM contains the following software Wireless Manager User Documentation On line Help ReadMe text file containing the latest information about the GC89 GC89 Hardware Set Up 1 Remove your GC89 card from its protective cover 2 Insert your SIM card ...

Page 12: ...r CD drive 2 The Wireless Manager is installed in the same language as your Windows installation or English if your Windows language is not available See Supported Languages on page 96 for more details 3 The InstallShield Wizard for Sony Ericsson Wireless Manager opens follow the instructions on screen Installation will appear to pause around 65 whilst drivers are installed do not cancel When inst...

Page 13: ...r attempts to start before all of the drivers are installed The reason this occurs is the New Hardware Wizard is still busy installing the 3 device drivers The Wireless Manager splash screen appears followed by a warning dialog saying You must have a Sony Ericsson GC89 EGPRS Modem installed to run this application Please install a Sony Ericsson GC89 EGPRS Modem and try again If this occurs 1 Click...

Page 14: ...N displayed for some operators it is deliberately blank If you selected Other enter the APN for your operator Contact your Network Operator if necessary to find out the correct APN 6 To modify the selected APN s settings Click Advanced See Appendix A Connection Parameters on page 103 for descriptions of the updateable parameters in the Advanced dialog The Secondary APN information is only used in ...

Page 15: ... preferred CSD network connection speed from the drop down list and the method you want to use to connect to the network on the Speed tab of the Advanced dialog Click Next Note If you are unsure which speed to choose from the Speed tab start with Analogue 9600 and check to see if it works Once your connection works on Analog you can try the V110 V120 settings V110 V120 connects faster than analog ...

Page 16: ...Delete a Connection 1 Select Delete a Connection The Select a Connection drop down menu is activated Click on the menu and select the connection you want to delete 2 Click Next The Success dialog is displayed Click Finish to close the Connection Wizard Using your Connection To Connect 1 Open Wireless Manager 2 If requested enter your SIM Card PIN and click OK The Status screen is displayed 3 Selec...

Page 17: ...n opening a connection 2 Start your Internet browser You are online and can browse the Internet Send and Receive emails You will need an email program installed on your PC in order to send and receive emails You can send and receive emails using a CSD or GPRS EDGE connection 1 Open your preferred connection from the Status screen See Connection on page 52 for details on opening a connection 2 Star...

Page 18: ...ity on page 23 for more details Configuring Your Network Using Windows Zero Configuration Service In countries other than the United States and Japan you must set the Location property to the country in which you are using your Sony Ericsson 802 11 Wireless LAN Adapter This ensures compliance with local regulatory restrictions on transmit power and optimizes network performance Configuring Your Lo...

Page 19: ...scribed below to configure your wireless network To manually configure your network connection 1 Click Start Control Panel 2 If you are not in Classic View click Switch to Classic View in the upper left corner of Control Panel 3 Double click Network Connections 4 Right click Wireless Network Connection Properties 5 In Wireless Network Connection Properties click the Wireless Networks tab 6 Verify ...

Page 20: ...s To connect to or disconnect from wireless networks in range 1 Right click in the taskbar at the lower right corner of your screen and then click View Available Wireless Networks 2 To connect to one of the listed networks select the network and click Connect if you are already connected to one of the listed networks and you want to disconnect select the network and click Disconnect Network securi...

Page 21: ...must ensure that the security settings chosen for the wireless connection exactly match those on the access point Setting Your Wireless Network Connection To Have No Security 1 Under Preferred networks click the name of your wireless network 2 Click Properties 3 Click Open from the Network Authentication list 4 Click Disabled in the Data encryption list 5 Click OK 6 Click OK The configuration of y...

Page 22: ... key is provided for me automatically check box should be cleared 5 Type the WEP network key in the Network key field Your network key must exactly match the network key of the access point Your network key is either 5 or 13 ASCII text characters or 10 or 26 hexadecimal 0 9 A F characters 6 Type the key again in the Confirm network key field 7 Click the Authentication tab and clear the Enable IEEE...

Page 23: ...o the country in which you are using your Sony Ericsson 802 11 Wireless LAN Adapter This ensures compliance with local regulatory restrictions on transmit power and optimizes network performance Configuring Your Location 1 Click Start Settings Network and Dial up Connections Local Area Connection 2 Click Properties 3 On the General tab of Local Area Connection Properties click Configure 4 Click th...

Page 24: ...o your computer are shown under Available networks The name of your network is usually shown here 3 Verify that the Let this tool manage your wireless settings check box is selected If it is not select it and then click Apply Note If this checkbox is unavailable you cannot use the Sony Ericsson Wireless Utility to manage your wireless settings For this checkbox to be available you must log on to y...

Page 25: ...e networks click the network name and then click Configure If you do not see your network listed click Add 5 In Wireless Network Properties if the name of your network does not already appear in the Network name SSID box type the name of your network in the Network name SSID box 6 Click OK ...

Page 26: ...s network The WEP option provides a basic level of security to your wireless network Additional advanced security settings are also available which are typically used in corporate environments or for advanced users who require higher levels of security You must ensure that the security settings chosen for the wireless connection exactly match those on the access point Setting Your Wireless Network...

Page 27: ...4 Click WEP in the Data encryption list 5 Type the WEP network key in the Network key box Your network key must exactly match the network key of the access point Your network key is either 5 or 13 ASCII text characters or 10 or 26 hexadecimal 0 9 A F characters 6 Type this key again in the Confirm key box ...

Page 28: ...work card for instructions on installing the hardware and software Windows Millennium users must use the Sony Ericsson Wireless Utility to configure wireless network connections as described in this section In countries other than the United States and Japan you must set the Location property to the country in which you are using your Sony Ericsson 802 11 Wireless LAN Adapter This ensures complian...

Page 29: ...are shown under Available networks The name of your network is usually shown here 3 Verify that the Let this tool manage your wireless settings check box is selected If it is not select it and click Apply Note If this checkbox is unavailable you cannot use the Sony Ericsson Wireless Utility to manage your wireless settings For this checkbox to be available you must log on to your system as Adminis...

Page 30: ...click Configure If you do not see your network listed click Add 5 In Wireless Network Properties if the name of your network does not already appear in the Network name SSID box type the name of your network in the Network name SSID box 6 Click OK Your network name is displayed on the Wireless Networks tab under Preferred networks ...

Page 31: ...ire higher levels of security You must ensure that the security settings chosen for the wireless connection exactly match those on the access point Setting Your Wireless Network Connection To Have No Security 1 Under Preferred networks click the name of your wireless network 2 Click Properties 3 Click Open from the Network Authentication list 4 Click Disabled in the Data encryption list 5 Click OK...

Page 32: ...k key must exactly match the network key of the access point Your network key is either 5 or 13 ASCII text characters or 10 or 26 hexadecimal 0 9 A F characters 6 Type this key again in the Confirm key box 7 Click OK 8 Click OK 9 The configuration of your wireless network connection is now complete ...

Page 33: ...st set the Location property to the country in which you are using your Sony Ericsson 802 11 Wireless LAN Adapter This ensures compliance with local regulatory restrictions on transmit power and optimizes network performance Configuring Your Location 1 Click Start Settings Network and Dial up Connections Local Area Connection 2 Click Properties 3 On the General tab click Configure 4 Click the Adva...

Page 34: ...istrator If you are unable to log on as Administrator contact your network administrator for assistance Your network administrator can either grant Administrator rights or arrange to have your computer automatically import the appropriate preferred networks Alternatively if you are using Windows XP you can use Windows Zero Configuration Service to manage your wireless settings 4 If you see the nam...

Page 35: ...our wireless network The WEP option provides a basic level of security to your wireless network Additional advanced security settings are also available which are typically used in corporate environments or for advanced users who require higher levels of security You must ensure that the security settings chosen for the wireless connection exactly match those on the access point Setting Your Wirel...

Page 36: ...With WEP Security 1 Under Preferred networks click the name of your wireless network 2 Click Properties 3 Click Open from the Network Authentication list 4 Click WEP in the Data encryption list 5 Type the WEP network key in the Network key box Your network key must exactly match the network key of the access point Your network key is either 5 or 13 ASCII text characters or 10 or 26 hexadecimal 0 9...

Page 37: ...Create a Wireless LAN Connection 37 6 Type this key again in the Confirm key box 7 Click OK 8 Click OK The configuration of your wireless network connection is now complete ...

Page 38: ...time you start your computer When the system startup process is complete is displayed in the taskbar at the lower right corner of your screen The utility begins scanning across the wireless frequencies for wireless APs and other wireless clients The appearance of the utility icon varies depending on the strength of the signal being received from the wireless AP or wireless client if any with which...

Page 39: ...se created by other wireless signals in your home or office The signal strength is graphically indicated by in the taskbar located at the lower right corner of your screen The appearance of the icon indicates the strength or weakness of the signal To view the client IP address and the name speed signal strength and status of your wireless network connection move your mouse pointer over Note On Win...

Page 40: ...wireless network connection using the Sony Ericsson Wireless Utility see A grey icon indicates that there is no signal being received Probable causes The computer is trying to establish an initial connection but has not yet succeeded You may have moved out of range of the access point Suggested action Wait Move closer to the access point An icon with a red bar indicates that there is no radio conn...

Page 41: ...ed information signal strength and noise level about the access point signal detected by your Sony Ericsson 802 11 Wireless LAN Adapter The two character country code that represents the country for which the operating characteristics of your Sony Ericsson 802 11 Wireless LAN Adapter have been set is shown opposite Location If you are not in the United States or Japan and plan to use your computer...

Page 42: ...onitoring details and to start a log file double click the network name Note Use of Site Monitor may degrade performance of the IEEE 802 11 network while Site Monitor is in use Diagnostics You can run a number of diagnostic tests on your Sony Ericsson 802 11 Wireless LAN Adapter to verify its operational and functional status Note The network connection is lost when you run the diagnostics When th...

Page 43: ...Ericsson 802 11 Wireless LAN Adapter fails any of the diagnostics tests see Troubleshooting on page 79 Information Important information about your Sony Ericsson Wireless Utility and your Sony Ericsson 802 11 Wireless LAN Adapter are shown on the Information tab ...

Page 44: ...ity 2 Click the Wireless Networks tab 3 Verify that the Let this tool manage your wireless settings check box is selected If it is not select it and then click Apply Note If this checkbox is unavailable you cannot use the Sony Ericsson Wireless Utility to manage your wireless settings For this checkbox to be available you must log on to your system as Administrator If you are unable to log on as A...

Page 45: ...ditional security options are available only on infrastructure networks The no security option provides no network security allowing anyone to access your wireless network The WEP option provides some level of security to your wireless network Configuring Your Ad Hoc Network with No Security 1 Under Preferred networks click the name of your wireless ad hoc network 2 Click Properties 3 Click Open i...

Page 46: ...nnect to the 1st laptop we set up C is specifying the drive on the laptop that you want to connect to Note To find a computers name open a Command Prompt on the PC you want to find the name of Type hostname and press return The computer name is returned Note You can also use a Command Prompt to make sure you can see the other PC Type ping IP address and press return The IP address belongs to the P...

Page 47: ...is connection and Enabled on demand dialing are selected If the host computer is connected to the internet using a cable or DSL modem double click Local Area Connection Properties Sharing and then ensure that the Enable Internet Connection Sharing for this connection option is selected Note For Windows 2000 you must enable local network sharing and select the Local Area Connection relating to the ...

Page 48: ...net connection and the private network connection or add the public Internet connection to an existing network bridge if you do not have ICF or Internet Connection Sharing ICS enabled To do so will create an unprotected link between your network and the Internet and your network will be vulnerable to intrusions If you remove adapters from the network bridge and less than two adapters remain Networ...

Page 49: ...e office or select Obtain IP address automatically for use outside Under Windows XP this situation can be automated 1 Go to Control Panel Network Connections Wireless Network Connection General Internet Protocol TCP IP Properties 2 In the General tab select Obtain an IP address automatically 3 In the Alternate Configuration tab select User configured and enter static IP address and any other netwo...

Page 50: ...by selecting the Information tab in the Sony Ericsson Wireless Configuration Utility Your MAC number is listed on this screen Concurrent WLAN and GPRS The GC89 supports concurrent connections to GPRS and WLAN however this ability may have been disabled for security reasons Switching between GPRS and WLAN connection is not automatic even if both are available or the WLAN connection is established a...

Page 51: ...of the screen is divided into two GSM Connection Status The left side of the screen shows information about your GSM connection including icons representing Receive signal strength GPRS EDGE service status See GSM GPRS Icons on page 54 for more information Unread SMS Text Message status or SIM Full indication See Wireless Manager SMS Messages Screen on page 70 for more details Connection status Th...

Page 52: ...nnection Connect Cancel connection attempt Cancel Disconnect Hang up an existing session To create a connection see Create a EDGE GPRS or CSD Connection on page 14 Note You can also launch or terminate a CSD dialup networking session directly from the Windows Network Connections icon Wireless LAN Connection Status The right side of the Status screen shows information about your wireless LAN connec...

Page 53: ...irm it To set the SIM Card PIN and Phone Lock code see Locks on page 64 3 The Wireless Manager opens displaying the Status screen Connectivity details are displayed on this screen The current signal strength and EDGE GPRS availability are shown See Wireless Manager Status Screen on page 25 for more details 4 The Wireless Manager Icon is displayed in the system tray of your PC Note There must be a ...

Page 54: ... is not available If the Connect button is available your mobile operator has configured the Wireless Manager to search for GPRS EDGE when you connect If the connection is successful GPRS EDGE is available and GPRS EDGE availability is indicated as below when connected When you disconnect the signal meter returns to this state The GC89 has GSM and GPRS service GPRS CSD SMS and fax may be used prov...

Page 55: ...mitter by selecting Turn GSM GPRS Radio On Off in the Wireless Manager File menu Active Windows dial up or wireless connection Hover your mouse over the icon or double click it to display information about the network connection e g number of bytes sent received Up to two of these icons may be displayed representing either Dial up or GSM GPRS EDGE and wireless LAN connections Disconnected Windows ...

Page 56: ...t to remain in the background See Safe Removal of the GC89 on page 57 for more details GC89 Wireless Control menu Right click on one of the following icons to see the GC89 Wireless Control menu options The GC89 Wireless Control menu options are described below Help This menu option provides information about the GC89 Wireless Control Utility Country Where provided This menu option allows you to se...

Page 57: ... the steps described below Right click the appropriate icon and select Open Network Connections Alternatively select Start Settings Network Connections A dialog opens displaying all the network and dial up connections available on your PC Right click the one you want to edit Click the Show icon in taskbar when connected box Click OK to close the dialog When you have an active connection use your m...

Page 58: ...tely when card inserted You should normally leave this checkbox turned off When enabled the Windows driver turns the radio transmitter on when the card is inserted and leaves it enabled even when the card is not in use You should check this option if your Windows logon requires you to log on using a dial up connection see Windows Log on Using GSM GPRS Dial up Connection on page 62 for more details...

Page 59: ...s Manager starts Specify the required radio state in Preferences Radio Power See Wireless Manager GSM GPRS EDGE Preferences on page 58 for more details Off Radio Off indicates that the GC89 will not register to the mobile network You may perform non communication related activities such as phone book maintenance but you must turn on the radio in order to make a connection or to send receive SMS As...

Page 60: ...en Wireless Manager is started Wireless Manager waits until GPRS is registered and then it establishes the specified GPRS connection Simply select the name of the connection to be established from the drop down list To automatically connect when you start or restart your PC see the example below If you need to connect at Windows log on see Windows Log on Using GSM GPRS Dial up Connection on page 6...

Page 61: ...s in the background You can start the program again from the Start menu double clicking the system tray icon or by re inserting the GC89 You can stop Wireless Manager running in the background by right clicking on the PC screen and selecting Exit If you attempt to start Wireless Manager with no GC89 inserted a warning dialog is displayed informing you that the GC89 is not present and Wireless Mana...

Page 62: ...l up connections available to the Windows Logon must have been created by a user account with Administrator privilege and designated For all users This must be done using the Windows Network Connection Wizard because the Wireless Manager can only create connections for the current user ID Normally the Windows Logon using dial up connection will be using a CSD session to a corporate network so that...

Page 63: ... Configuration Utility Note Your GC89 has to be inserted into your computer to make changes to the settings 1 Click or select View Telephony Settings The window is divided into two areas the navigation area on the left and the information area on the right When you have selected a setting in the navigation area Wireless Manager retrieves the current setting information from the GC89 and displays t...

Page 64: ...horized use if it is stolen and used with another SIM card Phone Lock is not activated when you buy the GC89 You can use this screen to change a default phone lock security code 0000 to any four to eight digit personalized code You can set the Phone Lock Status to one of the following states On A brief message Phone lock is displayed each time you turn on the computer The Enter phone lock code dia...

Page 65: ...gain 3 Click OK Note The SIM card lock only protects your subscription and not your GC89 from unauthorized use If you change your SIM card the GC89 will still work with a new SIM card 4 Click Apply when you have finished to transfer the changes to your GC89 This may take a few seconds Networks Current Network You can select which network you want to use by going to Networks and then choosing Curre...

Page 66: ...is not available the GC89 will check the available networks against the preferred network list and select the one placed highest Automatic network selection must be enabled If you want to add a new network 1 Click Add A new dialog with all the networks known to the GC89 appears on the screen 2 Select the network that you want to add and click OK 3 Click Apply to transfer the setting to your GC89 S...

Page 67: ...s You can select from four different diversion options Always this forwards all incoming calls to the phone number that you have entered in the text box When busy No reply Not reachable for example when your phone is turned off 3 If you know which phone number to forward your calls to type the number in the text box next to the forward option you have chosen Or Click to choose a phone number from ...

Page 68: ...ttings to your GC89 This may take a few seconds Your data forward setting has now been stored in the network Restrict Calls Restricting a certain type of call means that this type of call cannot be made to or from your GC89 You can restrict different types of outgoing and incoming calls The following restrictions can be set all outgoing calls all outgoing international calls all outgoing internati...

Page 69: ...he connection method that is to be used for sending SMSs You can specify a specific connection method or register a preference Wireless 802 11 To configure monitor and control your GC89 wireless connections click Telephony Setting 802 11 Launch the Wireless Control Panel button The Wireless Configuration Utility is displayed See Create a Wireless LAN Connection on page 18 for details ...

Page 70: ...of received messages sorted by date and the bottom half of the screen displays the content of a selected message This is referred to as the Information View The folders and their names are static therefore you cannot change them Click to display the contents of the SIM Inbox When Wireless Manager is opened any new SMS in the SIM Inbox are uploaded to the PC automatically A status flag indicates wh...

Page 71: ...k 4 Type your message into the Message field 5 If required you can click the Calculate SMS blocks to see how many SMSs your message will be split into You can check the Request Status Report to get confirmation when the SMS arrives at its destination if this service is supported by your network 6 Click Send to send the SMS or Cancel to close the dialog without sending the SMS To Edit a Message Whe...

Page 72: ...essages menu a dialogue box opens 4 Enter the phone number in the To field or click Lookup to select a number from a phone book To send an SMS to multiple numbers hold down Ctrl when selecting the numbers from the phone book 5 If required you can click the Calculate SMS blocks to see how many SMSs your message will be split into You can check the Request Status Report to get confirmation when the ...

Page 73: ...st select the message The contents of the message are displayed in the information view 3 Click Copy to from the Messages menu A progress dialog is displayed informing you that the SIM card is being updated 4 The selected message is copied Note To copy all messages click Select All from the Edit menu before you select Copy to SIM Inbox is Full When the Wireless Manager detects that the SIM SMS sto...

Page 74: ... manage your SIM Phone Book entries You can add new numbers edit existing numbers export and import entries 1 Click to display the Phone Book screen 2 Icons appear in the left pane representing the SIM Phone Book and Saved Phone Book You can manage your Phone Book entries by copying entries to the SIM Phone Book or the Saved Phone Book 3 Click on the icon to display the Phone Book entries in the r...

Page 75: ...ck OK to save the entry or Cancel to close the dialog If the modified entry is in the SIM Phone Book the changes are automatically sent to the SIM To Find Entries 1 Select Find in the Phone Book menu or key Ctrl and F 2 The Find dialog opens Enter the text or number you want to search for in the Look for field The entry can be complete or incomplete 3 Click Find The Wireless Manager searches both ...

Page 76: ...e Book radio button 3 Click and browse to find the file you want to import Note The file must be a text file in comma separated value CSV format Any invalid lines or files will be ignored Microsoft Excel can be used to edit this file 4 Click OK in the browse dialog The path and file name are displayed in the Import File Name field 5 Click Import to complete the import procedure To Export an Entry ...

Page 77: ... complete the procedure Delete a number 1 Select the number that you want to delete 2 Select Delete from the Edit menu 3 A confirmation dialog opens Click Yes to delete the number Note If you want to delete all numbers select Select All from the Edit menu before clicking Delete To Send a New SMS Message 1 Select an entry from a Phone Book 2 Select Create New Message from the Messages menu 3 A new ...

Page 78: ...are 1 Click to display the Online services screen You can also display the Online Services screen from the View menu The screen displays a menu of the online services offered by your network operator Click on the category you require and click Select More detailed choices are sometimes displayed If necessary select the required option and click Select The response may take various forms depending ...

Page 79: ...ator 03 05 01 14 17 57 Radio State 1 03 05 01 14 17 57 GSM Registration Searching 03 05 01 14 17 57 GPRS Registration Searching 03 05 01 14 17 57 Network Operator 03 05 01 14 18 06 GSM Registration Home Network 03 05 01 14 18 06 GPRS Registration Home Network 03 05 01 14 18 06 Network Operator MyOperator 03 05 01 14 18 21 User Connect operatorinternet apn 03 05 01 14 18 21 Connection Port successf...

Page 80: ...roaming on a network for which no GPRS EDGE roaming agreement exists or there is a temporary fault on the network Contact your network operator for more details appears in the task bar GC89 isn t present please insert appears in the task bar Indicates that the wireless LAN radio is turned off Right click the icon and select Enable Radio appears in the task bar Indicates that the GC89 cannot find a...

Page 81: ...ne lock on page 64 PIN blocked PIN2 blocked You have entered your PIN or PIN2 incorrectly three times in succession To unblock see SIM lock on page 65 PUK blocked contact operator You have entered your personal unblocking key code PUK incorrectly 10 times in succession Contact your network operator or service provider Cable Disconnected A number of possible causes You have moved out of range of th...

Page 82: ...e wireless network properties settings are correct see Create a Wireless LAN Connection on page 18 Also make sure that your computer is receiving a good signal from the access point see Viewing the Status of Your Wireless Connection on page 39 Network performance is really slow when the system is docked to a docking station that has an active Ethernet port This condition occurs if you dock your sy...

Page 83: ...er you use the GC89 Error 630 The port was disconnected due to hardware failure during dial up A Dial up networking connection is already connected Close the connected dial up and try again Error 645 Internal authentication error during dial up Incorrect APN or CID selected for network Modify your Dial up Connection see Create a Connection on page 21 for more details Make sure that the APN file co...

Page 84: ...s lost whilst dialing If you are experiencing problems contact your network operator and check the APN Error 678 Computer you are dialing is not responding during dial up Either Service is not supported by SIM usually for CSD or the computer is not answering Check SIM settings with your service provider if necessary Make sure that the server you are dialing is OK If you are unsure which speed to c...

Page 85: ...ause the remote server did not respond within an appropriate time This can be caused by poor line quality or a problem with the server ISP This error can occur when your modem has connected to the ISP and has sent a username and password but there is no response from the server Wait a few minutes and try again Connection Failed Not authorised to access network Please contact your Service Provider ...

Page 86: ...wing you to access their network Contact your service provider and check that you have the subscriptions required activated for your SIM Connection Failed Network Problem Please try again If the problem continues please contact your Service Provider You could not connect to the network Wait a few minutes and try again If the problem persists contact your service provider ...

Page 87: ...int your product Do not use your product near medical equipment without requesting permission Do not use your product when in or around aircraft or areas posted turn off two way radio Do not use your product in an area where a potentially explosive atmosphere exists Do not place your product or install wireless equipment in the area above your car s air bag Do not attempt to disassemble your produ...

Page 88: ...t radio frequency exposure guidelines Before a PC Card is available for sale to the public it must be tested and certified to the FCC that it does not exceed the limit established by the government adopted requirement for safe exposure The tests are performed in positions and locations as required by the FCC for each model For body worn operation this PC Card has been tested and meets FCC RF expos...

Page 89: ...e their use for essential communications e g medical emergencies is not possible Inserting and removing the SIM card precautions against electrostatic discharge ESD Do not touch the SIM card connectors As a precaution always make sure that the GC89 is already in your hand before you insert or remove the SIM card ...

Page 90: ...rd SIM Lock supported Regular non GPRS aware and GPRS aware SIMs supported Standard GPRS aware and USIM 2G functionality 1 8v 3v Type Number FAF 1051011 BV Size 32 bit PCMCIA PC Card Type II Card part 85 6 mm x 54 0 mm x 5 0 mm Extension part 15 4 mm x 55 0 mm x 10 5 mm Weight 44g including antenna excluding SIM card Battery Powered via the PC card slot i e uses laptop battery Antenna 50 ohm inter...

Page 91: ...k space Supported Voltages 3 3V 10 Nominal Operating Voltage 3 3V Average Standby Current Power Inserted not active 30mW Average Idle Current Power GSM attached WLAN disabled 150mW Data Transfer Current Power Worst case GSM xfer and WLAN active 2 8W Dimension GSM 850 GSM 900 E GSM 900 GSM 1800 GSM 1900 Frequency Range TX 824 849 MHz RX 869 894 MHz TX 880 914 MHz RX 925 959 MHz TX 1710 1785 MHz RX ...

Page 92: ...r EGPRS MCS 5 9 8 PSK Class 1 1W for GSM GPRS and EGPRS MCS 1 4 GMSK Class E2 0 4W for EGPRS MCS 5 9 8 PSK Class 1 1W for GSM GPRS and EGPRS MCS 1 4 GMSK Class E2 0 4W for EGPRS MCS 5 9 8 PSK Transmitter Output Impedance 50Ω 50Ω 50Ω 50Ω Transmitter Spurious Emission According to GSM specification According to GSM specification According to GSM specification According to GSM specification ...

Page 93: ...upport required for compression Error Correction End to End MNP2 and LAPM V 42 RLP Requires GSM Network support GSM ISDN According to V 110 and V 120 GPRS Specification SMG SMG31bis Data Rates Multislot class 10 supported see table below Coding schemes CS 1 CS 2 CS 3 and CS 4 Mode of Operation Class B attaches to both GSM and GPRS at the same time data connection is established using CS CSD or GPR...

Page 94: ... and MT 1 Number of PDP Context with traffic in parallel 1 PDP Context modification e g QoS renegotiation Network initiated PDP Context modification Network initiated PDP Context deactivation Collision of MS and Network initiated PDP Context activation SIM Support for GPRS aware as well as non GPRS aware SIMs Compression TCP IP Header Compression V42bis GPRS Encryption GEA1 GEA2 GPRS Frequency Hop...

Page 95: ... 66 40 16 60 49 80 33 20 MCS 4 19 40 77 60 19 40 58 20 38 80 MCS 5 24 05 96 20 24 05 72 15 48 10 MCS 6 31 25 125 00 31 25 93 75 62 50 MCS 7 47 45 189 80 47 45 142 35 94 90 MCS 8 57 05 228 20 57 05 171 15 114 10 MCS 9 61 85 247 40 61 85 185 55 123 70 Concatenated SMS Yes SMS Cell Broadcast Supported in Wireless Manager and by AT Commands excluding Cell ID SMS Immediate Display Supported in Wireless...

Page 96: ...e User s Guide PDF English EN Danish DA Dutch NL Finnish FL French FR German DE Greek EL Hungarian HU Italian IT Norwegian NO Polish PL Brazilian Portuguese PB Portuguese PT Russian RU Spanish ES Swedish SV Thai TH Turkish TR Chinese Simplified ZS Chinese Traditional ZT AT Commands Manual English ...

Page 97: ...luded on a label on any backup copy You may not according to the EC Council Directive of May 14 1991 on the legal protection of computer programs 91 250 EEG the Software Directive distribute any copy of this Software or its documentation to others nor modify rent lease or grant any rights to this Software whatsoever to another person or entity In addition you may not translate reverse engineer dec...

Page 98: ...e original purchaser by an for this Product Sony Ericsson authorised dealer specifying the date of purchase and serial number is presented with the Product to be repaired or replaced Sony Ericsson reserves the right to refuse warranty service if this information has been removed or changed after the original purchase of the Product from the dealer 2 If Sony Ericsson repairs or replaces the Product...

Page 99: ... force nor the consumer s rights against the dealer arising from their sales purchase contract European Union EU If you have purchased your Product in an EU country you can have your Product serviced under the conditions set out above within the warranty period in any EU country where an identical Product is sold by an authorised Sony Ericsson distributor To find out if your Product is sold in the...

Page 100: ...sonal injury death damage to tangibles or the environment Limitation of liability In no event shall Vendor or its suppliers be liable for any indirect or consequential losses or damages whatsoever irrespective of the cause for such losses or damages including loss of data loss of business profits or revenue or any business interruption arising out of the use of or inability to use this Software Ve...

Page 101: ...ation relates is in conformity with the appropriate standards 3GPP TS 51 010 1 EN 301489 7 EN 300328 EN 301489 17 and EN 60950 following the provisions of Radio Equipment and Telecommunication Terminal Equipment directive 99 5 EC with requirements covering EMC directive 89 336 EEC and Low Voltage directive 73 23 EEC Research Triangle Park NC April 2005 Place and date of issue Anders Franzén Corpor...

Page 102: ...This certificate represents the capabilities and features that have passed the interoperability testing governed by the Wi Fi Alliance Detailed descriptions of these features can be found at www wi fi org certificate Certification Date January 18 2005 Category External Card Company Sony Ericsson Product Sony Ericsson GC89 EDGE Wireless LAN PC Card FAF 1051011 BV This product has passed Wi Fi certi...

Page 103: ...he field blank IP assignment Server Static An address that the service provider knows you by and uses to route information to and from your GC89 Your IP address will either be Server assigned by the service provider when you connect Static assigned once by the service provider or the IT Manager If your IP address is Static you must enter it into IP address fields which is available when you select...

Page 104: ...ptor in the list right click on it and select Properties Click Configure on the Advanced tab If directed by your network operator you may change the settings by selecting TCPWindowSize or MTU and changing the value Changes to these settings require the network adaptor to be restarted It is recommended that the laptop is rebooted Required Useful information Preferred Connection Speed bits s Select ...

Page 105: ... specific to the network adaptor over which the broadband connection is made It is preferable that all TCPWindowSize settings are specific to the network adaptor involved since this ensures that each individual connection is correctly optimised In some cases it is necessary to set TCPWindowSize globally Further information and a utility to do this is available at www SonyEricsson com support ...

Page 106: ...106 Appendix A Connection Parameters ...

Page 107: ...ting to a wireless network you should verify that the Locale value is correct If you travel to different countries with your GC89 you should change the Locale value to suit If the destination country is not listed change the Locale value to Worldwide Reset the Locale value after returning Residents of both Canada and the United States should use the value USA For details of an easier way of changi...

Page 108: ...d computer into the IEEE 802 11 Power Save mode In Power Save mode the radio is periodically powered down to conserve power When in Power Save mode packets are stored in the AP until the PC comes on RTS Threshold If the number of frames in the data packet is at or above the RTS Threshold a request to send clear to send handshake is turned on before sending the data packet The default value is 2347...

Page 109: ...rs to transmit and receive just outside GSM s core 900 frequency band This extension gives increased network capability ETSI European Telecommunications Standards Institute www etsi org GGSN Gateway GPRS Support Node GPRS General Packet Radio Services GSM Global System for Mobile Communications GSM is the world s most widely used digital mobile phone system now operating in over 160 countries arou...

Page 110: ...RADIUS Remote Access Dial In Service Facility at the ISP or corporation to manage remote data connections RX Receive SC Service Centre for SMS Service Provider A company that provides services and subscriptions to GC89 users SIM card Subscriber Identity Module card a card that must be inserted in any GSM based mobile terminal It contains subscriber details security information and memory for a per...

Page 111: ...om PCMCIA URL Uniform Resource Locator USSD Unstructured Supplementary Services Data Narrow band GSM data service For example entering 79 1234 might return the stock price for stock 1234 V 110 ETSI standard for data over an ISDN circuit V 120 ETSI standard for data over an ISDN circuit VPN Virtual Private Network WWW World Wide Web XML Extensible Markup Language ...

Page 112: ... 76 Installation 11 Internet Connection Sharing ICS 47 Internet services 10 L Locks 64 N Network and Subscription 9 Circuit Switched Data CSD 9 General Packet Radio Service GPRS 9 Short Message Service SMS 9 O Operating System Support 91 P Phone Numbers 63 S Sending a New SMS Message 77 Sending an SMS 71 Short Message Service SMS 9 SMS Technical Data 95 Software installation 12 Software Overview 7...

Page 113: ...Index 113 Wireless Manager Status screen 51 Working with Phonebooks 75 ...

Reviews: