background image

5-2

Shut Down and Open Computer

1. 

Shut down your Power Macintosh. If the
computer has been on for any length of time,
wait a few minutes for it to cool before
beginning the installation.

2. 

Disconnect the power and peripheral cables
from the back of the computer and move it to
an area where you can freely work.

3. 

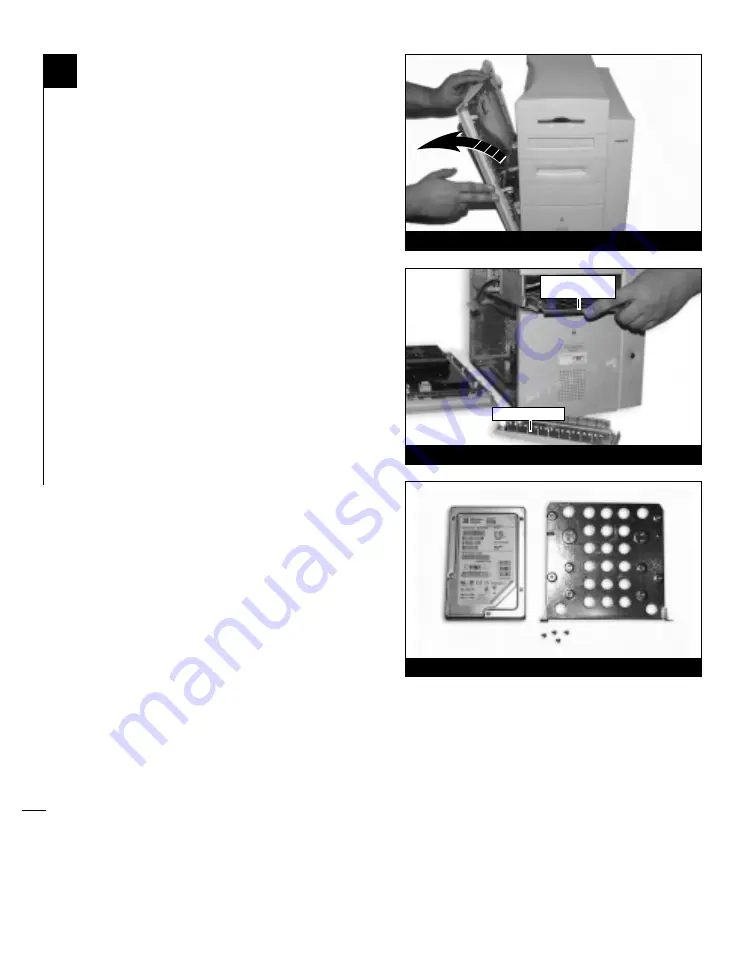
With the front of the computer facing you,
open your Power Macintosh by removing the
side panel. Depress the green button and lower
the panel away from the computer’s case

(Figure 1)

.

4. 

Determine the expansion bay where you will
install the hard drive and remove the front
bevel piece. In 

Figure 2

, the lower drive

expansion bevel has been removed.

5. 

Slide the hard drive mounting bracket forward
and out of the expansion bay 

(Figure 2)

.

You may need to pull firmly on the bracket.

6. 

Orient the hard drive, mounting bracket, and
mounting bracket screws in front of you

(Figure 3)

. Configure the hard drive for your

computer set-up. If necessary, use a small
flatblade screwdriver or a needle nose plier to
adjust the jumper pins. For further information
on jumper pin settings, see Chapter 2,
“Configuring Your Hard Drive.”

7. 

Mount the hard drive to the drive mounting
bracket with the screws provided with the
bracket or hard drive. You may require a Philips
screwdriver to perform the installation.

Figure 1

Figure 2

Figure 3

drive mounting

bracket

drive bay bevel

Summary of Contents for Tempo Ultra ATA66

Page 1: ......

Page 2: ...st logotype and Tempo are trademarks of Sonnet Technologies Inc Macintosh Mac and the Mac logo are trademarks of Apple Computer Inc registered in the U S and other countries Other product names are trademarks of their respective owners Product specifications are subject to change without notice This manual may not be copied in whole or in part without the written consent of Sonnet Technologies Inc...

Page 3: ...ing Your Hard Drive 2 1 Mounting Brackets 2 3 Jumper Block 2 3 Jumper Pin Settings 2 5 3 Hard Drive Initializing 3 1 Apple Drive Setup 3 3 Detailed Installation Instructions for Power Macintosh Models 4 Power Macintosh Desktop 4 1 Installation 5 Power Macintosh Tower 5 1 Installation 6 Power Macintosh G3 Blue 6 1 White or G4 Graphite Installation 7 Troubleshooting Guide 7 1 8 Warranty 8 1 9 Contac...

Page 4: ......

Page 5: ...rt Note Like most technologies IDE devices have their own vocabulary The following terms may be helpful as you read this manual IDE Integrated Drive Electronics A standard electronic interface between a PCI based system s memory and disk storage devices EIDE an enhanced version of IDE is commonly used in PCI computers ATA Advanced Technology Attachment The official name used by the ANSI American N...

Page 6: ...es Mactell XB Pro Power Computing PowerBase Desktop and Tower PowerCenter PowerCenter Pro PowerCurve PowerTower PowerTower Pro PowerWave StarMax 3000 4000 5000 5500 UMAX C500 C600 C600X J700 S900 The Tempo Ultra ATA66 Compatibility Chart Figure 1 identifies the number of PCI slots and expansion bays available in Tempo compatible computers Depending on your system config uration there may already b...

Page 7: ...t http www sonnettech com Take Precautionary Measures We recommend that you make a backup of impor tant information on your system s current hard drive s prior to installing new hardware or software When handling computer products you must take care to prevent the components from being damaged by static electricity Always ground yourself by working in an area free of static electricity and avoid c...

Page 8: ...he location and installation of the Tempo Ultra ATA66 into a PCI slot your computer s logic board and location of PCI slots may differ from what is pictured Figures 2 4 illustrate the location of drive expan sion bays in popular desktop and tower based Power Macintosh computers Tempo Ultra ATA66 Macintosh PCI Host Adapter PCI Slot Tempo supports a wide range of PCI based Macs Your PCI slot may var...

Page 9: ... Cable Uses a 40 pin 40 conductor cable to connect IDE drives to the 40 pin IDE connectors of PCI based computers A standard ATA cable supports ATA 33 but does not support Ultra ATA 66 technology CS Cable Select ATA Cable Not commonly used the CS ATA cable is required when each drive on the cable has an identical CS jumper setting A CS ATA cable is not supported with the Tempo Ultra ATA66 ix Suppo...

Page 10: ...to the intermediate connector on the cable Figures 6 7 illustrate the possible drive connection configurations available with the Tempo Ultra ATA66 with one Ultra ATA66 cable Tempo Ultra ATA66 Macintosh PCI Host Adapter Drive 0 Master or Single Ultra ATA66 Cable included Figure 6 Tempo Ultra ATA66 Macintosh PCI Host Adapter Drive 1 Slave Drive 0 Master Ultra ATA66 Cable included Figure 7 Support N...

Page 11: ...mpo Ultra ATA66 Macintosh PCI Host Adapter Ultra ATA66 Cable optional Drive 1 Slave Drive 0 Master Drive 3 Slave Drive 2 Master Ultra ATA66 Cable included Figure 9 Tempo Ultra ATA66 Macintosh PCI Host Adapter Ultra ATA66 Cable optional Drive 0 Single or Master Drive 1 Single or Master Ultra ATA66 Cable included Figure 10 Tempo Ultra ATA66 Macintosh PCI Host Adapter Ultra ATA66 Cable optional Drive...

Page 12: ......

Page 13: ...nual For the installation you may require the following items Medium Philips screwdriver Small flatblade screwdriver Needle nose pliers Drive mounting brackets if your computer does not already have them sold separately An additional Ultra ATA66 cable sold separately if 3 or 4 drives are being installed or 2 drives are being installed as a master master configuration 1 1 Chapter 1 Support Note For...

Page 14: ...urrent hard drive s prior to installing new hardware or software When handling computer products you must take care to prevent components from being damaged by static electricity Always ground yourself by work ing in an area free of static electricity and avoid carpeted areas Handle the Tempo only by its edges and avoid touching connector traces and component pins on PCI cards hard drives and othe...

Page 15: ...t the hard drive to a drive mounting bracket carrier Figure 1 or a drive sled Figure 2 You may require a medium Philips screwdriver to perform the installation If necessary refer to your computer s user guide for specific information on the installation of internal storage devices 8 Install the hard drive into an expansion bay 9 Attach a power cable connector to the hard drive there should be an a...

Page 16: ...ter 16 Initialize the newly installed hard drive with Apple s Drive Setup utility It is installed as part of the Mac OS installation process and is usually found in the Utilities folder on the hard drive of your active System Folder See Chapter 3 Hard Drive Initializing for further information Expansion Card Cover Ultra ATA66 Cable When closing the expansion card cover avoid crimping the Ultra ATA...

Page 17: ... configuring a hard drive In addition you may need to refer to your hard drive s user guide 2 1 Chapter 2 Support Note When an existing drive one with data on it already is connected to the Tempo Ultra ATA66 you must initialize the drive for your system to recognize it Since all data will be erased make a backup if necessary prior to connecting the drive to the Tempo ...

Page 18: ...nufacturer of the drive Refer to your drive s user guide or the jumper setting information printed on your drive Support Note When configuring your drive s jumper pins verify the orientation of the drive with respect to the illustration llustra tions may vary Master Jumper selection for the primary drive of two drives installed on the same ATA cable Master Single Jumper selection for the primary d...

Page 19: ...ave Drive If a secondary drive is installed onto the intermediate connector of an Ultra ATA66 cable it is considered a slave drive and must be properly configured by adjusting the jumper pins of the drive s jumper block 2 3 Support Note Make sure to properly configure the jumper pins of the hard drive s for your system set up or your computer may not boot 40 pin IDE Connector 8 pin Jumper Connecto...

Page 20: ......

Page 21: ... hard drive it will need to be initialized with drive formatting software The Mac OS includes Drive Setup a drive formatting utility which will be ade quate for initializing your hard drive Alternatively you can use third party drive formatting software 3 1 Chapter 3 ...

Page 22: ...up utility icon to run the utility 2 Select the drive you wish to format from the Drive Setup window Figure 1 A new uninitialized hard drive will show up as not initialized 3 From Functions in the menu bar select Initialization Options Figure 2 4 The Initialization Options window will appear Figure 3 Select Low Level Format and click OK to begin formatting the drive Support Note An IDE hard drive ...

Page 23: ...tes separate volumes disks that mount to the desktop For example you could partition the drive into two volumes one for applications and one for documents Partitioning also reinitializes erases the drive so it is best to do it prior to saving applications and files to it For further information on partitioning refer to Drive Setup Help from Help in the menu bar 3 3 ...

Page 24: ......

Page 25: ...e screwdriver Needle nose pliers 4 1 Chapter 4 Support Note We recommend you make a backup of important information on your system s current hard drive s prior to installing new hardware or software When handling computer products you must take care to prevent components from being damaged by static electricity Always ground yourself by working in an area free of static electricity and avoid carpe...

Page 26: ...tricity and rotate the expansion card cover up and to the left Figure 2 5 Determine the expansion bay where you will install the hard drive For the purposes of these instructions the hard drive will be installed into the lower expansion bay Figure 3 6 Orient the hard drive mounting bracket and mounting bracket screws in front of you Figure 4 Configure the hard drive for your computer set up If nec...

Page 27: ...ectors see page ix for further information Slide the drive into the drive bay 10 The current internal hard drive s power cable should have an additional drive power connector Figure 7 Attach the power connector to the newly installed hard drive Install Tempo Ultra ATA66 1 Select an available PCI slot to install the Tempo and remove its access port cover Figure 8 2 Remove the Tempo from the anti st...

Page 28: ... Ultra ATA66 cable inside the computer as to avoid crimping it by the expansion card cover see page 1 4 Figure 3 for illustration Rotate the expansion card cover into place over the PCI slots Figure 11 2 Replace the case cover onto your computer Figure 12 3 Return the computer to your computing area and reconnect the power and peripheral cables to the computer Turn On Computer 1 Turn on your Power...

Page 29: ...ewdriver Needle nose pliers 5 1 Chapter 5 Support Note We recommend you make a backup of important information on your system s current hard drive s prior to installing new hardware or software When handling computer products you must take care to prevent components from being damaged by static electricity Always ground yourself by working in an area free of static electricity and avoid carpeted a...

Page 30: ...ont bevel piece In Figure 2 the lower drive expansion bevel has been removed 5 Slide the hard drive mounting bracket forward and out of the expansion bay Figure 2 You may need to pull firmly on the bracket 6 Orient the hard drive mounting bracket and mounting bracket screws in front of you Figure 3 Configure the hard drive for your computer set up If necessary use a small flatblade screwdriver or ...

Page 31: ... connectors see page ix for further information 4 Align the Tempo over the PCI slot Figure 6 Gently press down until it is firmly seated in the PCI slot taking care not to wiggle the board as you install it into the slot 5 The current internal hard drive s power cable should have an additional drive power connector Thread the power connector along with the Ultra ATA66 cable through the opening of ...

Page 32: ...ATA66 cable inside the computer as to avoid crimping it by the case cover and replace the side panel onto your Power Macintosh Figure 11 2 Return the computer to your computing area and reconnect the power and peripheral cables to the computer Turn On Computer 1 Turn on your Power Macintosh 2 For your computer to properly recognize a new hard drive you will need to initialize and format it Refer t...

Page 33: ...r Small flatblade screwdriver Needle nose pliers 6 1 Chapter 6 Support Note We recommend you make a backup of important information on your system s current hard drive s prior to installing new hardware or software When handling computer products you must take care to prevent components from being damaged by static electricity Always ground yourself by working in an area free of static electricity...

Page 34: ...where you can freely work 3 Locate the security lock at the back of the computer Figure 1 If it is not already pressed in do so now 4 With the right side of the case facing you open your Power Macintosh by lifting the release latch and lowering the side panel away from the computer s case Figure 2 5 Touch the power supply metal shielding Figure 3 to discharge any potential static electricity Figur...

Page 35: ...ier Detach and remove the carrier from the computer For Power Macintosh G3 Blue White models built before June 1999 There is a single drive sled that occupies the floor of the cabinet To mount a drive to the drive sled you will need to temporarily remove the drive sled from the computer First remove the drive sled attachment screw next to the internal hard drive Figure 5 Then discon nect the power...

Page 36: ... ATA66 cable connectors see page ix for further information Figure 8 illustrates a new drive with attached Ultra ATA66 cable mounted onto a drive sled 3 Reinstall the drive carrier or drive sled into the computer and attach a drive power connector to the new drive The internal hard drive s power cable should have an additional power connector If disconnected earlier reconnect the logic board power...

Page 37: ...igure 12 if you are unfamiliar with the Ultra ATA66 cable connectors see page ix for further information Close Computer 1 Carefully position the Ultra ATA66 cable inside the computer as to avoid crimping it by the case cover and replace the side panel onto your Power Macintosh Figure 13 2 Return the computer to your computing area and reconnect the power and peripheral cables to the computer Turn ...

Page 38: ......

Page 39: ...a ATA66 cable s may not be connected to the Tempo or hard drive s properly Refer to Getting Started and the sections entitled Identifying Ultra ATA66 Cable and Ultra ATA66 Cable Drive Configurations for complete information about connecting hard drives to the Tempo 3 The Ultra ATA66 cable may have been damaged when you installed it Follow the directions you used for opening your computer then exam...

Page 40: ......

Page 41: ... within 30 days of authorization and paying for associated shipping and insurance costs Sonnet will pay the cost to ship repaired or replaced product s back to you This warranty shall also apply to product s that replace defective product s but only for the original warranty period The warranty period shall not be extended by reason of defect or any period of time during which the product s are no...

Page 42: ......

Page 43: ...or helpful information When you call Sonnet Customer Service have the following information available so one of our representatives can better assist you Product name Serial number Date of purchase Place of purchase Computer type and model Operating system and version If further assistance is needed please contact us at Sonnet Customer Service Tel 1 1 949 587 3500 Monday Friday 8 am 5 pm Pacific T...

Reviews: