seTTing The delAy Time
By default the alarm’s delay time is set to 20
seconds, but you can change this to 0, 5, 10 or 15
seconds.
1. Press the PROG button 6 times. The word ENTRY will
appear flashing on the display.
2. You can enter the menu by pressing the ARM/DISARM button.
3. You can switch between the values corresponding to 0, 5, 10, 15
and 20 seconds by pressing the UP/DOWN buttons; when at the
desired value, press ARM/DISARM to select it.
4. Press the PROG button 2 times to leave this menu.
seTTing The dATe And Time
1. Enter the safety code and press PROG 7 times. The word TIME will appear flashing on
the display.
2. You can enter the menu by pressing the ARM/DISARM button.
3. The display will show the current date in the format year-month-day. You can change the
value which is displayed flashing with UP/DOWN, and progress to the next value with
ARM/DISARM.
4. Press the PROG button 1 time to leave this menu.
You can only change these settings when the alarm is not armed. If you do not press any
of the buttons for 10 seconds while changing a setting, the alarm will leave the menu and
revert to the default mode.
If you forgot your safety code, press and hold the PROG button for 2 seconds, and press
the PAUSE button after the beep. Now unplug the adaptor’s wire from the alarm and remove
the battery. If you leave the alarm without power for 3-5 minutes, its memory will be cleared.
After replacing the battery the alarm reverts to the default settings. (Safety code: 0-0-0, ...)
oTher funcTions
If you press UP when the alarm is in the default mode, you can check the stored telephone
numbers. Press UP repeatedly to step through all numbers.
You can check the time of the last 5 alarms by pressing DOWN. (1 - oldest alarm; 5 - most
recent alarm)
Arming The sysTem
Enter the safety code and press the ARM/DISARM button. The alarm can be armed from the
remote control by pressing the ARM/DISARM button for 2 seconds.
The unit will then emit three short beeps and display the word ARM, and after approximately
60 seconds a short beep will indicate that the alarm is armed.
If the device detects movement, the alarm will sound for 30 seconds, followed by a pause
of 30 seconds and another 30-second alarm. At the same time, the alarm will dial the stored
telephone numbers after each other, 1 to 5 times each, depending on the settings. The
telephone then transmits the sound of a siren.
If the siren is switched off (silent alarm) the siren does not sound during an alarm, but you
will hear the sound of a siren over the telephone.
disArming The AlArm
Enter the safety code and press the ARM/DISARM button. The alarm can be armed from the
remote control by pressing the DISARM button for 2 seconds. Following a short beep the
word ARM will disappear from the display.
enTry signAl funcTion
Set the CHIDE sliding switch to ON. After approximately 60 seconds the unit will emit a short
beep, indicating that it is ready. When the sensor detects movement, the unit will sound a
chime. You can switch off this function by setting the switch to OFF. (If the alarm is ARMed,
the entry signal function does not work.)
pAnic buTTon
This function can be activated by pressing the PANIC button on the alarm, or by pressing
and holding the PANIC button on the remote control for 2 seconds.
The device will sound a 30-second alarm; after a 30-second pause it will sound the alarm for
another 30 seconds, and dial the stored telephone number according to the settings.
The alarm can be stopped by entering the safety code and pressing ARM/DISARM, or by
pressing and holding DISARM for 2 seconds on the remote control.
Accessories
connecTing The opening sensors
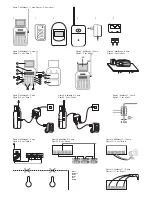
Place the opening sensor in the desired location. It is recommended to mount the sensors
as shown in the figure, at a maximum distance of 8 mm from each other.
It is possible to connect several magnetic opening sensors (e.g., HS 62) to the wireless unit
in a serial connection. The connection scheme is illustrated in the figure below.
The central unit will sound an alarm and dial the stored numbers after the delay period when
the opening detector signals.
connecTing The movemenT deTecTor
Fasten the movement detector’s wall mount to the desired location (it is recommended to
locate it 1.5 - 2 m above the floor for the best “view”), then attach the movement detector
to the wall mount.
If the movement detector signals, the central unit will sound an alarm and dial the stored
numbers after the delay period.
The movement detector is designed for indoor use.
opTionAl Accessories
The accessories in the HS70 set are registered with the central unit, you can thus start using
them instantly after opening the package.
The device is able to handle further accessories (up to a total of 8). Before starting to
use any additional accessories, you first need to synchronize them with the central unit as
described here.
The LEARN button is located at the back of the central unit, next to the connection sockets.
Press and hold this button for 2 seconds. The device then emits a beep. Place the accessory
(HS71, HS72 or HS74) within the unit’s range. For remote controls, press any button; for
opening sensors, remove the magnets; for movement detectors, perform some movement in
front of the detector. This triggers the accessory to send a signal. If the central unit receives
the signal, it emits 2 long beeps; if the action failes, it emits 4 short beeps.
Besides wireless accessories, you can also add wired ones to the set (e.g., opening sensor
(HS62), external siren (HS63), movement detector (HS64)).
You can connect these in the following way.
Wired accessories have to be connected to the terminal below the cover in the middle of
the device’s back panel as described here. You can lead the wires out of the case through
the hole on the right-hand side of the lid. (opening sensor 9. figure, external siren 10. figure,
movement detector 11. figure)
wArnings
• Do not expose the device to direct sunlight, and mount it in a location where it is shielded
from water.
• The device can only be used indoors in a dry environment.
• Metal surfaces and objects decrease the device’s range.
• Set a personal safety code which you can easily remember.
• Store telephone numbers that are always available and that enable you to call help
immediately upon an alarm.
• It is recommended to mount the siren in a protected location where it is shielded from
sunlight and rain, e.g. under the eaves.
• When mounting on the wall be careful not to damage the wires that might run inside the
wall.
• Always test the system before mounting and at regular intervals to check that it works
correctly.
• Cooling or heating equipment close to the movement detector might cause it to work
incorrectly.
• When locating the movement detector, make sure that no moving objects, pets etc. can
cause false alarms.
• Insert the batteries with the correct polarity.
• It is recommended to replace the batteries once every year.
• Clean with a soft, dry cloth; do not use aggressive detergents.
• Never disassemble the device; consult a technician if repair is needed.
• If the power cord is damaged, unplug the device immediately, and consult a technician.
Summary of Contents for Home HS 70
Page 2: ......

