INSTALLATION
1. Carefully remove the packing material before installation, taking care not to scratch the unit or the power
cable. Do not install the device in case of any damage.
2. The appliance should only be used in dry, indoor conditions.
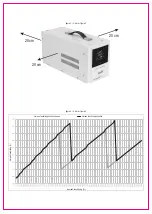
3. Free flow of warm air has to be ensured for the operation, so select the location of the device as shown in
Figure 2
.
4. Carefully remove the shrink tube from the battery terminals of the unit, taking care not to damage the cable
insulation.
5. Attach battery terminal corresponding to the battery, to the endings of the accumulator connector cables. If
necessary, seek the assistance of an expert.
6. Connect and fix the unit’s positive (red) connecting cable to the positive terminal of the battery.
7. Connect and attach the negative (black) connecting cable to the negative terminal of the battery.
8. Make sure that the switch (6) on the back of the machine is in off position. Connect the appliance to a
standard grounded wall socket.
9. Turn on the switch (6) on the backside of the machine.
10. Press and hold the on/off button (2) on the front of the device to turn it on. The unit now is ready for use.
Meaning of symbol on appliance: Do not cover! Covering the unit can cause overheating, fire or electric
shock!
Caution: Risk of electric shock! Do not attempt to disassemble or modify the unit or its accessories. In
case any part is damaged, immediately power off the unit and seek the assistance of a specialist.
In the event that the power cable should become damaged, it should only be replaced by the
manufacturer, its service facility or similarly qualified personnel.
FEATURES
•
voltage stabilizer function, 140 – 275 V ~ for input mains voltage
•
1000 VA
apparent output
•
700 W effective output
•
inverter and UPS supply function owing to
the connectable battery
•
battery charger
•
produces the same voltage as the mains
supply (Pure Sine)
•
2 grounded GS sockets
STRUCTURE
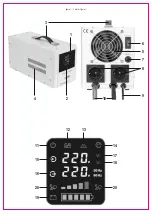
figure 1
Parts of the device:
1. display • 2. on/off switch • 3. carrying handle • 4. hot air
outlets • 5. cooling fan • 6. switch • 7. fuse • 8. power sockets • 9. power cable • 10.
battery connecting cable
Parts of the screen:
11. switched on state indicator • 12. the input voltage is too low
and the device is powered by the battery • 13. malfunction indicator (too high battery
voltage, short circuit, or MOSFET overheating) • 14. overheating indicator, the unit
switches off the output current • 15. input voltage • 16. output voltage • 17. the input
voltage is too high • 18. the input voltage is too low • 19. battery charge indicator • 20.
load scale and overload indicator
OPERATION
The device may only be operated with a connected battery.
Before connecting a consumer to the appliance, make sure that the appliance can
be operated at the voltage rating provided by the appliance.
Press and hold the on/off button (2) on the front of the device to switch it on.
Use the switch (6) on the back of the unit to select between inverter and stabilizer
operation. By setting the switch to OFF (0) position, the device generates and
supplies the 220 V ~ mains voltage required for the operation of the equipment
connected to it through its grounded sockets. Refer to the indicator on the display of
the device to determine the charge level of the connected battery. ATTENTION! The
switch on the backside of the device is not a main switch. By switching it off, the unit
will continue to supply power to the sockets when it is in inverter mode.
Turn the switch to (6.) ON (I) position to select the function of the voltage stabilizer.
The unit will then stabilize the input voltage of the power cable, as shown in the graph
in Figure 3, and charge the connected battery. When the mains voltage drops below
140 V ~, or rises above 275 V ~, the unit automatically switches to inverter mode,
and with the help of the connected battery, it continues to provide mains voltage to
the grounded sockets. The unit beeps once during switching.
Refer to the indicator on the display of the device for the current load of the device. To
avoid overloading, do not exceed the specified maximum load capacity. Check this
on the data table of the device.
If the battery voltage of the connected battery is too low or the plugged-in power is
too high, the device beeps every second.
The unit beeps continuously at a fast rate in the event of malfunction or overheating
protection.
CLEANING, MAINTENANCE
To ensure optimum operation of the appliance, cleaning may be necessary
depending on the degree of contamination, but at least once a month.
1. Before cleaning, switch off the appliance and disconnect it by unplugging the
power plug.
2. Let the appliance cool down (min. 30 minutes).
3. Clean the air inlets and outlets with a vacuum cleaner, a brush attachment.
4. Clean the outside of the machine with a slightly damp cloth. Do not use aggressive
cleaning agents. Do not allow water to enter the electrical components inside the
unit.
TROUBLESHOOTING
SPECIFICATIONS
power supply
: . . . . . . . . . . . . . . . . . . . . . . . . . . . 140 – 275 V~ / 45/65 Hz; 12 V
apparent output
:. . . . . . . . . . . . . . . . . . . . . . . . . . 1000 VA
effective output
: . . . . . . . . . . . . . . . . . . . . . . . . . . 700 W
battery charging current
:. . . . . . . . . . . . . . . . . . . . 10 A
dimensions
:. . . . . . . . . . . . . . . . . . . . . . . . . . . . . 14,5 x 17 x 34 cm
length of power cable
:. . . . . . . . . . . . . . . . . . . . . . 80 cm
length of battery charger cable
: . . . . . . . . . . . . . . . 75 cm
weight
: . . . . . . . . . . . . . . . . . . . . . . . . . . . . . . . . 7,4 kg
Malfunction
Possible solution
The device beeps in every seconds
.
The battery voltage is too low or the load
on the plugged in consumers is too high.
Check the battery and the consumers.
The appliance does not work.
Check the fuse on the back of the unit.


