background image

EQUINOX INTEGRATION GUIDE 


©Vantage Equinox 

Somfy: RS-485 SDN 2.0 

page 3 of 7 


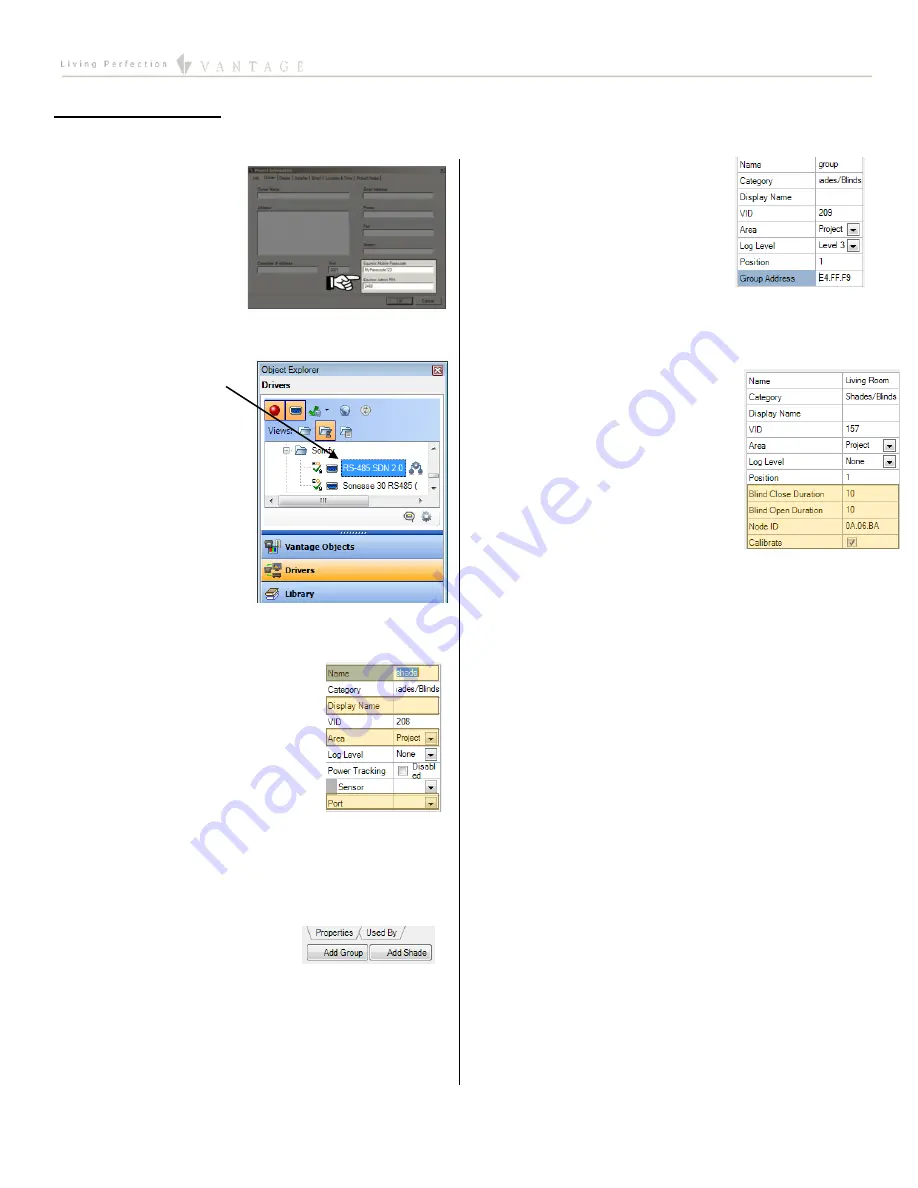
V.Design Center Setup


Follow these instructions to add the Somfy to your Design Center project and configure its settings appropriately. 

1.


Project Settings 

– Click 

on 

Settings | Project 

Information| Owner


(tab). Fill out the 

Equinox Mobile 
Passcode:


(alpha/numeric), and 
the 

Equinox Admin PIN:


(numeric). 
 

2.


Add Somfy RS-485 SDN 
2.0

– In the 

Object 

Explorer

, select 

Drivers


and drag or double click 
the driver to add it to the 
project. 
 

TIP:

 The Somfy is added 

to the room currently 
selected when double 
clicking. 
 

3.


Name the Somfy 

– In the 

Object Editor

, name the Somfy 

and give it a user-friendly display name also.  
 

4.


Set the Area

 – Set the area for each 

shade. Also, set the area for the 
system. 


5.


Add a port

 – Add a new RS-485 port 

(or RS-232 port with a station as described above). This 
will correspond to the port that you connected the Somfy 
to the InFusion Project with. 
 

6.


Add Groups 

– Add the number of groups you 

programmed during installation. 
 

7.


Add Shades 

– Add the number of 

shades you have in each group. 


8.


Set Group Addresses 

– Enter the 

group address you programmed 
during installation. If you leave 
this field blank it will send 
commands to all of the shades 
individually. 


9.


Set Shade Motor Addresses 

– Enter the motor address 

for each shade on the system. 

 
10.


Set the Open and Close Duration 

– 

In the 

Object Editor

, set the 

duration properties to the number 
of seconds the shade takes to open 
and close.  
 

11.


Calibrate

 – When the system is 

ready, check the “Calibrate” 
checkbox within each shade and perform an InFusion 
update. See notes above for more details.  


Summary of Contents for RS-485 SDN 2.0

Page 1: ...igure and control a shade group or individual shades Configure Presets Set up to four user defined presets for each group Supported Task Only Support Not Supported Feature Notes EQ40 support for open...

Page 2: ...e shade to go to what it thinks is the full open Use Jog Up Down Pulses to fine tune When satisfied select Adjust Limits box Select Set Up Current Do the same steps for the full close position setting...

Page 3: ...each shade Also set the area for the system 5 Add a port Add a new RS 485 port or RS 232 port with a station as described above This will correspond to the port that you connected the Somfy to the In...

Page 4: ...en close stop etc to a Somfy Shade while it is calibrating These may cause errors which will require recalibration If Equinox animation appears inaccurate recalibrate the effected shade VIII Equinox W...

Page 5: ...order Equinox App Licensing Note Install the Equinox App search for Vantage Equinox on your iOS or Android devices A valid license is needed for each Equinox device connected to a Vantage System Licen...

Page 6: ...ntage EQ41TB TI Ethernet w PoE Cat 5 RJ45 2 EQ73 Vantage EQ73TB TI Ethernet w PoE Cat 5 RJ45 3 EQ Mobile Apps Vantage EQ APP 5 10 X WiFi N A 4 Infusion Controller Vantage IC 36 1 Ethernet Station bus...

Page 7: ...mit setting tool before the shade can be used in calibration If you do not have access to the group addresses leave the group address field empty It will call all of the shades individually XII Design...

Reviews: