


60
▲
▲
SWITCHING OFF THE APPLIANCE
•
Switch the appliance off with the ON / OFF button (
A
).
•
Pull the power plug from the outlet.
•
Wait for a few minutes to let the water in the heating tank (
J
) cool down and
remove the cover (
C
).
•
Empty the water tank (
K
) and rinse it with fresh tap water.
•
Let all parts dry, reassemble the appliance and best store the appliance in the
original carton.
▲
▲
CLEANING AND MAINTENANCE
WARNING:
Before cleaning and maintenance, always switch the appliance off with the
ON / OFF button (A) and pull the plug first. Let the appliance cool down com-
pletely, including the cover (C), the aroma tray (D) and the steam duct (I).
1. CLEANING AND DECALCIFYING THE WATER TANK,
STEAM DUCT, HEATING TANK AND COVER
Using the appliance will cause limestone deposits to form in the steam duct (
I
) and
the heating tank (
J
). How quickly both parts will calcify is down to water hardness
and how frequently you use the air humidifier. Limestone deposits impair the effi-
ciency of the air humidifier, therefore the appliance should be descaled once a week
as follows:
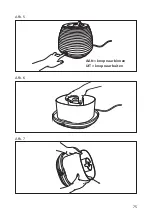
1.
Remove the cover (
C
) from the switched off, unplugged and cooled down ap-
pliance using the removal loop (
E
).
2.
Remove the steam duct (
I
) situated in the water tank from the base by turning
the steam duct clock wisely and lifting it (see
Fig. 6
).
3.
Fill the water tank with cold tap water.
4.
Rinse the water tank multiple times and pour out the water, but be careful to
keep the water from running over the power cord or the ON / OFF button (
A
)
resp. the function light (
B
) (see
Fig. 7
)
5.
Use a soft brush to remove the limestone deposits from the heater unit (
J
) (sup-
ply duct, heating tank and resistor) in the center of the water tank.
6.
Pour tap water into the empty water tank again and add some decalcifying
agent suitable for air humidifiers (f.e. SOLIPOL
®
forte). Please note the quan-
tities and prescriptions given on the agent bottle. Let the solution sit with the
cover closed as prescribed. Then, empty out the water and wipe the tank interi-
or clean with a cloth. Rinse the water tank (
K
), the cover (
C
) and especially the
steam duct (
I
) and the heating tank (
J
) multiple times and dry all parts with a
soft cloth. Please make sure that you use a suitable decalcifying agent. Damage
caused by an unsuitable decalcifying agent is not covered by the warranty.
Summary of Contents for 7215
Page 6: ...6 GERÄTEBESCHREIBUNG Abb 1 A B C D E F G H I J K ...
Page 9: ...9 Abb 2 Abb 3 MAX Linie für max Wassermenge 2 8 l Abb 4 ...
Page 11: ...11 Abb 5 EIN Taste innen AUS Taste herausstehend Abb 6 Abb 7 ...
Page 17: ...17 ...
Page 22: ...22 DESCRIPTION DE L APPAREIL Fig 1 A B C D E F G H I J K ...
Page 25: ...25 Fig 2 Fig 3 MAX ligne indiquant le niveau maximum d eau 2 8 l Fig 4 ...
Page 27: ...27 Fig 5 MARCHE touche enfoncée ARRET touche sortie Fig 6 Fig 7 ...
Page 33: ...33 ...
Page 38: ...38 DESCRIZIONE DEL DISPOSITIVO Fig 1 A B C D E F G H I J K ...
Page 41: ...41 Fig 2 Fig 3 MAX Indicatore della quantità massima di acqua 2 8 l Fig 4 ...
Page 43: ...43 Fig 5 ON Tasto dentro OFF Tasto fuori Fig 6 Fig 7 ...
Page 49: ...49 ...
Page 54: ...54 APPLIANCE DESCRIPTION Fig 1 A B C D E F G H I J K ...
Page 57: ...57 Fig 2 Fig 3 MAX Line for max water amount 2 8 l Fig 4 ...
Page 59: ...59 Fig 5 ON button pressed in OFF button standing out Fig 6 Fig 7 ...
Page 65: ...65 ...
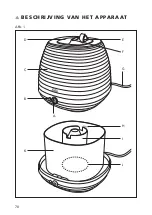
Page 70: ...70 BESCHRIJVING VAN HET APPARAAT Afb 1 A B C D E F G H I J K ...
Page 73: ...73 Afb 2 Afb 3 MAX De lijn die de maximale hoeveelheid water aangeeft 2 8 l Afb 4 ...
Page 75: ...75 Afb 5 AAN knop naar binnen UIT knop naar buiten Afb 6 Afb 7 ...


