


Page 24
Nucleus User Guide
T
IMELINE
F
UNCTIONS
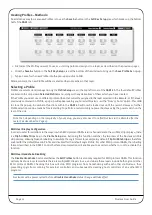
Transport Master
Nucleus directs transport commands to whichever DAW is currently selected on Nucleus
but if multiple DAWs are being used simultaneously it is possible for one DAW to be made
the Transport Master. When a DAW has been set as the Transport Master, Nucleus will then
always direct transport commands to that DAW, regardless of the DAW (Layer) selected
on the control surface. DAW transports on other Layers will be slaved to the master DAW.
To assign a DAW Layer to be the Transport Master, click on the
1
,
2
or
3
button in the
Transport Master
area of the Remote’s
DAW
tab. To have no Transport Master, select the
None
button.
Note that the
Transport Master
is the only area of the
DAW
tab which is not specific to the Layer selected in the tab’s
Layer
area.
Note also that a DAW Transport Master is not required when controlling multiple DAWs that are connected as ‘ReWire’
slaves to the Master DAW. See the relevant DAW User Guide(s) for more information.
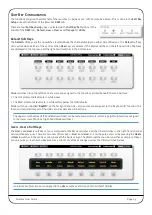
Jog Wheel Function
The function of the centre section jog wheel is selected in the
Jog Wheel Default
area of
the Remote’s
DAW
tab.
The four options are as follows:
Wheel
Sends basic control information which scrolls the timeline in most DAWs
Pro Tools Users.
Note that the wheel does nothing in ‘Wheel’ mode until ‘Jog/Shuttle’ mode is activated – by default
‘Jog/Shuttle’ mode is assigned to the jog wheel switch adjacent to Nucleus’ jog wheel. This assignment is set via the
Jog
Wheel
button in the
Transport / Utility
soft key set in the
DAW
tab.
FF/RW
HUI only timeline scrolling – resolution is controlled by the DAW’s Timeline format
+/–
HUI only timeline scrolling – resolution is controlled by the DAW’s Nudge value
TRACKS
Assigns the channel scrolling function to the jog wheel
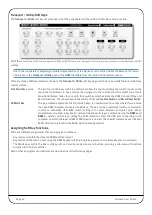
Automation Display (HUI Only)
In HUI protocol DAWs, a single letter indicating the current automation mode of each channel can be added to the end of each
channel name in the upper row of the display; ‘Write’ modes are indicated by a flashing
W
, ‘Read’ modes by a flashing
R
, and
‘Off’ is indicated by no flashing letter.
This single letter display is activated by clicking on the
ON
button in the
Show Auto Mode
area of the
Remote’s
DAW
tab.


