background image


ENG - 29 

03917700.ENG     rev. 0 


(8) 


(9) 

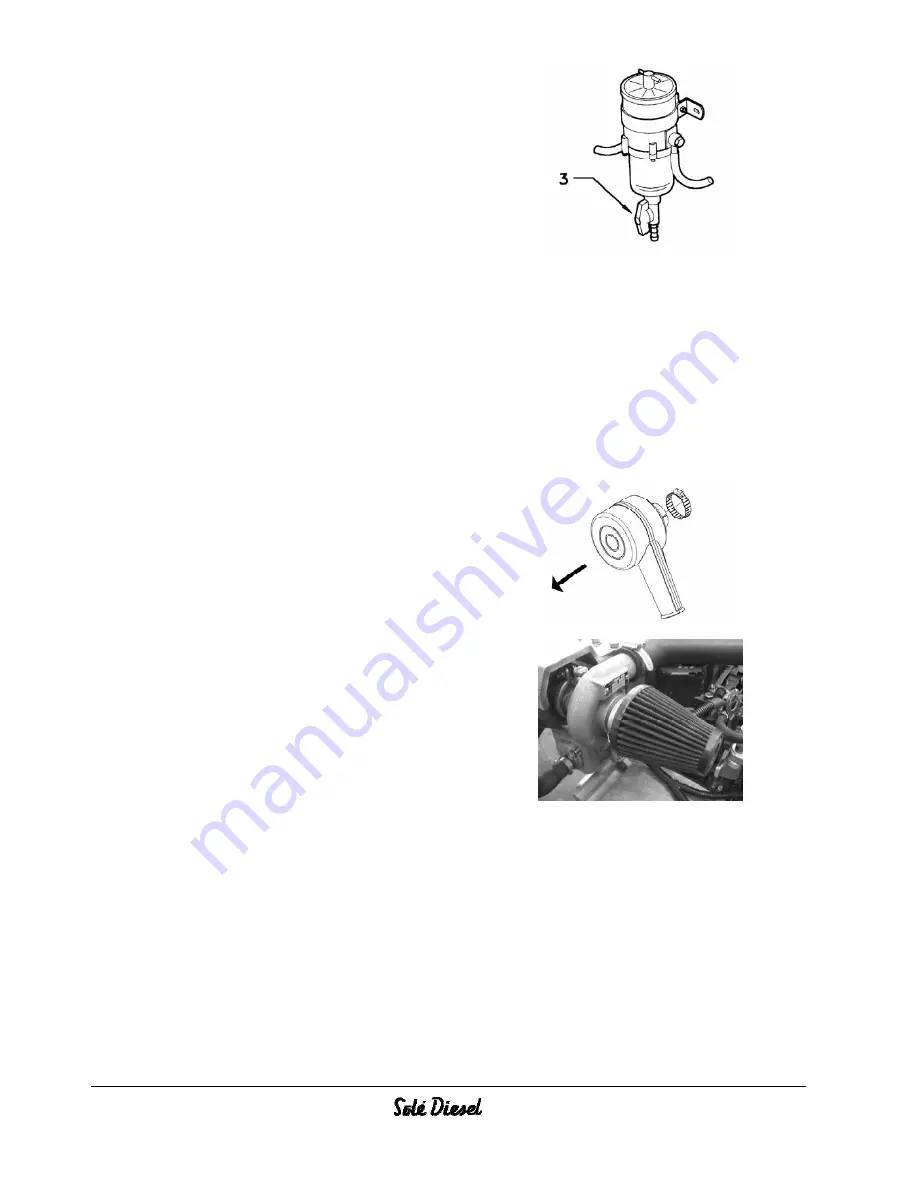
Fuel decanting filter drainage ( optional ): 

 
Loosen the wing nut (3) (Fig. 7.6) located at the lower side of the 

glass vessel and let go all the acrued water. Shut again off the 

wing nut and check it does not drip. 

 
Replace the fuel filter element (engine): 


The fuel filter is bladded and cannot be cleaned. It must be 

replaced at least once every 12 months. 
 

To perform the filter change: Shut off the cock located at the tank 

delivery. Unscrew cover filter with a chain spanner. Screw the new 

filter to the cover with the hand and at the same time replace the 
rubber seals. Carry out the operations at heading 5.1.1 bleeding 

air from the fuel system. 

Fig. 7.6 


(10)  Injector checking: 


This operation shall be made by a SOLÉ DIESEL service. If a hand-pump is available, monitor the calibration of 

injectors, by verifying that the pressures are those listed in paragraph 2.6 of this manual. 


(11)  Checking incandescent spark plugs: 


Supply power to the glow plugs and make sure that they become incandescent, if not renew them. 


(12)  Change air filter (MINI-17/26/2933/44 models): 


See the picture 7.7B. MINI-17/26/29/33/44 engines. Engine is 

provided with an intake air filtering component. To perform such a 

change, slacken off the central filter clamp, remove the old filter, 
byre placing with a new one. The filter and element are an 

integral unit. 


Fig. 7.7B


Change the conical air filter . 

 
See picture  7.7B. Only for MINI-55 engine. The engine is 

equipped with an element air filter. For to clean the air filter, slack 

the clamp, extract the filter and follow the instructions indicated 

for the producer. After, mount again the filter, tightening the 
clamp.  


Change the filter following the manufacturer instructions. 


Fig. 7.7B 


MINI55 air filter, cleaning instructions (use part no. 17710013):


First pre-cleaning the filter. Tap the filter to dislodge any loose dirt, then gently brush with a soft bristle brush. Use the 

spray cleaner liberally onto the filter media and left soak for 10 minutes. Large the filter can be rolled or soaked in a 

shallow pan of air filter cleaner. Then, remove immediately and let soak for approximately 10 minutes. Rinse off the 

cotton filter media with low-pressure tap water. Rising from the clean side to the dirty side. After rising, shake off all 
excess water, and dry naturally. The use of other cleaning or drying methods will damage the filter and void the air filter 

warranty. After filter is completely dry, oiling (using the spray or squeeze bottle) along each pleat, once only, holding 

nozzle 3 seconds away from filter media.   

 
Carefully apply oil on any visible white spots and let sit for 20 minutes. Wipe the gasket or sealing surface with a clean 

cloth or paper towel to remove excess oil, prior to installation. DO NOT OVER-OIL AIR FILTER. Over-oiling may 

interfere with the proper performance of the engine and/or certain engine components. 


Summary of Contents for MINI 17

Page 1: ...ENGINE INSTRUCTIONS MANUAL MINI 17 MINI 26 MINI 29 MINI 33 MINI 44 MINI 55 MARINE DIESEL ENGINES ...

Page 2: ......

Page 3: ... operations illustrated in these pages If you run into difficulties or setbacks Service SOLÉDIESEL department will be happy to provide you with the necessary advice and assistance This INSTRUCTION MANUAL is and integral part of the product you have acquired Please conserve it in a safe place for the full working life of the engine SOLÉ S A reserves the right to make changes aimed at improving its ...

Page 4: ...FETYGLASSES PROTECT RESPIRATORYPASSAGES MASK DANGER GENERAL DANGERSITUATION FOR THE SAFETYOF PERSONS AND PROTECTIONOF THE ENGINE Danger Warning Attention Notices triangular General Attention regarding personal safety and protection of the engine DANGER DANGER OFELECTRICAL DISCHARGES FORTHE SAFETY OF PERSONS ANDENGINE DANGER DANGER FROMSOURCES OF HEAT FOR THESAFETY OF PERSONS AND THEENGINE THE OPER...

Page 5: ...uilt as a power unit for generating mechanical energy ALL USES OTHERTHAN THE PRESCRIBED APPLICATIONAUTOMATICALLY RELEASE SOLÉ S A FROMLIABILITY FOR DAMAGES THAT MAY ENSUE in any event the use of products other than those agreed upon at the time of purchase RELEASES SOLÉ S A FROM ALL LIABILITY FOR DAMAGE TO THEENGINE OR PROPERTY OR INJURY TO PERSONS Although the engine is built in compliance with t...

Page 6: ...F AIRBONE NOISE POLLUTING EXHAUST GAS WHEN USING THE MOTOR IN A CLOSEDENVIRONMENT THE EXHAUST FUMES MUST BECONVEYED OUTSIDE 1 3 1 INFORMATION REGARDING RESIDUALRISKS The engine must be used in compliance with the manufacturer s prescriptions technical specifications safety regulations etc Any modifications you make be previously authorized by the Manufacturer If you use the engine beyond its appli...

Page 7: ...cooled circulation controlled by centrifugal pump with thermostatic control and heat exchanger Cooled exhaust collector Injection pump BOSCH type Lubrication forced feed lubrication by gear pump Mini 17 26 29 Forced feed lubrication by trochoid pump Mini 33 44 55 Electrical system 12V Alternator 40A Mini 17 26 29 Alternator 50A Mini 33 44 55 2 2 COOLING CIRCUIT 2 2 1 FRESHWATER COOLING CIRCUIT Fig...

Page 8: ...The oil is forced by the pump through acontrol valve to the filter the enginemain bearings and by way of external pipelines to the rocker arms Oil circuit pressure with hot engine min 800 rpm 0 5 kg cm2 máx 3000 3600 rpm 3 4 kg cm2 2 3 2 GEARBOX Gearbox has its own lubrication independent from the engine See the picture fig 2 2 2 4 FUEL CIRCUIT Fig 2 4 Fig 2 2 1 Main gallery 2 Oil pump 3 Oil filte...

Page 9: ...ump 6 Fuel filter 7 Tank 2 4 1 INJECTION PUMP Circuit pressure 0 3 0 4 bar 2 5 ELECTRICAL PLANT 2 5 1 ELECTRICAL PLANT INSTRUMENT PANEL ENGINE Part No MINI 17 26 29 609 38 125 MINI 33 44 55 609 72 125 Model Quantity MINI 17 2 MINI 26 29 33 3 MINI 44 55 4 DESCRIPTION A GLOW PLUG OPERATION LAMP B BATTERY CHARGE LAMP C WATER TEMP ALARM LAMP D OIL PRESSURE ALARM E STARTER F TACHOMETRE G COOLANT TEMP G...

Page 10: ... 5 17 8 24 2 19 25 8 22 8 31 29 9 40 6 36 9 50 2 Oil capacity liters 2 4 3 6 4 2 3 7 5 5 5 5 RONIM V 0 5 0 5 0 5 SMI R2 0 8 0 8 SMI R3 1 3 ATF 1 3 ATF TMC40 2 0 2 ATF 0 2 ATF 0 2 ATF 0 2 ATF TTMC35P 2 0 5 SAE 15W 40 Gearbox oil capacity in liters 1 TTMC35A2 2 0 65 SAE 15W 40 Min oil pressure hot engine kg cm2 0 5 0 5 0 5 0 5 0 5 0 5 Cooling water capacity liters 3 0 4 0 4 2 6 25 8 0 8 0 Injection ...

Page 11: ...ENG 9 03917700 ENG rev 0 2 6 1 ENGINE DIMENSIONS MINI 17 26 RONIM V MINI 17 26 TMC40 all versions A B A B RONIM V TMC 40 A B A B MINI 17 295 mm 634 mm 295 mm 615 mm MINI 26 384 mm 723 mm 384 mm 704 mm ...

Page 12: ...ENG 10 03917700 ENG rev 0 MINI 29 TMC40 all types of TMC40 MINI 29 TTMC35A2 ...

Page 13: ...ENG 11 03917700 ENG rev 0 MINI 33 RONIM V MINI 33 TMC40 all versions MINI 33 TTMC35A2 ...

Page 14: ...ENG 12 03917700 ENG rev 0 MINI 44 SMIR3 MINI 44 TTMC35P MINI 44 TTMC35A2 ...

Page 15: ...de with high mechanical and seawater resistance grey castiron alloy Operation With engine at idle speed smoothly push forwardly the inverter lever forward gear and rearwardly rear gear according to the sense wanted For the rest of the gearboxes read the specific gearbox manual attached MINI 55 TTMC35P ...

Page 16: ...e to the intended position of installation and remove the plastic wrap film Unscrew screws that secure the engine to the wooden base with draw the base and proceed with installation operations 3 1 3 PACKING AND UNPACKING WITH ENGINE MOUNTING FIXTURE AND PLASTIC PACKAGIN Lift the engine using chains with safety hooks and of suitable load capacity Attach the chain hooks to the engine eyebolts and li...

Page 17: ...nce guarantee against possible damage to the engine 3 4 TRANSPORT AND HANDLING OF THE UNPACKED ENGINE 3 5 STORAGE OF PACKED AND UNPACKED ENGINE If the engine is left idle for prolonged periods the client must check the possible conditions of conservation in relation to the place of storage and the type of packing system base pallet etc If the engine is unused for prolonged periods and stored obser...

Page 18: ...ng nuts 1 2 4 5 3 5 1 2 4 5 3 5 1 2 0 1 5 0 5 5 5 0 5 1 2 0 1 5 0 5 5 5 0 5 Nozzle holder mounting bolts Glow plug Nut for B terminal of starter 3 0 2 0 1 1 3 0 2 0 1 1 3 75 0 25 1 75 0 25 1 1 0 1 3 75 0 25 1 75 0 25 1 1 0 1 Reversing gear flange setscrew Water cooler element locknut Reversing gear body setscrew 12 0 2 3 5 12 0 2 3 5 12 0 2 3 5 0 12 0 2 3 5 0 Oil gearbox drain plug General tighten...

Page 19: ...ngine sealing Check then oil level by removing the rod Fig 4 3 cleaning it witha rag and repositioning it by retightening Remove it again immediately to check oil level and if it does not reach the top sign add carefully more oil through the filler hole Fig 4 2 up to the top rod sign Fig 4 3 be careful that any rod marksrefer to the engine at a horizontal position Therefore check the engine inclin...

Page 20: ...igerator unit and to the block and in proportion to the temperatures expected The anti freezing agent manufacturer in the package labels is giving the instructions to be followed at each case However in the following box suitable rates a reset out in accordance with temperatures Ant freezing liquid concentration 30 40 50 60 Freezing temperature ºC 10 20 30 45 It is advisable the anti freezing agen...

Page 21: ...and hence to the engine and also invalidate the terms of the guarantee 4 3 INSTALLATION warning When water cooled engines must be located in an enclosed place or protected by guards or a cabinet it is important to ensure thatcombustion air is freely supplied and freely expelled from the area The above recommendation is of primary importance in relation to the perfect operation of the engine becaus...

Page 22: ...NECTION f a Engine Connect control cable to the ball joint fitted to the lever A and position the cable with the clamp B Adjust in a way that gas is not delivered until the inverter gear is engaged Fig 5 1 See picture 5 1A for MINI 17 26 29 engines See picture 5 1B for MINI 33 44 55 engines Fig 5 1A Fig 5 1B f b Gearbox Connect control cable to the lever by means of the ball joint provided for thi...

Page 23: ... with electrical priming puma operate the key to START position Do not run the starter motor for more than 20 seconds at a time The air bledding from the injection pump and from the injectors is automatic Once this operations have been terminated proceed to start the engine see heading 6 1 warning Protect hands The fuel can harm the skin 5 2 PRELIMINARY RUNNING TESTS 5 2 1 NO LOAD RUNNING TEST Run...

Page 24: ...h the ignition key in the START position for10 seconds draw your hand out from the key for 30seconds and then try again to start the engine if necessary heating again the glow plugs warning Do not run the starter motor for more than 20 seconds at a time Once the engine has started release the ignition key allowing it to automatically return to the ON running position and disconnecting the starter ...

Page 25: ...el loses fluidity 4 The air inlet temperature is low and the engine has difficulty in starting To prevent the damage caused by low temperature operation the engine should be prepared as follows 1 Use anti freeze as indicated in section 4 2 2 of this manual 2 When the engine is to be stopped close the sea watercock open the sea water filter cover and start the engine adding a mixture of fresh water...

Page 26: ...m will be filled with anti freeze mixture Stop the engine 5 Use a dielectric spray on the electrical connections disconnect the battery and charge it several times during the period of inactivity 6 7 RESTORATION OF THE RUNNINGCONDITIONS When starting up the engine again after winter lay up certain operations must be performed Follow these steps 1 Fill the fuel tank with clean diesel oil Carry out ...

Page 27: ...S STRICTLY FORBIDDEN TOCLEAN THE ENGINE WITHCOMPRESSED AIR IT IS STRICTLY FORBIDDEN TOPERFORM MAINTENANCE CLEANING OPERATIONS IN THEPRESENCE OF MOVING PARTS USE GLOVES OVERALLS ETC TOPROTECT THE BODY FROM BURNS Service interval Inspection concept Daily 1ª 50 hour Cada 200 hour Cada 400 hour Cada 800 hour Every 2 years Engine Screw tightening fixing Valve play Exhaust gases noise and vibrations Com...

Page 28: ...ing water is flowing and if some failure is detected in the exhaust gases noise and vibrations Overhaul of the propeller shaft and positioning screw tightening torque Check cooling water level Clean water filter for impurities EVERY 200 OPERATING HOURS EVERY 400 OPERATING HOURS Change oil engine a Check the tightening torque of the engine positioning propeller shaft screw and gas oil piping nipple...

Page 29: ...ntake valve play 0 25 mm Exhaust valve play 0 25 mm With piston nº 1 in the top dead centre of the compression cycle adjust the play of the intake and exhaust valves of cylinder nº 1 Proceed similarly as with the other cylinders The position of the BTDC can be confirmed with the a lining signs of the ditribution or timming cover and the crakshaft pulley Fig 7 2 After the adjustment the rocking nut...

Page 30: ...ble to drain the water circuit Once this operation has been completed close the drain cocks and fill to the hole in the tank cap see heading 4 2 2 of this manual Fig 7 5A Fig 7 5B 7 Checking battery electrolite level and charge Batteries require a very careful handling and frequent checkings Proceed as shown below 1 Always keep batteries dry and cleaned 2 Regularly check terminal cleanliness If du...

Page 31: ...an integral unit Fig 7 7B Change the conical air filter See picture 7 7B Only for MINI 55 engine The engine is equipped with an element air filter For to clean the air filter slack the clamp extract the filter and follow the instructions indicated for the producer After mount again the filter tightening the clamp Change the filter following the manufacturer instructions Fig 7 7B MINI55 air filter ...

Page 32: ...and switch sour face roughness Replace if the service limitation has been reached 15 Cleaning the fuel tank Drain out the contains of the fuel tank to remove condensate and any foreign materials Wash the tank with fuel dispose of fuel as described in heading 4 4 16 Replace alternator belt Fully detension old belt so that ist removal can be made easier Fig 7 9 When the belt is unfitted check the co...

Page 33: ...ragments would be carried to the cylinders c Lubricant contamination this causes scoring of journal bearings clogs oil passages wears the seals with consequent leakages and seizdures 2 Turbocharger construction siplicity is only apparent in fact many of its parts are machined to 1 1000 mm tolerances Its therefore recommended that you entrust any servicing to skilled personnel having availability o...

Page 34: ... CORRECTLY OR SEIZED C6 OIL LEVEL TOO LOW L6 INJECTION PUMP INCORRECTLY SET C7 FAULTY OIL PRESSURE VALVE L7 WATER IN FUEL SYSTEM C8 FAULTY OIL PRESSURE GAUGE OR SWITCH L8 FUEL OUTLET COCK CLOSED C9 OIL SUCTION LINES CLOGGED OR UNIONS LOOSE L9 ELECTRICAL SYSTEM COOLING CIRCUIT BATTERY DISCHARGED E1 SHORTAGE OF WATER IN FRESH WATER CIRCUIT CR1 LOOSEN CABLE CONNECTION E2 FAULTY FRESH WATER PUMP CR2 F...

Page 35: ...ON PROPERTIES FUEL PROPERTIES Output correction due to fuel properties Specified outputs presuppose the following fuel properties as per ISO 3046 Energy value 42700 kJ kg Temperature before feed pump 35ºC Density 15ºC 0 84 kg dm3 If the fuel derivates from these values correction factors in are found in the graphs below Use the correction factors in calculation of engine output Output correction O...

Page 36: ...ction factors in calculation of engine output Output correction Output correction Temperature ºC Air Pressure mbar Graph 3 Graph 4 Effect of intake air temperature on engine output 25ºCis reference temperature 0 Effect of air pressure on engine output Normal value is1000 mbar 750 mm Hg 0 _________ NORMALLY ASPIRATED TURBOCHARGED ...

Page 37: ...ED BY SOLÉ S A For another gearboxes we recommended use the oil that the manufacturer recommends Read the delivered documentación ENGINE TYPE GEARBOX TYPE RATIO SERIAL NUMBER MINI 17 26 RONIM V 2 28 1 225 13 02400 MINI 17 26 RONIM V 3 05 1 225 15 00300 MINI 33 RONIM V 2 28 1 225 13 10700 ENGINE TYPE GEARBOX TYPE RATIO SERIAL NUMBER MINI 33 SMI R2 3 1 256 155 xxxx MINI 44 SMI R2 3 1 256 155 xxxx EN...

Page 38: ...iration by the oil pump See the table enclosed for modification level in rod oil Increase level D or decrease the level E starting off of level H of the original oil dipstick A ENGINE INCLINATION D MINI 17 E MINI 26 29 D MINI 33 D MINI 44 D MINI 55 4º 0 mm 0 mm 7 6 mm 3 mm 8º 1 5 mm 2 mm 14 mm 6 3 mm 12º 3 mm 4 mm 21 5 mm 8 7 mm 16º 3 5 mm 6 mm 28 7 mm 9 5 mm 20º 5 mm 8 mm 37 2 mm 13 mm ...

Page 39: ......

Page 40: ...GINES SOLÉ S A Dpto Publicaciones Técnicas Ctra Martorell a Gelida km 2 08760 Martorell Barcelona Spain Tel 34 93 775 14 00 Fax 34 93 775 30 13 e mail sole solediesel com www solediesel com Ref 03917700 ENG Ed 1 rev 0 ...

Reviews: