|
85
December 2020
|
Solar Stik
®
, Inc.
System Setup and Operation Manual for the Solar Stik G-BOSS E Light HPS
PRELIMINARY
Item #
Item to be
Inspected
Interval
Procedures
Non-mission Capable
1
Visual
inspection of
24VDC PRO-
Verter S 3000
M
1. Inspect case for visible damage
and missing items.
2. Clean excessive dust or dirt
accumulation from the exterior,
interior and connectors.
3. Close all unused port covers.
~If the case is broken or split or
if connectors are damaged, do
not place into service.
2
Air Intake
Filters
M
1
1. Remove the three (3) air intake
vent covers to expose the filter
material. (See PRO-Verter Manual
for location of air intake filters.)
2. Wash with water and dry the filter.
Reinstall.
3. If the filter is damaged or cannot
be cleaned replace.
~If the filter cannot be cleaned,
is too damaged to function
properly and a replacement is
not immediately available, the
unit is partially mission capable.
Replace the filter as soon as
possible to restore the unit to
fully mission capable.
1
Clean or replace more frequently when the System is operating in dusty, windy environments
Table 14. 24VDC PRO-Verter S 3000-120 PMCS
24VDC PRO-Verter S 3000 PMCS
1
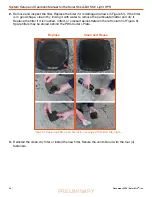
Use a #2 cross-tip screwdriver to remove the four (4) fasteners from the vent shroud and remove
the louvered vent cover to access the filter.
Figure 49. Fastener locations on vent shroud (upgraded/new
version)
Figure 50. Removed vent shroud to access the
louvered vent cover
PRO-Verter Filter Removal and Cleaning or Replacement
MAINTENANCE INSTRUCTIONS


