SoftBank P00000401A01 Quick Manual Download Page 15

14

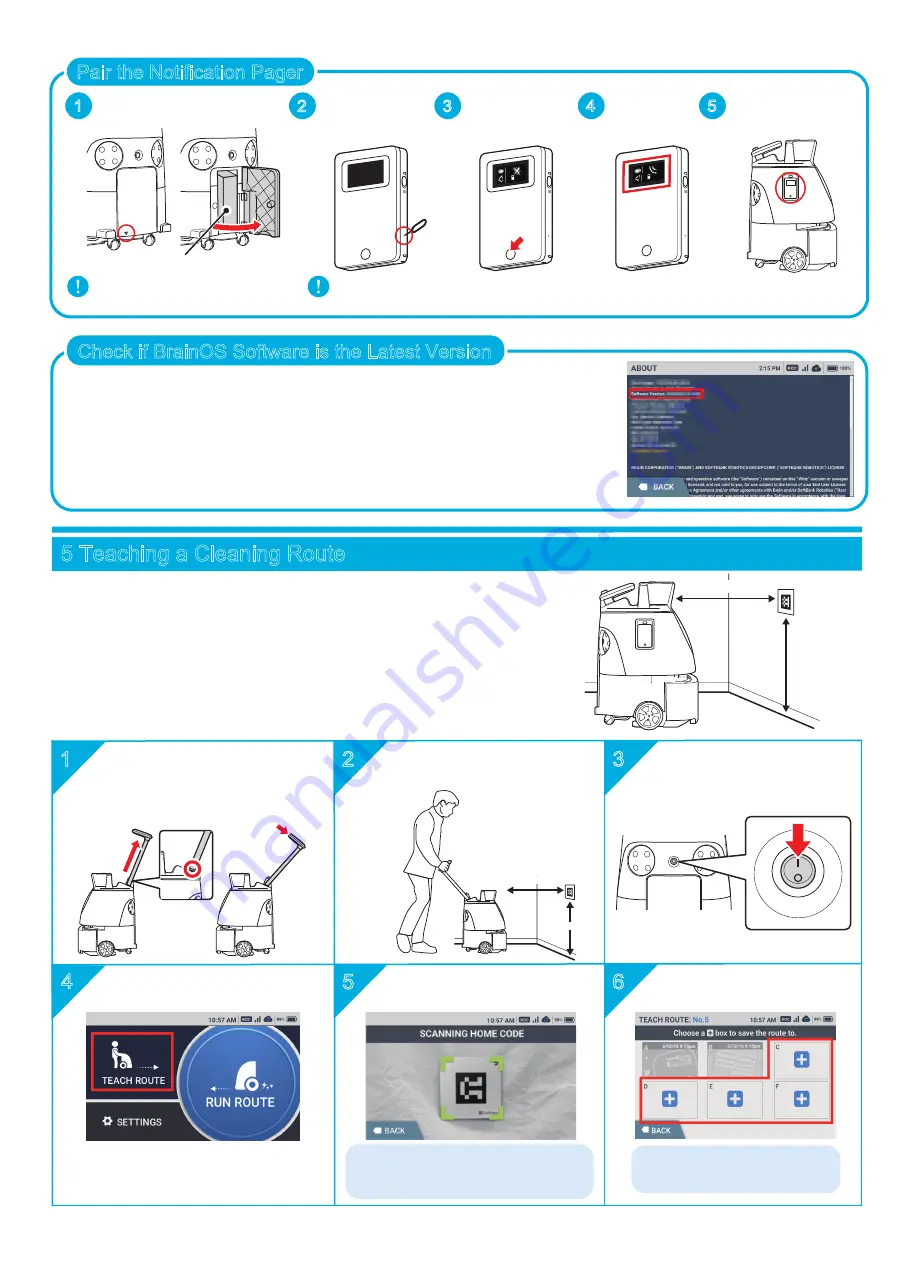
Press the Main power switch 

to turn it on ( l )

Tap "TEACH ROUTE"

3

Pull the Steering Handle 

straight up until you reach the 

joint and tilt the handle to lock 

it into position

80cm (2.6ft)

60cm (2.0ft)

Move the Machine to

the Home Location Code

Scan the Home Location Code

If an error is displayed in a red frame, 

adjust the distance of the Machine and 

the code and scan it again.

Select "+" to create a new 

route

1

2

3

4

5

6

For each Home Location Code,

six cleaning routes can be saved. 

5 Teaching a Cleaning Route

Before teaching a cleaning route to the Machine, stick

the Home Location Code (HLC) at a permanent location where

autonomous cleaning will start / stop (flat against a wall or

a pillar). If the HLC needs to be moved, place it at the same

location whenever the Machine runs autonomously.

Please note that cleaning may not be performed correctly

if the installation of HLC is slightly off.

80cm (2.6ft)

60cm (2.0ft)

Tap “ABOUT” on the SETTINGS menu and check if the Machine is

updated to its latest software. If it is not updated, leave the Machine

on for over an hour in an environment where the Robot Operations

Center (ROC) can be connected. (The Machine can be used during

this time). Then, reboot the Machine and check the software version

from the SETTINGS menu again.

Check if BrainOS Software is the Latest Version

Make sure the Machine is on ( l ) before pairing.

Attach the Pager to 

the pager holder

Pair the Notification Pager

1

2

Turn the power 

button on

Remove the Notification pager

from the accessory box.

3

Press the main 

button for over 

5 seconds

4

Check the 

pairing mark

5

Open the battery door, and 

take out the accessory box

Accessory box

Summary of Contents for P00000401A01

Page 1: ...Quick Guide 0SJHJOBM JOTUSVDUJPOT CAUTION Read the Quick Guide this document before using the product and store in a safe location after reading it...

Page 2: ...any circumstances such as when the machine does not operate properly when the machine has tripped over etc Always adhere to warnings regarding machine installation maintenance and use and store this m...

Page 3: ...lt in minor or moderate injury Indicates the caution item that may cause failure or damage to the equipment when mishandled 1 2 Description of Symbols The following symbol categories explain the level...

Page 4: ...jurisdiction and may be subject to penalty Servicing disassembly modification soldering replacement or other repair work may not be undertaken by people other than by SoftBank Robotics or other autho...

Page 5: ...arger battery or notification pager Do not force the battery into the machine or battery charger if it cannot be connected correctly Doing so may cause fire injury electric shock damage malfunction ov...

Page 6: ...or an outdoor operating environment Be careful that dust does not adhere to the LIDAR sensor camera or other sensors May interfere with normal machine operation or lead to an accident See P54 8 Inspec...

Page 7: ...damage malfunction overheating leakage chemical explosion or other damage to the machine battery charger battery or notification pager including deformation of the machine When lifting the machine fro...

Page 8: ...erate it correctly Do not insert metal pins or other foreign materials in the air vents in the battery charger Doing so may cause fire injury electric shock damage malfunction overheating leakage chem...

Page 9: ...or notification pager Do not use the power cable with any another product Always unplug the battery charger from the outlet if not using it for a long time or when carrying out maintenance on it Fail...

Page 10: ...oven or a high pressure container such as a pressure cooker or place on top of an electromagnetic cooker IH cooker Doing so may cause leakage overheating explosion or ignition of the battery pack insi...

Page 11: ...ll with water Use the battery only in the machine May cause leakage overheating ignition or rupture and otherwise result in injury electric shock damage malfunction overheating leakage chemical explos...

Page 12: ...essory Box 2 Supplied Accessories Recharges the notification pager Notification pager 1 P00000401A01 Notification pager charger 1 P00000501A01 micro USB cable 1 P00014201A01 Connect the notification p...

Page 13: ...achine Battery charging status light Once the battery is recharged it flashes in green Hold the handles with both hands and be careful not to drop it on the floor Check Charging Status Hopper Tray Fro...

Page 14: ...Robot Operations Center connection mark ROC is displayed If the connection mark does not appear move the Machine to where it can be connected to the network Check that it is Connected to Robot Operat...

Page 15: ...ace it at the same location whenever the Machine runs autonomously Please note that cleaning may not be performed correctly if the installation of HLC is slightly off 80cm 2 6ft 60cm 2 0ft Tap ABOUT o...

Page 16: ...mous Clean Start Stop Button Tap OK Routes that have completed cleaning is shown in blue and routes that have not completed cleaning is shown in white Hold the handle with both hands and raise it forw...

Page 17: ...he attachment sheet onto the right side If the dustbag is installed correctly the dustbin pin will float Check that it is afloat and close the dustbin cover Dustbag If the error message is displayed w...

Page 18: ...d health care facilities Only use the battery included with the product This equipment complies with MPE ICNIRP radiation exposure limits This equipment should be installed and operated with minimum d...

Page 19: ...60MHz 23 2 FDD B1 1920MHz 2170MHz 23 2 FDD B3 1710MHz 1880MHz 23 2 FDD B7 2500MHz 2690MHz 23 2 FDD B8 880MHz 960MHz 23 2 FDD B20 830MHz 860MHz 23 2 TDD B28 703MHz 748MHz 23 2 This product can be used...

Page 20: ...with the product This equipment complies with SAR ICNIRP radiation exposure limits This equipment should be installed and operated with minimum distance 0 cm between the radiator and your body This tr...

Page 21: ...ne to malfunction or cause damage to the machine Do not affix a seal or tape on the sensor or the wheels Doing so may cause the sensor to operate improperly which may cause failure Cleaning Use the ma...

Page 22: ...length width height 290mm 215mm 79mm 11in 8 5in 3 1in Battery weight Approx 5kg 11lbs Operating time Approx 3hours normal mode approx 1 5hours max power mode Time to fully recharge 4hours Charger siz...

Page 23: ...arger is used 14 Disposal This product is designed and manufactured with recyclable high quality materials and components When disposing of the product check that it is being disposed of properly as i...

Page 24: ......

Reviews: