


38
Connecting PlayStation
®
Vita/
PSP
®
(PlayStation
®
Portable)
Connect PS Vita and PSP
®
to connect to the Internet.
The described connection procedures are independently
verified. Please refrain from contacting Sony Computer
Entertainment Inc. regarding these descriptions.
PlayStation
®
Vita
This section describes setup operations with screenshots
and steps for "SSID A" at "WPA" security setting. Some
operations and screenshots vary by security method. For
details, refer to PS Vita user guide.
Press & Hold Power Button for two seconds or more
Lock Screen appears when powered on and WLAN
function is enabled. Wi-Fi router automatically connects
to the Internet.
・ When WLAN is enabled,
(Number of connected
devices) lights and when Wi-Fi router connects to the
Internet,
(Internet connected) lights.
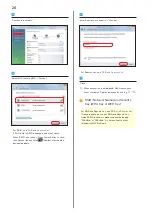
In PS Vita Home menu, "Settings"
➜
"Start"
In list, select Wi-Fi router's SSID
."
・ If Wi-Fi router's SSID is changed, select set name.
・ When SSID is not shown, Press Power Button to show
Lock Screen, then confirm
(Number of connected
devices) appears.
Enter Security Key correctly, "OK"
・ For Security Key, see "
"OK"
Saving of settings starts.
"OK"
Connection test starts. When " 接続テストに成功しまし
た。" appears, setting is complete. When connection is
established, WLAN connection count number on Display
increases by one (e.g.
➜
).
SSID (Network Name) and Security
Key (WPA Key or WEP Key)
For SSID and Security Key, see "
If they are changed, use set SSID and Security Key.
Default SSID is shown in alphanumeric with leading
"304HWa-" or "304HWb-." Do not connect to other
neighboring WLAN network.
Summary of Contents for 304HW
Page 1: ...304HW User Guide ...
Page 2: ......
Page 5: ...Introduction Introduction 4 ...
Page 8: ...6 ...
Page 52: ...50 ...
Page 58: ...56 ...
Page 70: ...68 はい Data volume is reset Resetting Data Traffic データ通信量 設定 リセッ ト ...
Page 102: ...100 ...
Page 116: ...114 Set each item Save Created profile appears for profile name ...
Page 127: ...125 304HW Settings WEB UI Save SoftBank Wi Fi Spot setup is complete ...
Page 131: ...129 304HW Settings WEB UI Set each item Apply LAN Wi Fi basic settings for SSID A are made ...
Page 134: ...132 Set each item Apply LAN Wi Fi basic settings for SSID B are made ...
Page 136: ...134 Set each item Apply LAN Wi Fi advanced settings are made ...
Page 138: ...136 OK MAC Address Filtering is set ...
Page 140: ...138 OK MAC Address Filtering is canceled ...
Page 146: ...144 Canceling IP Address Filtering In Menu List Router Setting IP Address Filtering Delete OK ...
Page 147: ...145 304HW Settings WEB UI Apply Setting is canceled ...
Page 151: ...149 304HW Settings WEB UI Apply OK Canceled setting is applied ...
Page 153: ...151 304HW Settings WEB UI Enter each item OK Apply OK Setting is made ...
Page 155: ...153 304HW Settings WEB UI Apply OK Canceled setting is applied ...
Page 174: ...172 Deleting Viewed Information In Main Menu Information Select Information Delete ...
Page 175: ...173 304HW Settings WEB UI OK Information is deleted after pop up screen is shown ...
Page 177: ...175 304HW Settings WEB UI Delete OK Information is deleted after pop up screen is shown ...
Page 185: ...183 304HW Settings WEB UI Enter Login password Log In Quick Setup wizard opens Next ...
Page 188: ...186 ...
Page 230: ......