background image

12

5. 

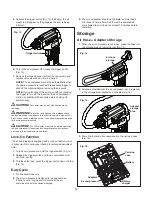
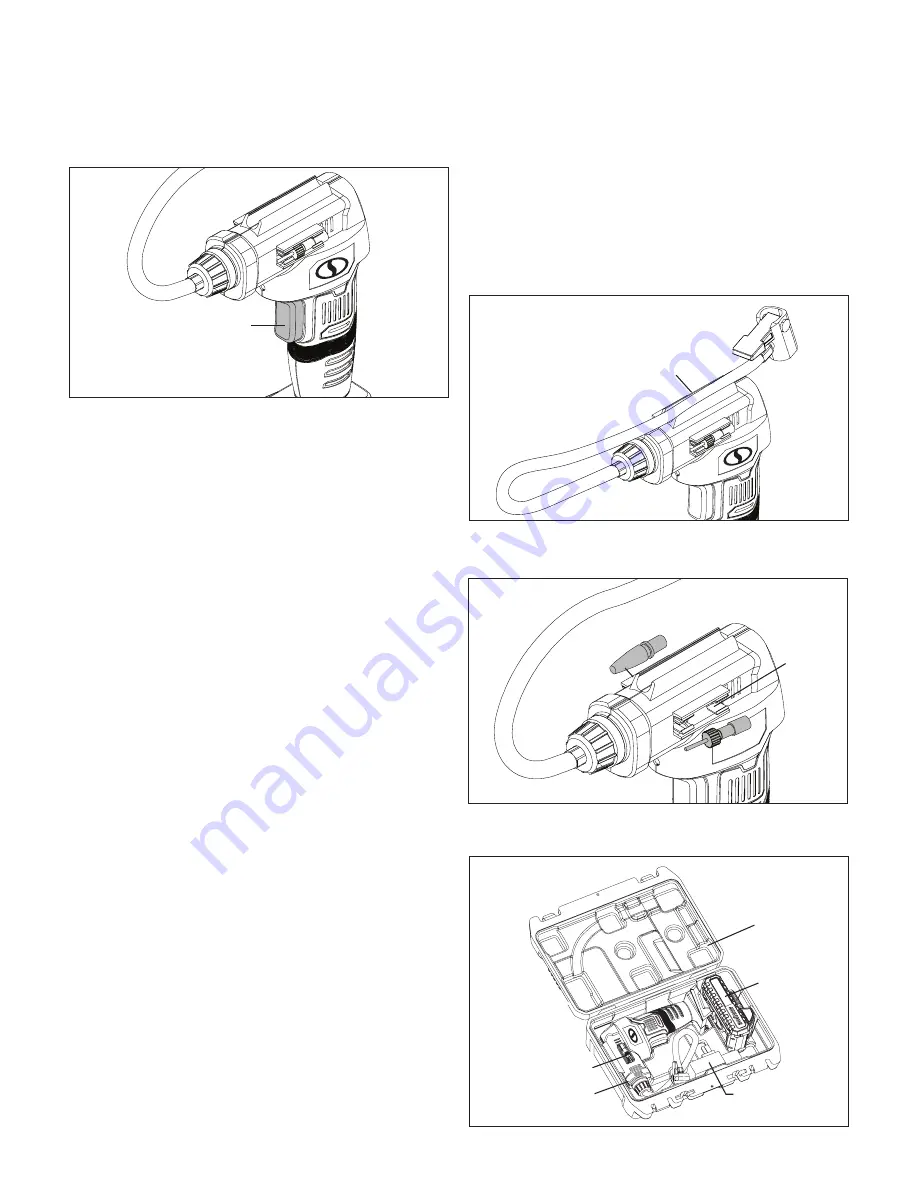
Depress the trigger switch (Fig. 13). If inflating, the air 

pressure will appear on the gauge as the item is being 

inflated.

6. 

To turn the compressor OFF, press the trigger switch 


(Fig. 13).

7. 

Remove the thread connector from the tire quickly, and 

replace valve stem cap on tire, if required. 


NOTE: 

The air compressor will stop automatically when 

the desired pressure is reached. Please press trigger to 

shut off the machine before removing the air chuck.


NOTE: 

If you disconnect the air chuck without pressing 

the trigger to turn off the machine, the air compressor 

will run an additional 30 seconds before shutting off 

automatically.

m

CAUTION!


Connector may be hot. Use caution when 

removing.

m

WARNING!


To avoid over-inflation of tires, please check 

the recommended tire pressure in the vehicle’s owner’s manual. For 

bicycle tires, check markings on tire. Use a separate pressure gauge 

for a more accurate reading.

m

CAUTION!


The LCD display must turn on before operating 

the air compressor. Please read and understand the instructions 

provided in the manual prior to operation.

Lock-On Function

The air compressor is equipped with a lock-on feature, which 

is convenient for continuous inflating for extended periods of 

time.

1. 

To lock on, depress and hold the trigger switch (Fig. 13).

2. 

Release the trigger switch and the air compressor will 

continue running.

3. 

To release the lock, press the trigger switch down to stop 

(Fig. 13).

Duty Cycle

1. 

For household use only.

2. 

The air compressor is designed for occasional use. 

Inflation over a long period will overheat the air 

compressor and may cause damage.

3. 

The air compressor should not operate for more than 5 

minutes at a time, after which it must be switched off 

and allowed to cool down for at least 10 minutes before 

restarting. 

Storage

Air Hose + Adapters Storage

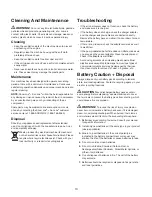
1. 

When the air compressor is not in use, press the hose into 

the storage area on top of the tool (Fig. 14).

2. 

Adapters provided with the air compressor can be placed 

in the storage area located on both sides (Fig. 15).

3. 

Store the tool and all accessories into the carrying case 

(Fig. 16).

Fig. 13

Trigger switch

Fig. 14

Air hose 

storage

Fig. 15

Adapter 

storage 

area

Fig. 16

Carrying 

case

Battery

Battery 

charger

Adapters

Air compressor

Summary of Contents for SUNJOE 24V-AJC-LTE

Page 1: ...a solid surface enables better control of the cordless air compressor in unexpected situations 12 Do not force the tool It will perform better with less likelihood of personal or mechanical injury if...

Page 2: ...injury 10 Do not use cordless air compressor as a breathing device 11 Never direct a jet of compressed air toward people or animals Take care not to blow dust and dirt towards yourself or others Foll...

Page 3: ...ng damaged or improperly wired extension cord poses a risk of fire and electric shock If an extension cord must be used plug the charger into a properly wired 16 gauge or larger extension cord with th...

Page 4: ...es additionally seek medical help Liquid ejected from the battery may cause irritation or burns This advice is considered correct for conventional NiMh NiCd lead acid and lithium ion cell types If thi...

Page 5: ...reach over 105 F 40 5 C In particular do not leave the battery charger in a car that is parked in the sunshine 6 Protect batteries from overheating Overloads overcharging and exposure to direct sunlig...

Page 6: ...ution a warning or a danger WEAR EYE PROTECTION For protection against injury wear safety goggles WARNING Do not expose the unit to rain or wet conditions Keep dry Symbols Symbols Descriptions Descrip...

Page 7: ...or 154 Watt Air Flow 2 1 gal min Working Air Pressure Max 40 PSI 2 76 BAR 276 KPA Inflation time varies by item Air Pressure Max 120 PSI 8 27 BAR 827 KPA Gauges Digital readout PSI BAR KPA Hose Length...

Page 8: ...oring LEDs are lit Battery charge level is high 2 level monitoring LEDs are lit Battery charge level is decreasing Stop work as soon as possible 1 level monitoring LED is lit Battery is flat Stop work...

Page 9: ...ible damage to the battery Operation mWARNING Always wear safety goggles when operating the air compressor Failure to do so could result in objects being thrown into your eyes resulting in possible se...

Page 10: ...flate them by blowing air into them The sport ball needle can be used to inflate any type of sports ball or any other item that requires a sport ball needle The Presta valve adapter can be used to inf...

Page 11: ...t will turn on when the power button is pressed and will stay on for 30 seconds Starting Stopping 1 Slide the battery into the battery compartment until it clicks to lock it into position Fig 12 2 Pla...

Page 12: ...instructions provided in the manual prior to operation Lock On Function The air compressor is equipped with a lock on feature which is convenient for continuous inflating for extended periods of time...

Page 13: ...he battery does not charge check the charger adapter and the charger adapter cable are connected correctly Remove the battery pack and allow it to cool down to room temperature If there is no pressure...

Page 14: ...ructions may create a risk of shock or injury If your Sun Joe cordless air compressor requires service or maintenance please call the Snow Joe Sun Joe customer service center at 1 866 SNOWJOE 1 866 76...

Page 15: ...y Battery Charge Time Max 24VCHRG AC 1 hr 40 min 24VCHRG QC 1 hr 10 min Battery Runtime Max 50 min 24V iON 4 0 Ah Lithium Ion Battery Battery Charge Time Max 24VCHRG AC 2 hrs 40 min 24VCHRG QC 1 hr 50...

Page 16: ...16 NOTES...

Page 17: ...17 NOTES...

Page 18: ...18 NOTES...

Page 19: ...the owner s manual Snow Joe Sun Joe will not be responsible for the cost of any unauthorized warranty repairs This warranty does not cover any cost or expense incurred by the purchaser in providing su...

Page 20: ...snowjoe com...

Reviews: