background image

 © Trynex International 2009      L1102

5 — 25

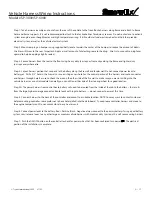
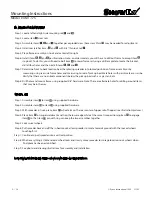
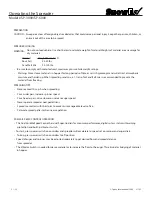
Mounting Instructions  

Model # SP-3000/SP-6000

Step 1: 

Remove tailgate from pickup bed.

Step 2: 

Load spreader onto truck bed and mount spinner assembly.

Step 3: 

Slide spreader forward until deflector/chute assembly makes contact with vehicle. Then, slide spreader back approx.  

                1” to allow proper clearance.

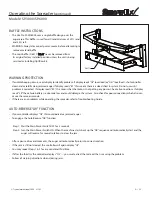
Step 4: 

Install stop bars using supplied hole patterns (see Fig.2). To achieve the best position, you may need to drill  


               additional holes in bracket in order to properly position spreader.

Step 5: 

Now that the spreader is positioned front to back, you will now center it left to right. Looking at the inside front and  

               rear corner of the lower frame area, you will notice (4) holes in the bottom of the frame. Using a paint pen or similar

              marking device, mark hole locations.

Step 6: 

Before drilling holes, look beneath the approximate area where each hole will be located. Make sure there are no  

               vehicle components that will be in the path of the drill before doing this step. If there are interferences, you can  
               relocate holes, making sure there are at least two forward and two rearward of the front to back centerline.

Step 7: 

Install and tighten all (4) bolts.

Step 8: 

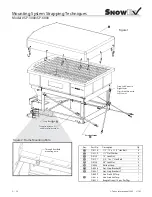
Install ratchet straps (see Vee Pro 3000/6000 Mounting System: Strapping Techniques). It is very important for  

               everyone’s safety this strapping method be used as the standard mounting procedure. 

              (Do not use ratchet straps exclusively.)

Step 9: 

Connect the spreader power cord to vehicle main power plug mounted at rear of vehicle (see Electrical Installation).

Step 10: 

Connect Center High Mount Stop Lamp (CHMSL) cord from the spreader to mating half attached to vehicle 

(see Electrical Installation). 


Summary of Contents for Vee Pro 3000

Page 1: ...Trynex International 2009 REV 003 L1102 5 1 Spreaders for Snow Ice Control FOR MODELS Vee Pro 3000 Vee Pro 6000...

Page 2: ...ction 3 General Information and Registration 4 Safety Information 5 7 Spreader Assembly and Exploded Views 8 16 Wiring Instructions 17 Electrical System Information 18 24 Spreader Mounting and Assembl...

Page 3: ...ALERT YOU The Society of Automotive Engineers has adopted this SAFETY ALERT SYMBOL to pinpoint characteristics that if NOT carefully followed can create a safety hazard When you see this symbol in thi...

Page 4: ...of Snowex Performance Registration Record the following information in this manual for quick reference Spreader Model Number __________________________________________________________________________...

Page 5: ...ver allow children to operate or climb on equipment Always check areas to be spread to be sure no hazardous conditions or substances are in the area Always inspect unit for defects broken worn or bent...

Page 6: ...mber most accidents are preventable and caused by human error Exercising of care and precautions must be observed to prevent the possibility of injury to operator or others Never operate equipment whe...

Page 7: ...Trynex International 2009 L1102 5 7 Safety and Warning Labels D 6546 D 6548 D 6335 D 6544 D 6545 D 6547 Model SP 3000 SP 6000...

Page 8: ...Trynex International 2009 L1102 5 8 Side and Bottom View Model SP 3000...

Page 9: ...Trynex International 2009 L1102 5 9 Side and Bottom View Model SP 6000...

Page 10: ...d HWH D 6172 10 32 x 5 8 Hex Machine Screw 2 D 6140 5 16 18 x 3 8 S S Set Screw 1 D 6232 Motor Drive Coupler 1 1 r e g u A 0 2 2 6 5 6 D 1 r o t o M r e g u A 0 2 3 6 D D 6566 Auger Trans 30 1 1 D 651...

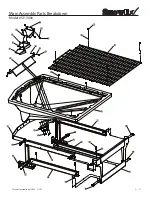
Page 11: ...Trynex International 2009 L1102 5 11 Main Assembly Parts Breakdown Model SP 3000...

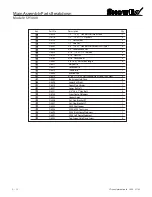
Page 12: ...4 0 5 6 D 1 n w o D d l o H n e e r c S p o T 9 0 5 6 D 1 r o t a r b i V y t u D y v a e H 5 1 5 6 D 4 t h g i R l i a R r e w o L 6 9 4 6 D 4 t f e L l i a R r e w o L 7 9 4 6 D 1 t l o B x e H 1 x...

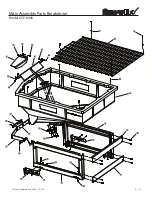
Page 13: ...Trynex International 2009 L1102 5 13 Main Assembly Parts Breakdown Model SP 6000...

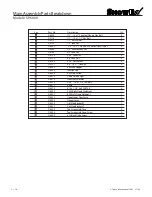
Page 14: ...e V d e t r e v n I 4 0 5 6 D 1 n e e r c S p o T 0 0 0 6 6 0 5 6 D 1 t h g i L e k a r B L S M H C 4 1 5 6 D 1 r o t a r b i V y t u D y v a e H 5 1 5 6 D 4 t l o B p a T 2 1 1 x 8 1 6 1 5 4 2 5 6 D...

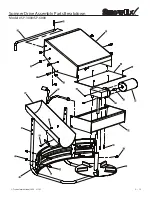
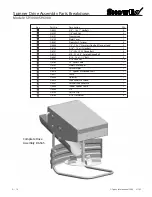
Page 15: ...Trynex International 2009 L1102 5 15 Spinner Drive Assembly Parts Breakdown Model SP 3000 SP 6000...

Page 16: ...3 1 6 D 2 t l o B e g n a l F d e t a r r e S 8 5 x 2 3 0 1 2 7 1 6 D 8 t l o B 2 1 1 x 8 1 6 1 5 2 6 4 6 D 0 1 t u N k c o L 6 1 5 8 3 1 6 D 1 e l b a C r e w o P 4 2 2 6 1 6 D 1 r e l p u o C e v i...

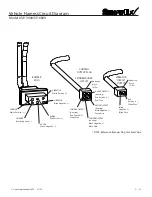
Page 17: ...r use existing access hole for the control portion of the harness and route connector and harness through hole Be sure to check the area on the other side of the fire wall to make sure you are not dri...

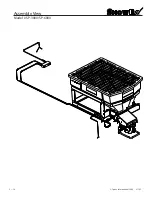
Page 18: ...Trynex International 2009 L1102 5 18 Assembly View Model SP 3000 SP 6000...

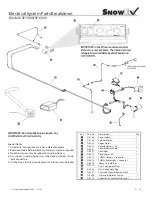
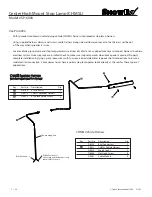
Page 19: ...heat shrink butt connectors 5 If inline fuse is installed use a 60 amp maxi fuse or circuit breaker CHMSL Lamp Optional for SP 3000 Power Cable Spinner Motor Auger Motor Vehicle Harness 25 Control Po...

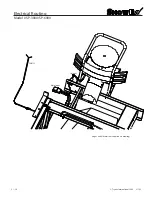
Page 20: ...Trynex International 2009 L1102 5 20 Electrical Routing Model SP 3000 SP 6000 CHMSL Spinner Main Input Auger and Vibrator not supplied on drawing...

Page 21: ...Connect to control mating half Positive White with Red Tracer to battery Ring Terminal Negative Black to battery Ring Terminal NOTE A Leads must only be attached to battery B If fusing must use minim...

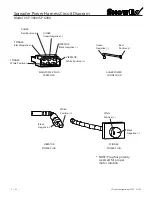
Page 22: ...PLUG SPREADER NOTE Plug has polarity reversed for proper motor rotation SPINNER Black Negative AUGER Red Positive AUGER Green Negative VIBRATOR White Positive VIBRATOR Black Negative AUGER POWER CONNE...

Page 23: ...hite Positive Red Positive White Wire Black Negative Black Wire Anderson Block 2 Pos Anderson Block 4 Pos AUGER OUTPUT housing Red Positive Red Wire AUGER OUTPUT housing Black Negative Green Wire SPIN...

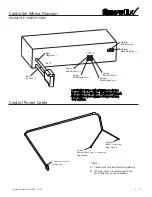
Page 24: ...ake pedal is pressed Properly complete installation by tying up any loose wires with ty wraps also add electrical tape over both connections to insure a solid electrical connection Some newer trucks h...

Page 25: ...g a paint pen or similar marking device mark hole locations Step 6 Before drilling holes look beneath the approximate area where each hole will be located Make sure there are no vehicle components tha...

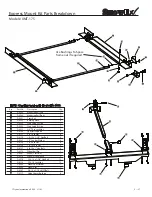
Page 26: ...R 3 0 5 6 D D 6536 Adj Stop Bracket RT 1 D 6537 Adj Stop Bracket LT 1 D 6499 Vee Pro 3000 Tarp 1 D 6510 Vee Pro 6000 Tarp 1 Ratchet Straps Ratchet Straps Through floor bed Through floor bed mounting...

Page 27: ...6569 D 6587 D 5717 Mounting Rail Left Mounting Rail Right Cross Rail Backing Plate Stop Latch Lt Side Stop Latch Rt Side 5 8 Thin Lock Nut Special Stop Bolt 5 8 Lock Nut 1 2 13 x 1 1 2 Hex Bolt 1 2 Fe...

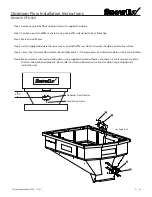
Page 28: ...ts below the pick up bed such as a gas tank etc Step 8 Drill holes and mount frame using supplied 5 8 hardware Note There are alternate holes for drilling around items that may be in the way WHEEL KIT...

Page 29: ...way as original baffle was Nut and washer should be on exterior surface Step 5 Center the Optimum Flow vibrator horizontally and 6 1 2 below apron see illustration below mark and drill holes Step 6 M...

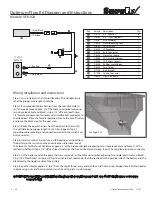
Page 30: ...on off switch and leave the black wire for the next step Step 3 Route the power harness from the battery to the switch this will determine proper length to cut wires Repeat step 2 regarding cable jac...

Page 31: ...ched to the first stage is for dry coarse free flowing materials D 6499 final stage attached to the second and first stage is for fine materials or ice melters y t Q n o i t p i r c s e D o N t r a P...

Page 32: ...e material from freezing SPREADING TIPS Never exceed 10 m p h when spreading For a wider pass increase spinner speed For a heavier pass drive slower or increase auger speed Never operate spreader near...

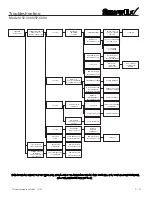
Page 33: ...all connections If display reads LB the vehicle battery is extremely low and could damage the system Also check for poor connections which also can cause the same error code If there are any problems...

Page 34: ...trical connections are tight and clean Be sure nothing is jammed in the hopper Motor doesn t run Controller shut down Material not flowing from hopper Audible alarm beeping and display shows OL or OH...

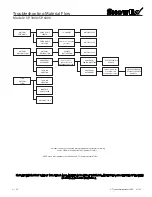
Page 35: ...M TEST 4 TO 20 AMP DRAW NO LOAD GOOD 20 AMP DRAW NO LOAD BAD TEST TURN SHAFT BY HAND SHOULD TURN FREELY REPLACE ALL CORRODED CONNECTIONS PLUG IN SPREADER OPEN ACCESS COVER AND PLUG TOGETHER REPLACE HA...

Page 36: ...N SHOULD TOUCH HOPPER ON 3 SIDES MATERIAL DOES NOT FLOW MATERIAL ISSUE AUGER RUNS PROPER DIRECTION AUGER RUNS BACKWARDS REPLACE VEHICLE HARNESS CHECK CONNECTIONS AT AUGER MOTOR FOR REVERSE POLARITY PO...

Page 37: ...warranty Use diaelectric grease on all electrical connections to prevent corrosion at the beginning and end of the season and each time plugs are disconnected Gently wash unit after each use to preven...

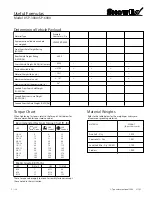
Page 38: ...r to the Torque Chart below for the recommended fastener torque values These torque values apply to mount assembly fasteners except those noted in the instruction Recommended Fastener Torque Chart ft...

Page 39: ...THIS PAGE INTENTIONALLY LEFT BLANK Trynex International 2009 L1102 5 39...

Page 40: ...THIS PAGE INTENTIONALLY LEFT BLANK Trynex International 2009 L1102 5 40...

Page 41: ...THIS PAGE INTENTIONALLY LEFT BLANK Trynex International 2009 L1102 5 41...

Page 42: ...be made to the dealer from where the product was purchased unless otherwise authorized by Snowex Snowex reserves the right to determine if any part is defective and to repair or replace such parts as...

Page 43: ...x Dealer sold you the correct product for your needs application Yes No 10 How would you rate your overall satisfaction with your SnowEx Dealer 11 How would you rate your overall satisfaction with you...

Reviews: