background image

Return to contents

9

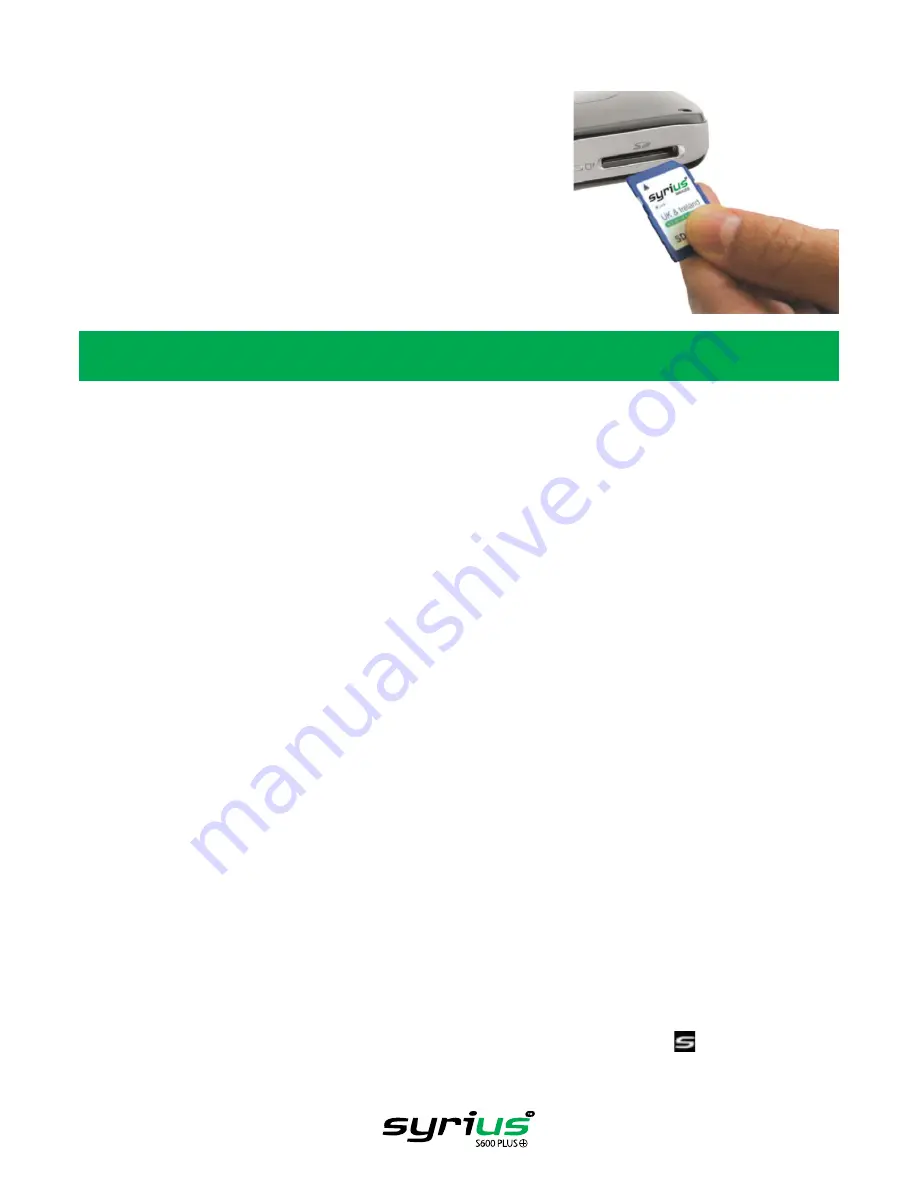
Start Up – Installing the SD Card

Before using your Syrius Plus, you will need to install the SD Card included 

with the device. The SD Card comes complete with a digital map of the UK 

and Ireland or Western Europe depending on the model purchased and is also 

where the Enigma™ camera database is stored if you choose to subscribe and 

download it.
Start by moving the ‘Batt. ON/OFF’ switch located on the underside of the unit 

to the ‘ON’ position, then remove the SD card from its packaging and insert it 

into the SD Card slot as indicated. Finally switch on the device by pressing and 

holding the standby power button located on the left hand side of the unit for 2 

seconds. As soon as the device is switched on, the Syrius Plus will automatically 

synchronise with the SD Card. Once the synchronisation is completed, the SD 

Card will not function with any other device. Your Syrius Plus is now ready to 

navigate and the camera database can be downloaded if necessary.

Please note that if the unit does not activate when you press and hold the standby power button for 2 seconds it 

may require charging. Refer to the section ‘Charging the internal battery’ later in this manual.

System Requirements and Downloading

Before you can begin to download the database onto your Syrius Plus, you will need to install the Syrius Updater software 

provided on the CD ROM. 
In order for the software to be installed successfully, there are certain minimum hardware and software requirements 

needed. 

Hardware Requirements

The computer must have an Intel Pentium Class processor or equivalent, a minimum of 32MB of RAM, a monitor with 256 

(8-bit) colours or greater, a CD ROM drive, 20MB of free disc space and a spare USB connection.

Software Requirements

The software will only operate on the following Windows based operating systems: 

Windows 2000 
Windows XP 
Windows Vista 

and, in addition, will only work with Internet Explorer 6 or Netscape Navigator 6 or above.

NOTE: The Syrius Plus Updater software does not support Windows 95, 98, Millennium or Apple Macintosh 

operating systems.
Software Installation Instructions

Place the Software CD into a CD ROM or DVD drive. Your PC should automatically open a window displaying the 

instructions for installing the software. Follow the instructions onscreen to install the download software. 
To launch the CD manually: Click on 

‘Start’

 and then 

‘Run’

. In the dialogue box that opens click on 

‘Browse’

 – another 

dialogue box will open. Locate your CD ROM or DVD drive (drive letter is normally D) using the 

‘Look in’ 

option and select 

‘Menu’

 from the lower portion of the dialogue box. Once you have selected 

‘Menu’

 click on 

‘Open’

 on the explorer box and 

then 

‘OK’

 on the Run dialogue box.

Please make sure that the operating system installs the new hardware (Win 2K, XP and Vista) before installing the Syrius 

Plus Updater software. Once the ‘Syrius Plus Updater’ software has been installed click 

‘Finish’

 and then close the CD auto 

run window. After installing the software, please re-boot your PC.
Any later download software updates can be obtained from 

www.snooperneo.co.uk.

 If you have any problems using this 

software please call 0870 787 0700 during office hours and select Option 3.

Once the software is installed, you are ready to download the database onto your Syrius Plus. The Syrius Plus 

download software runs automatically in the background*. This is indicated by the symbol 

, which can be 

located in the system tray in the bottom right hand corner of your desktop near the system clock.

*When the Syrius Plus Updater is run for the first time you will be asked to select your language and then to select the camera 

data that you wish to download. Select the data you would like and then click ‘OK’. The software is now ready for use.

Summary of Contents for syrius s600 plus

Page 1: ...Developed by Mapping by...

Page 2: ...e SD slot on the top of the unit When necessary upgrades to this mapping data will be made available for you once every twelve months As the Enigma camera database changes daily regular updates to you...

Page 3: ...ness Day Night Volume 37 Change Language Setup 38 2D 3D North Speed Time MPH KMH Arrival Time Remaining Time Page 38 Show POI 39 Auto Scale Camera Alert 40 Display Cameras Alert Sound Mute Auto Mute 4...

Page 4: ...Version 1 x Windscreen suction cup bracket 1 x 12v DC to 5v DC Coiled power lead with cigarette lighter socket adaptor 1 x USB Data Cable 1 x 240V AC to 5V DC mains power adaptor 1 x Download Software...

Page 5: ...n Power LED Battery Status LED On Off Button Manual Store Microphone for use with Bluetooth function USB Cable Socket Audio Out Socket Mic In Socket for use with Bluetooth function Battery ON OFF swit...

Page 6: ...ally be activated within one hour By Post If you would like to register by post send the completed registration form to us at the following address Performance Products Limited Cleaver House Sarus Cou...

Page 7: ...tion is indicated by the icon Tip To reduce the cold start GPS time remain stationary 2 Bring up the main navigation menu by touching the centre of the display Select Tip The icon always means that th...

Page 8: ...now highlighted for you As you approach a specific turn in the calculated route the Syrius Plus will advise you what to do For example After 200 yards turn left followed by Now turn left As you procee...

Page 9: ...rate on the following Windows based operating systems Windows 2000 Windows XP Windows Vista and in addition will only work with Internet Explorer 6 or Netscape Navigator 6 or above NOTE The Syrius Plu...

Page 10: ...ess bar will start to progress across the screen l The software will then connect to our database server and then download the database l The Syrius Plus will then save the data received l The softwar...

Page 11: ...ere it might endanger the driver or passengers should your vehicle suddenly come to a stop or be involved in an accident Installing your Syrius using the Windscreen Suction Cup bracket You can mount y...

Page 12: ...et is clean of any debris remembering not to insert metal objects into the socket Check that the cigarette lighter adaptor is inserted all the way into the socket and check that the fuse in the cigare...

Page 13: ...or 2 seconds to switch on the device Low Battery Warning If the Syrius Plus is powered from the internal battery and the Battery Low Please Recharge warning is displayed on the screen the unit has app...

Page 14: ...how a section of a map The Syrius Plus needs to acquire a minimum of four satellites in order to work Once this has been achieved the Syrius Plus will ascertain your position and this will be indicate...

Page 15: ...nd the unit will display the alternate setting and vice versa However each time you power the device up the original setting will be displayed 2 2 The Syrius Plus enables you to adjust the brightness...

Page 16: ...ning a route There are several ways to plan a route on the Syrius Plus 3 1 l Press the centre of the screen to access the Navigate to menu l Press the Find by Post Code icon l If you have the European...

Page 17: ...town or city that you would like to navigate to then select this option l Press the centre of the screen to enter the Navigate to menu l Press the Find by City icon l If you have the European version...

Page 18: ...nformation screen is displayed saying Set Home Press OK in the information window to continue press cancel to exit If Home has already been set it can be edited in My Favourites refer to section 4 on...

Page 19: ...the destination l Press Name and a keyboard will be displayed with the road name you selected l Press the Arrow key to erase this data then input the new name using the keyboard Please note You can e...

Page 20: ...essing Go 3 6 1 Create a Multi route l Press the centre of the display to enter the Navigate to menu l Press the Multi route icon You will then see the Multi route screen that allows you to l Create a...

Page 21: ...Arrow Note These functions only apply to the stage that you have selected To edit the other stages in the list press the Return Arrow in the bottom right hand corner of the screen and select the new s...

Page 22: ...nation or to cancel the multi route 3 7 The Syrius Plus has the capacity to store up to 100 user locations To add your favourite locations see section 4 1 on page 26 l To navigate to one of your store...

Page 23: ...ry Screen will tell you the distance to your destination estimated time of arrival and the estimated time it will take to complete your journey Please note The summary screen is only displayed for app...

Page 24: ...aken Route Option to change the parameters of the route or Guide which will list the turn by turn instructions of the journey The Summary Screen will tell you the distance to your destination estimate...

Page 25: ...rn instructions 3 10 2 To navigate using a Different Position l Press the centre of the screen to enter the Navigate to menu l Press the black arrow once l Press the Find by Nearest POI icon l Select...

Page 26: ...press Map l To change the route parameters press Route Option see Route Options on page 35 for specific instructions l To return to the previous page press the return arrow located on the bottom righ...

Page 27: ...Summary Screen will tell you the distance to your destination estimated time of arrival and the estimated time it will take to complete your journey Please note The summary screen is only displayed fo...

Page 28: ...taken Route Option to change the parameters of the route or Guide which will list the turn by turn instructions of the journey The Summary Screen will tell you the distance to your destination estima...

Page 29: ...your journey The summary screen is only displayed for approximately 10 seconds before the unit automatically returns to providing you with turn by turn instructions 3 14 After a multi route has been...

Page 30: ...then input the new name using the keyboard l Press Save once you have entered the name Please note You can enter a new name for the favourite using up to a maximum of sixteen characters 4 1 2 Using a...

Page 31: ...button at the bottom of the display If the destination selected is not the one you wish to delete you can press the arrow located in the bottom right hand corner of the display to go back to the list...

Page 32: ...num option becomes available This option is NOT available for any other location type Select Direction to specify the compass direction of the user point Select Limit Speed to specify the speed limit...

Page 33: ...he top of the display l Press the User points icon l Press the Delete All button an information box will be displayed with Delete All and the options of OK and Cancel l Press the OK button and ALL the...

Page 34: ...is function is accessed from the My Favourite menu you are able to change the Office location for example if you move house or to delete the Office location 4 5 1 To change the office location l Press...

Page 35: ...unit l Press the centre of the screen to access the Navigate to menu l Press My Favourite at the top of the display l Press the Home or Office icon l Press the Change button l Press Save using Curren...

Page 36: ...the same procedure Once you have selected the desired brightness press the OK button at the bottom of the screen Please note If Day is ticked when you press OK at the bottom of the display the Syrius...

Page 37: ...the navigation screen To alter any of these settings l Press the centre of the screen to enter the Navigate to menu l Press the Configure button l Press the Setup icon where you will see the list of...

Page 38: ...s the bottom of the navigation screen To make your selection touch the relevant tick box with your finger To save any of the changes press the OK button at the bottom of the display If you wish to kee...

Page 39: ...switched On by default during manufacture Auto Scale automatically magnifies the map as you approach a junction or roundabout where you may need to make a turning so that you can see it in more detail...

Page 40: ...fixed speed safety camera warnings are displayed on the navigation screen To make your selection touch the relevant tick box with your finger 5 7 2 You can choose between the following options Yes The...

Page 41: ...rimary Schools at the following specified times 08 30 09 30 12 00 13 00 and 15 30 16 30 To make your selection touch the relevant tick box with your finger To save any of the changes press the OK butt...

Page 42: ...ion touch the relevant tick box with your finger To save any of the changes press the OK button at the bottom of the display If you wish to keep the settings unchanged you can exit the Alert menu by p...

Page 43: ...you wish to keep the settings unchanged you can exit the Change map colour menu by pressing the return arrow located in the bottom right hand corner of the display 5 11 This function allows you to sw...

Page 44: ...etooth l Press Search the device will search for and display a list of Bluetooth devices l Select the Bluetooth device you wish to pair with the Syrius Plus l Enter the passkey onto the Bluetooth devi...

Page 45: ...button This will give you a choice of calculating a route that takes the shortest time or the shortest distance and will also allow you to calculate a route that avoids any Toll Roads and Motorways if...

Page 46: ...elect this option l Press Avoid by Road Name You will be provided with the turn by turn instructions of the route that you are currently following If the road you are looking for is not visible press...

Page 47: ...layed for approximately 10 seconds before the unit automatically begins to provide you with turn by turn instructions 6 2 3 If you do not wish to use the alternative routes offered by the Syrius Plus...

Page 48: ...mmary screen which will give you a list of each turn by turn instruction from the start of your journey to the end 6 4 You can use this function if you would like to calculate a route but from a diffe...

Page 49: ...three seconds From this Menu you can l Zoom closer in or zoom further out from the map l Mute or alter the audio level l By pressing the icon you can manipulate the map l Switch between the 2D 3D and...

Page 50: ...reverts to your previous personalised setting 7 4 Camera Alerts Only applicable if you have subscribed to the Enigma Camera Database This function allows you to temporarily disable the safety camera a...

Page 51: ...te the exact action that you need to take Gatso Safety Camera Alerts Speed camera type Speed limit Distance to camera Your current speed The red line indicates the route you will be taking Next motorw...

Page 52: ...maintained throughout the danger zone When approaching the first camera in the SPECs system your Syrius Plus will begin to alert you at approximately 700 yards with a display indicating SPECS START an...

Page 53: ...bed and downloaded the Enigma camera database on to your Syrius Plus you will be unable to store User points if your are in close proximity to fixed cameras which are already in the database and are s...

Page 54: ...upply The Syrius Plus needs to be switched on BEFORE connecting it to the PC If the battery charge on the unit is low the unit may switch off during the download process and the download will fail As...

Page 55: ...ape Navigator are you using The software will only operate if you have Internet Explorer or Netscape Navigator 6 or above To check what version of Internet Explorer you have open your browser click on...

Page 56: ...ill inform you that the Syrius Plus Updater software is trying to access the internet Please make sure that you grant allow permit access through the Firewall Please read the messages supplied by your...

Page 57: ...x D x H Recommendations for safe use of product Syrius Plus Battery AC Mains Charger and other accessories l Always treat your product with care keep it in a clean and dust free environment l Warning...

Page 58: ...d personnel replace the battery in your unit Using other batteries and chargers could be dangerous Battery charge time can vary depending on different conditions such as operating temperature applicat...

Page 59: ...e 14 99 Pro Fit brackets are a custom made bracket that usually attaches to an air vent and are designed specifically for each make and model of vehicle Therefore you should contact Performance Produc...

Reviews: