


2. Install the supplied carriage bolts in the handle and
through the handle brackets. Tighten the nuts with a
1/2 in wrench.
3. Lift the upper handle section into position on the
lower handle and tighten the two top knobs.
4. Discard all remaining package material from the
motor control handle.
7RDVVHPEOHWKHJUDVVFDWFKHU
1. Attach the grass catcher frame to the grass bag with
the rigid part of the bag on the bottom. Keep the
handle of the frame out of the top of the bag.
2. Attach the grass bag to the frame with the quick-
action clips.
7RVHWWKHFXWWLQJKHLJKW
The cutting height can be adjusted to 5 (1-5) different
positions. Lift the wheels for a lower cut and lower the
wheels for a higher cut. The medium position is best for
most lawns.
1RWH
The adjuster lever is spring loaded.
1. Squeeze the height adjuster lever in the direction of
the wheel.
2. Move the wheel up or down for your cutting
requirements.
3. Set the same height at all four corners.
23(5$7,21
:$51,1*
Read and understand the safety
chapter before you operate the product.
%HIRUH\RXVWDUWWKHPRZHU
• Keep persons and animals away from the work area.
902 - 001 - 06.11.2018
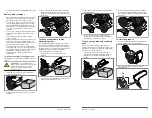
3. Pull the motor control handle in the direction of the
handlebar. The power button starts to flash.
4. Press the flashing power button. The product then
starts.
1x
7RVWRSWKHSURGXFW
• Release the motor control handle on the product, or
press the power button one time.
1x
7RHPSW\WKHJUDVVFDWFKHU
1. Lift the grass catcher with the frame handle.
2. Remove grass clippings from the grass catcher from
below the handle.
3. Empty grass clippings from the bag with the frame
handle and the bag handle.
&$87,21
Do not drag the bag when you
empty the grass catcher to prevent wear.
7RFKDQJHWKHFXWWLQJPRGH
The product can be changed to one of three different
cutting modes while in operation by pressing the cutting
mode button.
•
$XWRPRGH
- The product automatically adjusts the
cutting speed of the product in response to the
quantity of grass being cut.
•
1RWH
The product is set to Auto mode by default
while in operation.
•
%RRVWPRGH
- The product operates at high speed
regardless of the quantity of grass being cut.
• While the product is in operation, press the
cutting mode button one time to change from
Auto mode to Boost mode. The cutting mode
button then illuminates.
•
(&2PRGH
- The product operates at low speed
regardless of the quantity of grass being cut.
• While the product is in operation, press the
cutting mode button one time to change from
Boost mode to ECO mode. The cutting mode
button then illuminates and flashes.
• To go back to the default Auto mode, press the
cutting mode button one time while the product is
in operation. The cutting mode button then stops
flashing.
1RWH
If the motor control handle is released during
operation, the product stays in the current cutting mode.
If the product automatically stops, or the operator
presses the power button, the cutting mode used before
is erased from memory and the product starts in Auto
mode when started again.
%DWWHU\VWDWXVLQGLFDWLRQGXULQJ
RSHUDWLRQ
The display on the user control interface shows the
battery capacity and if there are problems with the
battery pack. The battery capacity is shown while the
machine is in operation.
/('OLJKWV
%DWWHU\VWDWXV
All Green
LEDs come on
Fully Charged (100% - 76%)
LED 1, 2 and 3
come on
The battery pack is 75% - 51% charg-
ed.
LED 1 and 2
come on
The battery pack is 50% - 26% charg-
ed.
LED 1 comes
on
The battery pack is 25% - 6% charg-
ed.
LED 1 flashes The battery pack is 5% - 0% charged.
902 - 001 - 06.11.2018