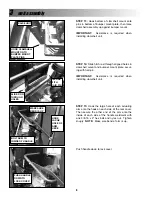
unit assembly
3
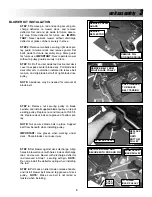
STEP 1:
Remove pin, rod and spring securing dis-
charge deflector to mower deck, and remove
deflector. Set rod and pin aside for future assem-
bly step. Store deflector for future use.
IMPOR-
TANT:
Never operate mower without discharge
deflector or grass catcher securely in place.
STEP 2:
Remove two bolts securing right deck pul-
ley guard to mower deck and remove guard. Set
bolts aside for future assembly step. Store guard
for future use.
IMPORTANT:
Never operate mower
without a pulley guard securely in place.
STEP 3:
Lift off and set aside foot rest/center deck
cover to expose senter blade deck. Pull blade belt
deck idler arm in direction indicated to relieve belt
tension, and slip blade belt off of right blade drive
pulley.
NOTE:
Assistance may be needed for removal of
blade belt.
STEP 4:
Remove nut securing pulley to blade
spindle, and install supplied blower pulley on top of
existing pulley. Replace nut, and torque to 70-80 ft-
lbs. Replace deck belt onto groove of bottom pul-
ley.
NOTE:
Nut secures blade bolt in place. Support
bolt from beneath while installing pulley.
IMPORTANT:
Use gloves when working under
deck. Sharp blades can cause injury.
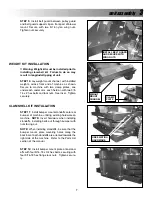
STEP 5:
Set blower against deck discharge. Align
holes in blower mount with holes in deck discharge
tabs, and secure blower with discharge deflector
rod removed in Step 1, securing with pin.
NOTE:
Do not reinstall the deflector spring when installing
the rod.
STEP 6:
Pull back on idler tension release handle,
and install blower belt around top groove of deck
pulley.
NOTE:
Make sure belt is not rolled or
twisted when installing.
5
REMOVE PULLEY
GUARD
REMOVE
DEFLECTOR
PULL ON IDLER
TO RELIEVE
BELT TENSION
BLOWER PULLEY
INSTALL BLOWER AND
SECURE WITH ROD AND PIN
FROM UPPER
IDLER PULLEY
TO LOWER
IDLER PULLEY
PULL
BACK
BLOWER KIT INSTALLATION
REPLACE
BELT
ONTO
BOTTOM
PULLEY
REMOVE BELT FROM
RIGHT BLADE PULLEY
REMOVE PIN,
ROD AND SPRING
Summary of Contents for 7011299
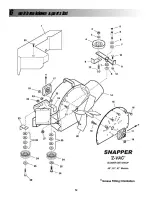
Page 12: ...6 unit breakdown parts list 12 ...
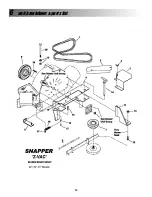
Page 14: ...6 unit breakdown parts list 14 ...
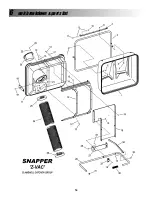
Page 16: ...6 unit breakdown parts list 16 ...
Page 18: ...6 unit breakdown parts list 18 ...
Page 20: ...6 unit breakdown parts list 20 ...


