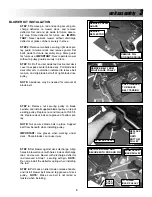
STEP 9:
Install belt guard between pulley guard
and belt guard support clip on front part of blower
mount. Secure with two 5/16 nylon wing nuts.
Tighten nuts securely.
!! Warning: Weight kit must be installed prior to
installing clamshell kit. Failure to do so may
result in longitudal tipping of unit.
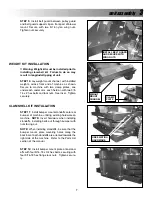
STEP 10:
Lay weight mount channel, with installed
weights, across front end of machine as shown.
Secure to machine with two clamp plates, one
under each caster arm, each held on with two 3/8-
16 x 4” hex bolts and lock nuts. See Inset. Tighten
securely.
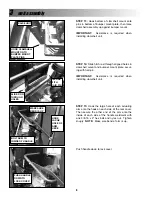
STEP 11:
Install bumper mount standoffs onto rear
bumper of machine, utilizing existing hardware on
machine.
NOTE:
Invert hardware when installing
standoffs, installing bolts out through bumper with
nuts facing out.
NOTE:
When installing standoffs, be sure that the
bumper mount plate mounting holes along the
back bar of both standoffs are oriented towards the
right side of the machine. Refer to the Parts List
section of the manual.
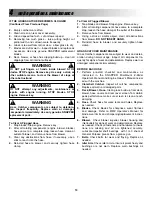
STEP 12:
Install bumper mount plate onto stand-
offs with four 5/16-18 x 3/4 hex bolts, securing with
four 5/16-18 hex flange lock nuts. Tighten secure-
ly.
unit assembly
3
7
INSTALL BELT GUARD
AND SECURE WITH
WING NUTS
WEIGHT KIT INSTALLATION
WEIGHT
MOUNT
CHANNEL
CLAMSHELL KIT INSTALLATION
USE EXISTING
HARDWARE
CLAMP
PLATE
Summary of Contents for 7011299
Page 12: ...6 unit breakdown parts list 12 ...
Page 14: ...6 unit breakdown parts list 14 ...
Page 16: ...6 unit breakdown parts list 16 ...
Page 18: ...6 unit breakdown parts list 18 ...
Page 20: ...6 unit breakdown parts list 20 ...


