background image

109

SureTrack Community

SureTrack - Online Community

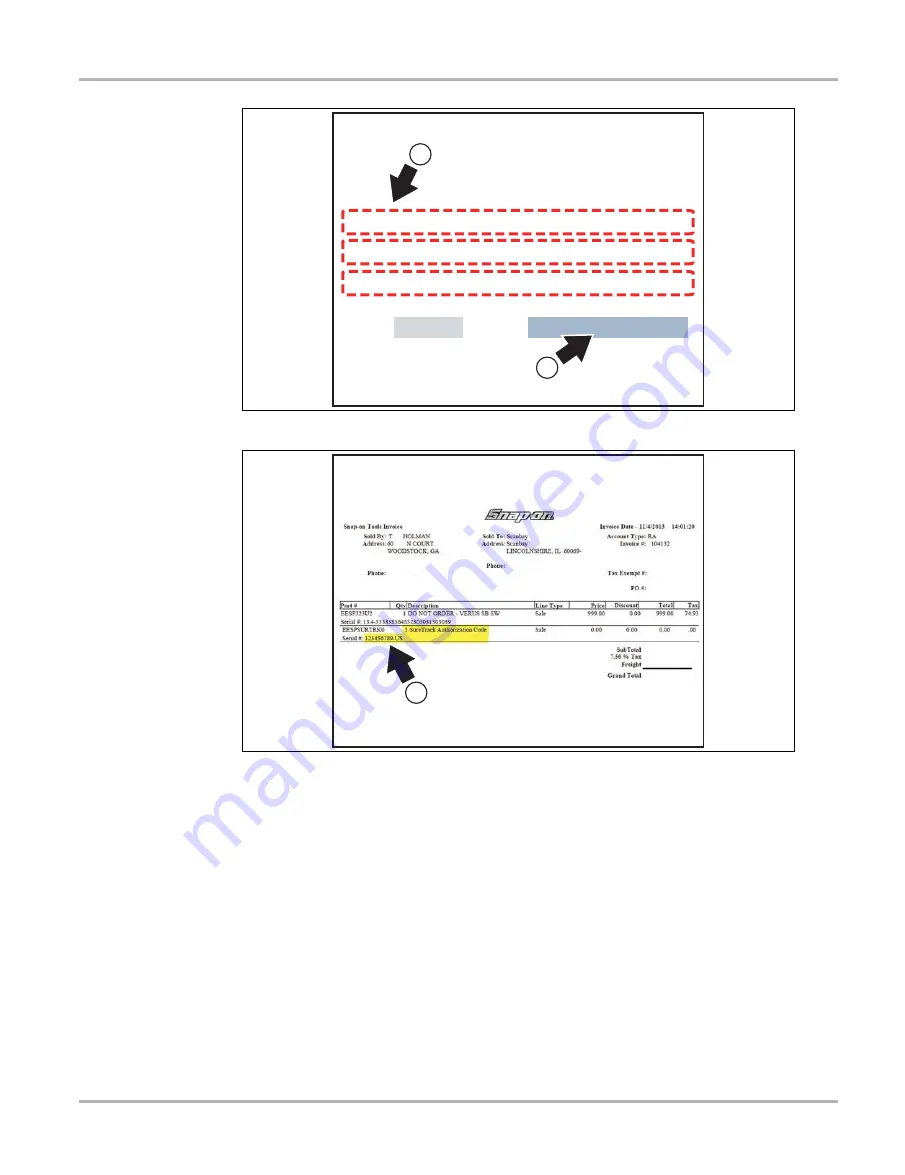
Figure 10-7 

Figure 10-8 

Submit

Cancel

Question 3:

Choose a question...

Question 2:

Choose a question...

Question 1:

Choose a question...

Select three security questions below. These questions will help us verify your identity should you forget
your password.

9

10

Choose 3 security questions.

11

Find the SureTrack Authorization Code
on your sales receipt.

12 digit alpha-numeric code (e.g. 123ABCAP4-US)

Summary of Contents for Vantage Ultra

Page 1: ...User Manual EAZ0081L00B Rev C 31 G 18 NA ...

Page 2: ...s Snap on reserves the right to make changes at any time without notice IMPORTANT Before operating or maintaining this unit please read this manual carefully paying extra attention to the safety warnings and precautions Software License Information Use of Software is governed by the terms and conditions of the End User License Agreement The diagnostic tool should not be initially operated until th...

Page 3: ...agent Product Training Videos Diagnostic tool specific training videos are available on our website Follow along and learn the basics of diagnostic tool operation with our free training videos Videos are product specific and are available at http diagnostics snapon com Click on the Training Support tab select the applicable diagnostic tool then select See Training NOTE i Sample titles are listed b...

Page 4: ... select See Quick Tips https www youtube com user snaponscanner videos Use the search function to find a title or enter Diagnostic Quick Tips in the search field to see a list of all applicable titles NOTE i URL links above and titles listed below are subject to change and may not be available in all markets A sample list of titles are listed below other titles may be available Some videos may not...

Page 5: ...es Ford Battery Monitor System Oil Specs Service Light Resets Ford Coil Current RFI Test Scope PID Trigger Functions Scanner Ford Flash Reprogramming Piezo Injectors Signature Test Ford Misfire Monitor Neutral Profile Correction Scanner Relative Compression Test Scope Ford PATS Key Programming ShopStream Connect Data Manipulation Ford Relative Compression Test ShopStream Connect Software Updates F...

Page 6: ... variations in the products that can be tested with this instrument we cannot possibly anticipate or provide advice or safety messages to cover every situation It is the responsibility of the automotive technician to be knowledgeable of the system being tested It is essential to use proper service methods and test procedures It is important to perform tests in an appropriate and acceptable manner ...

Page 7: ...rate or minor injury to the operator or to bystanders Safety Message Conventions Safety messages are provided to help prevent personal injury and equipment damage Safety messages communicate the hazard hazard avoidance and possible consequences using three different type styles Normal type states the hazard Bold type states how to avoid the hazard Italic type states the possible consequences of no...

Page 8: ...ecifications 9 Chapter 3 Basic Operation and Navigation 10 Turning On Off and Emergency Shutdown 10 Turning On 10 Turning Off 10 Emergency Shutdown 10 Basic Navigation 11 Home Screen Layout 11 Title Bar 11 Home Screen Icons 12 Common Toolbar Control Icons 13 Scroll Bar 14 Screen Messages 14 System Messages 14 Chapter 4 Guided Component Tests 15 Training and Classes 15 Power User Tests 16 Screen La...

Page 9: ...and Features 39 Measurement Out of Range Alert 41 Operation and Controls 42 Test Lead Probe Connection 42 Test Lead Probe Calibration 43 Control Panel and Settings 44 Secondary Ignition Testing 60 Optional Settings 62 Display Grid on off 62 Divisions 63 Saving and Reviewing Scope Multimeter Data Files 67 Data Buffer 67 Saving Files 68 Stopping and Reviewing Data Files 69 Saving Screens 70 Using th...

Page 10: ...Connect 100 Using SSC Connecting to your PC 100 SSC Main Screen 101 Image Viewer 102 Software Upgrades and Updates 103 End User License Agreement 104 Chapter 10 SureTrack Community 105 SureTrack Online Community 105 Main Topic Links 105 Quick Reference 105 Finding your SureTrack Authorization Code 106 Creating a SureTrack Account 107 Logging In active account 111 Logging In with New Authorization ...

Page 11: ...ecting the confirmation menu choice such as Continue Accept OK Yes or other similar choice Abbreviated example for the following procedure Select Brightness 1 Navigate to and highlight the Brightness selection 2 Select OK or similar button 1 2 2 Symbols Different types of arrows are used The greater than arrow indicates an abbreviated set of selection navigation instructions Abbreviated example fo...

Page 12: ... any abrasive cleaners or chemicals on the touch screen 1 2 5 Hyperlinks Hyperlinks or hot links that take you to other related articles procedures and illustrations are available in electronic documents Blue colored text indicates a selectable hyperlink Example IMPORTANT Read all applicable Safety Information before using this Diagnostic Tool 1 2 6 Procedures An arrow icon in the left margin area...

Page 13: ...ur push type control buttons and one thumb pad rocker type multi directional button located on the right side of the Diagnostic Tool All other Diagnostic Tool operations are controlled through the touch screen Figure 2 1 Front view Item Button Description 1 N X or Cancel Push type button To exit a menu or program To close an open list and return to the previous menu or screen To answer No when a y...

Page 14: ... 5 Power On Off Push type button Turns the Diagnostic Tool on and off Also press and hold for 5 seconds for emergency shutdown Item Button Description Item Description 1 Battery Status Indicator LED Green battery is fully charged Red battery is charging Amber indicates there is a battery issue correct before operating 2 DC Power Supply Jack AC power supply connection 3 Scope Multimeter Jacks Scope...

Page 15: ...hargeable battery pack A fully charged battery provides sufficient power for about 3 hours of continuous operation Battery charging occurs when the Diagnostic Tool is connected to the AC Power Supply and to a live AC power source Item Description 1 Built in Stand shown closed The built in stand extends from the back of the Diagnostic Tool and clips into the Diagnostic Tool for storage 2 Battery Co...

Page 16: ... the Diagnostic Tool Use only the AC power supply provided 2 5 Technical Specifications Item Description Specification Touch Screen Resistive Touch Panel Display 8 0 inch diagonal Color LCD 800 x 480 resolution SWVGA Meter Category 1 Battery Rechargeable lithium ion battery pack Approximately 3 hour run time Approximately 5 hour charge time Power Supply Supply Rating 15 VDC 2A DC Operating Voltage...

Page 17: ...icle Forcing a shut down while communicating may lead to ECM problems on some vehicles Never disconnect the Data Cable when the Diagnostic Tool is communicating with the vehicle ECM z To turn off the Diagnostic Tool 1 Close and exit all applications normally and navigate to the Home screen A stopping communication message may appear briefly before the Home screen displays 2 Disconnect the Diagnost...

Page 18: ...y there are no selectable items Elements of the Title bar let you know at a glance What Diagnostic Tool function is currently active The current time The source and status of the power being supplied to the Diagnostic Tool An active function icon is always displayed along the left hand edge of the Title bar These icons resemble their Home screen icon counterparts in appearance and color The name o...

Page 19: ... Icons Icon Function Full Battery Charge Level Indicates power is being supplied by the internal battery pack Horizontal bars diminish as the battery discharges Low Battery Charge Level Indicates the internal battery pack is low and needs to be recharged immediately A warning message will also display on the screen when the battery gets low External Power Connected Indicates power is being supplie...

Page 20: ... Opens the tools menu Save Writes data from buffer memory to a file The saved movie file can be accessed for future reference by selecting Previous Vehicles and Data View Saved Data The control icons below are used to navigate through paused or saved movie files during playback Step Forward allows forward movement in singular steps To quickly step forward select this icon yellow frame appears then...

Page 21: ...irectional button to rapidly scroll through data 3 3 Screen Messages 3 3 1 System Messages There are four types of system messages that may be displayed Message Type Description Loading and Connecting Loading and connecting messages display when the Diagnostic Tool is performing an internal operation such as loading a database or initiating a test The message automatically clears once the internal...

Page 22: ...OTE i Availability of tests and information may vary As an added resource Training and Classes provides even more support by including non vehicle specific tests and resources that allow you to quickly perform common tests review basic reference information and more 4 1 Training and Classes Training and Classes is a companion feature to the Guided Component Tests function This resource includes a ...

Page 23: ...w Amp Current probes or generic Low Amp Current probes Snap on Low Amp Current Probe operation information is also provided within the Snap on Low Amp Probe Reference Manual option Fuel Injector Current Ramp multiple types Fuel Pump Current Ramp Fuel Pump RPM Calculation Ignition Coil Current Ramp multiple types Parasitic Draw Snap on Low Amp Probe Reference Manual Dual Channel Tests provides comm...

Page 24: ...ed Voltage Drop Test Other Electrical Measurements Resistance Scientific Notation Voltage 15 minute Ignition Class provides basic introductory ignition system information Topics may include Introduction Coil on Plug COP Conventional Waste Spark Illustrated Terms Definitions provides common term definitions illustrations and tips associated with automotive component testing No Start Basics provides...

Page 25: ...l Pump Current Ramp Fuel Pump RPM Calculation Ignition Coil Current Ramp multiple types Parasitic Draw Snap on Low Amp Probe Reference Manual Using Fuse Box for Current Test Hard to Reach Wiring Features and Benefits Selecting Features and Benefits provides basic feature description and operational information about the diagnostic tool Additional information is provided for ShopStream Connect opti...

Page 26: ...tream Connect Test Leads and Clips Product Description provides an overview of diagnostic tool capabilities and operations 4 2 Screen Layout and Icons This section describes the Guided Component Tests control icon functions and screen layout 4 2 1 Screen Layout 1 Vehicle Identification 2 Toolbar contains control icons 3 Main Body displays menus information meter scales and signal traces 4 Informat...

Page 27: ...formation to assist you with testing Test Meter The test meter can display up to two signals simultaneously Signal and display adjustments are made through the Control Panel Signals are displayed using a grid with scales both vertical y axis and horizontal x axis Meter touch screen functionality is limited however you can adjust the zero baseline position 0 value of the signal on the horizontal sc...

Page 28: ...is icon displays a white frame around it and opens the control panel at the bottom of the screen while switching the active selection focus to the Show Hide or Probe icon in the Control Panel b In split screen mode control panel open when selected this icon displays a white frame around it and switches the active selection focus to the Show Hide or Probe icon in the Control Panel Note Switching ac...

Page 29: ...tification sequence is menu driven follow the screen prompts to enter the information Exact procedures may vary by the make model and year of the vehicle z To identify a vehicle for testing 1 Select the Guided Component Tests icon on the Home screen 2 Select a vehicle type from the menu A list of manufacturers displays Figure 4 3 Figure 4 3 Manufacturer list 3 Select the vehicle manufacturer from ...

Page 30: ...to return to the previous screen A list of systems available for testing displays Figure 4 5 Figure 4 5 Available systems menu 6 Select a system and a list of tests available for the identified vehicle displays 7 Select a test from the list to continue The identification sequence is now complete refer to the Operations section that follows for details on how to navigate through the Guided Componen...

Page 31: ...ure 4 7 2 Select a Component to continue Figure 4 7 Component Menu Depending on the vehicle and component selected different options and sub menus may be displayed Information and tests may vary Component Information see Component Information on page 25 Tests see Tests on page 27 Reference Information provides identification of components connector pin location and functions and abbreviation refer...

Page 32: ...d pin location and function details z To view component information 1 Select a component 2 Select Component Information from the Component Test menu Figure 4 8 Figure 4 8 Component Tests Menu NOTE i An additional selection may be required for some components e g selecting front or rear for an oxygen sensor O2S Component Information is displayed Figure 4 9 and Figure 4 10 Figure 4 9 Component Infor...

Page 33: ...eration Tech note provides component related tips e g common failures or faults additional information may include OEM service updates and recall information Connector displays illustrated electrical connectors and socket pin identification Location provides component locations testing tips and alternate testing locations if available Use the scroll bar to view additional information 3 Select Back...

Page 34: ...s specifications and testing tips z To select a test 1 Select a component 2 Select a Test from the Component Test menu Figure 4 11 The component test menu lists all of the tests available for the selected component Choices vary by the type of component as well as the make model and year of the vehicle Figure 4 11 Component Test Menu NOTE i An additional selection may be required for some Component...

Page 35: ... on the Information Panel once to display the information panel in full screen view Tap on it again to return to split view The Expand Collapse icon can also be used to toggle through split and full screen views Figure 4 13 Figure 4 13 View Options Some tests e g signature integrity tests may include waveforms examples within the information panel These waveform examples allow you to compare your ...

Page 36: ...ents can be made by selecting the Control Panel icon from the toolbar to display the Control Panel Figure 4 15 For additional information on channel settings see Control Panel and Settings on page 44 Figure 4 15 Control Panel Channel Controls 4 3 4 Saving and Reviewing Data Files Save and Stop control icon operation and data review procedures are the same as used for the Scope Multimeter function ...

Page 37: ... and is typically used for measuring signals that are not rapidly changing The DMM is ideal for performing basic tests on most standard automotive circuits and displays the results in a large easy to see format To use the DMM select the Scope Multimeter icon from the home screen then select Digital Multimeter from the menu See Tests and Capabilities Quick Reference on page 33 for a list of availab...

Page 38: ...ed to the lab scope sweep scales that use relatively short time intervals e g milli and micro seconds This allows you to monitor a signal over a longer period of time when looking for erratic glitches or dropouts To use the GMM select the Scope Multimeter icon from the home screen then select Graphing Multimeter from the menu See Tests and Capabilities Quick Reference on page 33 for a list of avai...

Page 39: ...hen performing diagnostics To use the lab scope select the Scope Multimeter icon from the home screen then select Lab Scope from the menu See Tests and Capabilities Quick Reference on page 33 for a list of available testing functions Specifications Function Range Accuracy Comments Signal Measurement Ch 1 yellow jack Ch 2 green jack Each channel input is referenced to common ground GND black jack S...

Page 40: ...rement as they are more representative of DC measurements a a Ohms Measures electrical resistance opposition to current 0 to 4 M Ohms Scope supplied DC current is passed through the circuit to measure the resistance between the two connected test leads a Diode Continuity Measures voltage drop across a diode and continuity through a diode Scope supplied DC current is passed through the diode to mea...

Page 41: ...nsducer a a 100 PSI Pressure Used to measure pressures for typical systems such as fuel oil EVAP hydraulic transmission fluid etc up to 100 psi using the 0 100 psi transducer a a 500 PSI Pressure Used to measure pressures for typical systems such as hydraulic transmission fluid pressure cylinder compression and AC high side up to 500 psi using the 0 500 psi transducer a a 5000 PSI Pressure Used to...

Page 42: ...h the channel 1 jack on the diagnostic tool Figure 5 1 Yellow Channel 1 Lead This lead also includes two black right angle common ground plugs One plug is standard and the other is stackable The standard ground plug should always be connected to the ground GND jack on the diagnostic tool The stackable ground plug is used for connecting additional ground leads such as the Channel 2 or the Secondary...

Page 43: ... a signal and the CIC and COP adapters attach to the ignition coil The coil adapter lead includes a black right angle stackable ground plug and a RCA type connector that is used to connect the lead to a secondary ignition adapter The spring clamp is used to connect to a ground Figure 5 4 Secondary Ignition Coil Adapter Lead and Clip on Wire Adapter NOTE i Contact your sales representative for addi...

Page 44: ...re available for surface fluid and air temperature measurements Figure 5 6 5 3 7 Pressure Transducers and Adapters optional Different pressure transducers and adapters are available for measuring positive and negative gas and liquid pressures Depending on the adapter measurement capabilities range from 1 to 5000 psi and up to 29 inHg Measurement and application capabilities vary per device Figure ...

Page 45: ...istics by turning glitches on off helping you to become more familiar with the lab scope controls Common waveforms include AC sine wave variable frequency and pulse secondary ignition and more There are two tools currently available the standard model Figure 5 8 left and the vehicle simulator model Figure 5 8 right which produces waveforms e g Crankshaft Position Sensor CKP Camshaft Position Senso...

Page 46: ...d lab scope NOTE i Scope and Multimeter tests are not vehicle specific therefore vehicle identification is not required 5 4 1 Scope Multimeter Screen Layout and Features 1 Toolbar contains navigational and control icons 2 Data Buffer Position Indicators graphical and numerical position indicators 3 Main Body contains the meter scope display 4 Control Panel contains channel trace controls 5 Expand ...

Page 47: ...y The Data Buffer Position Indicators are used to visually see the overall amount and position of the of stored buffer data during saving and playback For additional information on the Data Buffer Data Buffer Position Indicator and Saving Storing and Reviewing Data files see Saving and Reviewing Scope Multimeter Data Files on page 67 Icon Function Stop Stops the data buffer Control Panel a In full...

Page 48: ...age exceeds the input rating of the meter Figure 5 10 51 1 Risk of electrical shock Do not exceed voltage limits between inputs as indicated on the rating label Use extreme caution when working with circuits that have greater than 40 volts AC or 24 volts DC Electrical shock can cause personal injury equipment damage or circuit damage IMPORTANT If arrows are displayed in the live voltage values dis...

Page 49: ...ble with all functions z To open a scope multimeter function 1 Select the Scope Multimeter icon from the home screen 2 Select either Lab Scope Graphing Multimeter or Digital Multimeter from the menu 5 5 1 Test Lead Probe Connection Standard safety type test lead jacks are located on the top of the diagnostic tool and are compatible with many test leads and probes Insert the applicable test lead or...

Page 50: ...structions to complete the calibration Example For the ohms resistance calibration process once completed zero ohms should be displayed when the leads are connected together When the leads are separated the upward arrows on the display indicate infinite resistance or an open circuit NOTE i During an ohms test or a pressure test a manual probe recalibration can be initiated by selecting the probe i...

Page 51: ...tended as a general overview of the channel settings Not all the settings or controls described in this section are applicable with all functions some may be grayed out or not active applicable depending on the function or test Function availability is noted as applicable NOTE i The control panel can be toggled on off by selecting the Expand Collapse Icon to switch the screen between full and spli...

Page 52: ...ale Y axis represents what is being measured voltage amperage pressure etc and the unit of measurement it is being measured in The vertical scale is always divided into10 major divisions how these divisions are defined sets the scale of measurement NOTE i Vertical scales either channel can be set independently NOTE i Optional vertical scale preference settings are available The Divisions option al...

Page 53: ...hanges the vertical scale to a 10V volt scale The scale is always divided by 10 therefore each division is incremented by 1V Figure 5 15 Example Selecting 50 psi displays a 50 psi scale that is divided by 10 therefore each division is incremented by 5 psi Figure 5 16 ...

Page 54: ...sweep Scale icon indicates the active sweep setting NOTE i The sweep setting applies to all channels and cannot be set independently per channel To adjust the sweep scale unit of measurement value select the Sweep Scale icon to open the sweep scale menu Select a value then press the N X button to exit the menu 1 Sweep Scale 2 Sweep Scale Menu 3 Sweep Scale Icon Figure 5 17 Example Selecting 500ms ...

Page 55: ...nformation see Test Lead Probe Calibration on page 43 Probe test Options Menu Option Probe Device Used Test Lead Volts DC Standard Channel 1 and 2 test leads with alligator clips or test probes Vacuum 100 optional 0 100 psi pressure transducer with pressure adapter Pressure 100 Pressure 500 optional 0 500 psi pressure transducer with pressure adapter Pressure 5000 optional 0 5000 psi pressure tran...

Page 56: ...ect maximizes sampling rate 5 Filter removes signal noise or interference 6 Invert switches signal polarity 7 Coupling AC blocks the DC portion of signal 8 Scale Vertical scale adjustment adjusts vertical scale 9 Trigger turns triggering on off and sets direction of trigger slope 10 Refresh clears Min Max and Live values and resets to zero 11 Min Live and Max Display Panel displays lowest highest ...

Page 57: ... memory to plot a waveform across the screen No preference is given to any point during the selection process NOTES i Turning peak detect off is suitable for basic measurements and viewing waveforms e g oxygen O2 or Cam sensor when capturing fast events is not necessary The longer the time sweep the greater the chance a glitch could be missed because it occurred in between the sample points saved ...

Page 58: ...the filter feature can minimize or smooth out signal spikes and fast variations depending on which function is its used with Filter Lab Scope Using the filter with the lab scope smooths out fast spikes which helps to provide a good balance between noise suppression and signal integrity Using the filter is useful when working with scales of 5 volts and below as the lower the voltage scale the more ...

Page 59: ...m sources like the ignition system are ignored when filter is active To turn the filter on and off select the Filter icon Invert The Invert feature is used to switch signal polarity so the trace appears upside down inverted on the screen This is typically used when measuring amperage using the low amp probe or high voltage signals like secondary ignition Example A signal that normally rises from 0...

Page 60: ... trace appear more consistent or static A trigger is basically a specific point on the display at which a trace will start to display start the sweep if it crosses that point The trigger feature allows you to set the conditions of that specific point also called a trigger point When the trigger conditions are set and a trace meets those conditions crosses the trigger point the trace will start Tri...

Page 61: ...dicated by a plus symbol on the display Figure 5 22 The trigger marker represents the trigger point and is displayed on the screen when the trigger is turned on To roughly position the trigger marker select and drag it into position using the touch screen 4 To more accurately position the trigger marker select the Trigger Position Control icon Figure 5 22 The trigger position control panel opens 5...

Page 62: ... Press the N X button to exit 1 Trigger Marker 2 Trigger Position Control Panel Figure 5 21 Trigger marker and position controls 1 Trigger Marker out of range symbol 2 Waiting for Trigger Message 3 Trigger Position Control Icon Figure 5 22 1 3 2 ...

Page 63: ...g Auto Trigger as the screen will update regardless if the signal crosses the trigger point Once the trigger point is set then switch to Manual Trigger mode z Selecting Trigger Auto Manual Mode 1 From the Control Panel on the test meter screen turn the trigger on for the desired channel 2 Select the Settings icon from the toolbar 3 Select Settings Configure Scope Meter Trigger Mode from the menu s...

Page 64: ...he signal still seems incorrect use the lab scope to verify the signal integrity and signal spacing Slow or unequal spacing will display as a band or ragged signal depending on the sweep setting Refresh Selecting the Refresh icon Figure 5 24 clears the active trace s displayed and restarts the signal tracking from zero It also clears the minimum maximum and live measurements displayed for both cha...

Page 65: ...e lab scope and Graphing Meter functions Two vertical cursors are provided that allow you to make precise signal measurements when determining signal characteristics such as amplitude at specific points and cycle time duration or frequency Using cursors can also be helpful when performing certain diagnostic tests such as O2 sensor rich lean switch time fuel injector pulse width frequency secondary...

Page 66: ...e 60 for additional information on the cursor measurements panel 2 To turn the Cursors off select the Cursor icon again from the toolbar 1 Cursors Icon 2 Cursor no 1 3 Cursor Marker no 2 4 Cursor Measurement Panel amplitude and delta display 5 Cursor Measurement Panel time and delta display Figure 5 25 z To position the cursors The cursors can be positioned anywhere within the range of the sweep s...

Page 67: ...for the time period between cursor 1 and 2 NOTE i Frequency is the number of times a signal repeats itself per second and is measured in hertz Hz The frequency value displayed is the inverse of the Delta value and can also be calculated as 1 divided by Delta The frequency value Hz shown is automatically calculated by the scope Example 1 Delta 20 46ms to get frequency divide 1 by 02046 1 02046 48 8...

Page 68: ...dually OEM specific COP adapters Ford COP 1 Chrysler COP 2 VW Audi COP 3 Acura Honda Isuzu COP 4 Volvo BMW COP 5 Mercedes Benz COP 6 Mercedes Benz Dual Type COP 7 BMW COP 8 Lexus COP 9 Chrysler Jeep Lexus Toyota COP 11 OEM specific CIC adapters GM HEI CIC 1 Toyota Honda CIC 2 z Connecting the Secondary Coil Adapter Leads 1 Connect the black ground lead into the diagnostic tool test lead ground jac...

Page 69: ...g optional Scope Meter settings are available and can be set to your preference Trigger Auto Manual Mode Optional Setting on page 56 Display Grid on off on page 62 Divisions on page 63 All optional settings are available from the Tools icon located on the Home screen Select Tools Settings Configure Scope Meter to access the options menu 5 6 1 Display Grid on off The Display option allows you to tu...

Page 70: ...menu 5 6 2 Divisions The Divisions options allow you to change to your preference how the Vertical Scale Menu selections are represented and the type of value that displays in the Vertical Scale icon This section describes the following settings Trace Trace Full Scale Trace Per Division Display Display Full Scale Display Per Division The following illustration is for reference and identifies key t...

Page 71: ... selections are represented NOTE i This setting ONLY changes the vertical scale the sweep horizontal scale is NOT changed NOTE i When adjusting the vertical scale setting it is important to remember that the vertical scale is divided into 10 major divisions and all scale adjustments reflect this factor of 10 The division set of 10 cannot be changed divisions cannot be added or removed Trace Full S...

Page 72: ...n turn changes the vertical scale to represent by division represents variable what is being measured voltage amperage pressure etc Example Figure 5 30 Selecting 1 0V div displays a vertical scale divided by 10 The vertical scale is always divided by 10 therefore each division is incremented by 1 0V thus a 10V scale Figure 5 30 ...

Page 73: ...Y changes the value displayed in the Vertical Scale icon Display Full Scale displays the value of the entire full scale Example Figure 5 31 If the vertical scale is set to 1V the value displayed is 1V Figure 5 31 Display Per Division displays the graduation value of the major scale divisions Example Figure 5 32 If the vertical scale is set to 1V the value displayed is 0 1V Figure 5 32 ...

Page 74: ...test function is selected The Data Buffer Indicator can be used to visually see the amount of stored buffer data This graphical indicator contains a slider within a bar graph The bar graph shows how much stored data is in the memory buffer The slider indicates the position of the current screen in relation to the entire memory buffer contents The Data Buffer Position Counter displays a numerical v...

Page 75: ... saved file can also be downloaded to a personal computer PC using the Mini USB jack Once connected to the PC the files can be printed transferred and copied using ShopStream Connect ShopStream Connect is a companion application that interfaces the diagnostic tool with a PC ShopStream Connect is available at no cost and can be downloaded online See the ShopStream Connect website information at the...

Page 76: ... the conditions while capturing data Utilize the GMM to monitor the signal over longer time periods and review the histogram for possible faults z To stop and review data files Playback control icons are described in Scope Multimeter Control Icons on page 40 and Common Toolbar Control Icons on page 13 1 While viewing a waveform capturing data select the Stop icon The playback control icons are dis...

Page 77: ... 5 7 5 Using the Zoom Function The zoom function allows you to change the magnification level of the signal sweep during data review Changing magnification levels allows you to compress or expand multiple screens of data to quickly find glitches or signal losses Example While monitoring a MAF Mass Air Flow Sensor signal the waveform displays normally As the signal is being monitored an erratic con...

Page 78: ...aptured on one screen Figure 5 37 Figure 5 37 Max Magnification Level displays all captured data When zoom levels of 2X and higher are selected a Zoom cursor vertical dashed line Figure 5 37 displays onscreen The cursor is used to quickly mark and navigate to points of interest or glitch in a captured waveform The Zoom cursor can be used to mark the approximate position of a glitch and can be manu...

Page 79: ...the same waveform shown in Figure 5 37 and Figure 5 38 In Figure 5 39 at 16X the glitches are easily seen as compared to higher magnification levels Figure 5 39 Example of Magnification Level at 16X For illustration purposes the Zoom cursor has been positioned in the area near the glitches 1 Waveform Glitches 2 Magnification Level at 128X 3 Magnification Level at 32X ...

Page 80: ... repair decisions Listed below are a few basic questions to help narrow down the testing direction to follow Are you looking to make or test a simple voltage or current level or maybe check resistance or continuity Then you may want to use the DMM Are you looking to check a circuit component for an erratic dropout or make a frequency test You may want to use the GMM Do you need to see signal detai...

Page 81: ...stments may be needed to get the signal displayed exactly how you need Review the channel settings section in this manual for additional information on using the settings See Channel Settings on page 49 At this point you should have a signal displayed that will allow you to see the overall signal characteristics and allow you to begin your diagnosis Comparing your captured waveforms to known good ...

Page 82: ...0 3 Select the 1Search or Component Search tab Figure 5 40 4 Enter a search term e g MAF sensor 5 If SureTrack results are available select the link under the Probable Components header 6 From the SureTrack page select the Waveforms and PIDs link the link is active only if waveforms or PIDs are available Figure 5 40 NOTE i Examples are not available for all vehicles or components and are supplied ...

Page 83: ...76 Scope Multimeter General Reference Figure 5 41 Waveform examples ...

Page 84: ...leads are recommended Check the test lead or probes for damage Enable or disable channel controls also to help try and clean the signal Peak Detect maximizes sampling rate but may pickup unwanted noise Filter removes signal noise or interference Invert switches signal polarity Coupling AC blocks the DC portion of signal Threshold provides a more accurate measurement on select GMM tests where noise...

Page 85: ...1 V mV millivolt 1 mV 0 001 V V volt 1 V 1000 mV kV kilovolt 1kV 1 000 Volts Ohms mΩ milliohm 1 mΩ 0 001 ohms Ω ohm 1 Ω 1000 mΩ kΩ kiloohm 1 kΩ 1000 Ω MΩ megaohm 1 MΩ 1 000 000 Ω Amperes µA microamps 1 µA 0 000001 amps mA milliamps 1 mA 0 001 amps A amps 1A 1000 mA ka kiloamps 1 ka 1000 amps Frequency MHz megahertz 1 MHz 1 000 000 Hertz kHz kilohertz 1 kHz 1000 Hertz Pressure Units Symbol Descript...

Page 86: ...5299 inHg kg cm x 98 0700 psi kg cm x 0 9807 bar kg cm x 14 2200 kPa inHg 60 x 0 0333 bar inHg 60 x 3 3770 kPa inHg 60 x 0 0344 kg cm inHg x 25 4 mmHg mmHg x 0 003994 inHg Temperature Units Symbol Description Conversions C degree Celsius C 0 556 x F 32 F degree Fahrenheit F 1 8 x C 32 Time Units Symbol Description Equivalents µs microsecond 1 µs 0 000001 of a second ms millisecond 1 ms 0 001 of a ...

Page 87: ...ws in one direction only Delta Difference in time between two events Dropout An intermittent or unwanted vertical fall in a signal to zero that may cause an undesired result Duty cycle Measurement of the length of a signals on time Specified as a percentage ratio of the total cycle time Dwell Used to measure a signals on time in degrees of dwell Commonly used to measure mixture control solenoids o...

Page 88: ...ollection of signal pulses traveling together Pulse Width duration Measurement of a signals on time in a circuit that pulses on and off Specified in units of time Pulse Width Modulation PWM A signal that continuously cycles on and off while the on time varies within each cycle RMS The RMS root mean square value of alternating currents and voltages is the effective current or voltage applied rather...

Page 89: ...s a sweep VAC Volts Alternating Current VDC Volts Direct Current Vertical Scale The vertical scale on the grid or y axis represents what is being measured voltage amperage pressure etc and the unit of measurement it is being measured in Volt Unit of electric potential difference Voltage Electromotive force or potential difference expressed in volts Voltage inductive Kick A voltage many times highe...

Page 90: ...wing options are available from the Previous Vehicles and Data menu Vehicle History View Saved Data on page 84 Delete Saved Data on page 85 6 1 1 Vehicle History The Diagnostic Tool stores the identification of the last twenty five vehicles tested so there is no need to go through the complete vehicle identification sequence when performing a retest after repairs have been made The oldest vehicle ...

Page 91: ...option opens a list of all the saved data movie files and screen images that are stored in memory Saved files are listed in chronological order by the date and time that they were created with the most recent files are at the top of the list Figure 6 2 Saved data list Saved files can either be opened directly on the Diagnostic Tool or downloaded to a personal computer and opened using ShopStream C...

Page 92: ...elete icons become available on the toolbar so that you can either delete individual files or clear the entire memory buffer all at once 3 Select a file from the list and a confirmation message displays 4 Select an option from the confirmation message OK deletes the selected file and returns to the saved files list which no longer includes the deleted file Cancel returns to the saved files list wi...

Page 93: ...s Menu The following options are available from the Tools menu Connect to PC use to transfer and share files with a personal computer PC Configure Shortcut Button on page 88 use to change the function of the shortcut button System Information on page 88 use to view configuration information for the Diagnostic Tool Settings on page 89 use to configure certain characteristics of the Diagnostic Tool ...

Page 94: ... files The ShopStream Connect application is available free online see ShopStream Connect on page 100 z To connect the diagnostic tool to a PC 1 Connect the supplied USB cable to the diagnostic tool and then to the PC A USB cable supplied with your diagnostic tool is used to connect the diagnostic tool to the PC When the diagnostic tool is connected to the PC a communications icon appears on the r...

Page 95: ...lect Tools from the Home screen The Tools menu opens 2 Select Configure Shortcut button from the menu 3 Select a function from the menu 4 Select the Back on the toolbar or press the N X button to return to the options menu 7 1 3 System Information System Information allows you to view patent information and system information such as the software version and serial number of your Diagnostic Tool F...

Page 96: ...he background color of the screen display High Contrast Toolbar on page 91 enhances toolbar graphics for poor lighting conditions Font Type on page 91 switches between standard and bold text for better visibility Backlight Time on page 92 adjusts how long the screen stays on with an idle Diagnostic Tool Touch Screen Calibration on page 92 calibrates the touch screen display Date Time options inclu...

Page 97: ...r down respectively Select Back from the toolbar or press the N X button to exit Color Theme This option allows you to select between a white and black background for the screen The black background can be beneficial when working under poor lighting conditions Selecting opens a menu with two choices Day Theme white background and Night Theme black background Make a selection and a please wait mess...

Page 98: ...ght Figure 7 5 High contrast toolbar Selecting opens a menu with two choices Color Toolbar and High Contrast Toolbar Select and a please wait message displays followed by the Home screen The new setting is now active Font Type This option allows you to select between standard and bold faced type for the display screen Bold type makes screen writing more legible under poor lighting or bright sunlig...

Page 99: ...o make a selection Select Back or Home on the toolbar to return to either the Settings menu or the Home screen Touch Screen Calibration Calibrating the touch screen maintains the accuracy of the touch sensitive display IMPORTANT To avoid serious damage to the Diagnostic Tool always complete the touch screen calibration sequence once it has begun Never turn off the Diagnostic Tool while a screen ca...

Page 100: ... 2 Select Settings from the menu 3 Select Clock Settings from the menu A warning message briefly displays followed by the Clock Settings screen Figure 7 8 Figure 7 8 Clock settings 4 Select the up icon on the screen or press the up b button to incrementally increase the number in the highlighted field Select the down icon on the screen or press the down d button to incrementally decrease the numbe...

Page 101: ...ither selection then select the Back icon or press the N X button to return to the menu Date Format This option allows you to select how date information is displayed Select from MM_DD_YYYY Month Day Year DD_MM_YYYY Day Month Year YYYY_MM_DD Year Month Day Make a selection then select the Back icon or press the N X button to return to the menu Configure Scope Meter These menu options allow you to ...

Page 102: ...peed air pressure and other pressures Figure 7 9 Configure units menu z To change the units setup 1 Select Tools from the Home screen to open the menu 2 Select Configure Units to open the menu 3 Select an item from the Configure Units menu 4 Select a setting from the listed choices 5 Select Back on the toolbar or press the N X button to return to the options menu ...

Page 103: ...e Touch Screen The touch screen can be cleaned with a soft cloth and a mild window cleaner IMPORTANT Do not use any abrasive cleansers or automotive chemicals on the touch screen 8 2 Battery Pack Service Follow all safety guidelines when handling the battery pack 51 1 Risk of electric shock Prior to recycling the battery pack protect exposed terminals with heavy insulating tape to prevent shorting...

Page 104: ...h the battery pack Do not heat the battery pack to over 100 C 212 F or dispose of it in a fire Do not expose the battery pack to excessive physical shock or vibration Keep the battery pack out of reach of children Do not use a battery pack that appears to have suffered abuse or damage Store the battery pack in a cool dry well ventilated area NOTE i The battery pack should be used within a short pe...

Page 105: ...vot the cover into an upright position then lift the battery cover off of the housing 3 Slide the battery down to disengage the electrical contacts 4 Remove the battery from the tool housing 5 Align the tabs on the sides of the battery compartment with the slots on the new battery then place the battery into the housing 6 Slide the battery up to engage the electrical contacts and snap it into plac...

Page 106: ...he battery pack to a recycling facility in accordance with local national and international regulations For additional information contact United States Rechargeable Battery Recycling Corporation RBRC at http www rbrc org or http www call2recycle org or call 1 800 822 8837 USA Products bearing the WEEE logo Figure 8 2 are subject to European Union regulations Figure 8 2 WEEE logo NOTE i Always dis...

Page 107: ...trouble codes saved with select diagnostic tools This allows you to share the data in a report format with vehicle owners or other technicians Add or edit notes and comments to diagnostic tool data files Download and install diagnostic tool software updates and upgrades The ShopStream Connect SSC software is available free of charge at ShopStream Connect http diagnostics snapon com ssc 9 1 Using S...

Page 108: ...m the menu bar to save your notes NOTE Not all file types allow notes the Notes window will be grayed out when a file type that does not support notes is highlighted Some image files may display notes for reference purposes the notes are grayed out and not editable 2 File directory structure displays the file directory structure of your PC in standard Windows format and shows any connected diagnos...

Page 109: ...mple of the file if the selected file is a image file 9 3 Image Viewer SSC allows you to view and print bmp jpg and sps image files screenshots saved on your diagnostic tool with your PC NOTE i File extension types vary depending on the diagnostic tool Not all the file extensions described here may be available on your diagnostic tool Figure 9 3 1 Exit closes the Image Viewer 2 Print prints the im...

Page 110: ...oftware 1 Select Tools Update Software diagnostic tool type e g ETHOS Edge MODIS Edge SOLUS Edge etc from the Menu bar Figure 9 4 The software checks the Snap on web server for available updates Figure 9 4 2 If service release updates are available select Next to continue then select Download and follow the on screen instructions to complete the installation Figure 9 5 Figure 9 5 NOTE i For additi...

Page 111: ...e acknowledges your acceptance of the End User License Agreement The Snap on Incorporated Software End User License Agreement is available at https eula snapon com diagnostics To Accept at the screen prompt Figure 9 6 click the checkbox on the left side of the window and then select Agree and Continue The software will be installed automatically Figure 9 6 below represents a typical EULA acceptanc...

Page 112: ...page 116 10 1 2 Quick Reference SureTrack Community FAQ s For the latest SureTrack Community information and answers to frequently asked questions visit mitchell1 com support suretrack faqs Using SureTrack for the First Time If you have purchased a new diagnostic tool you will need to create a SureTrack account before you can access SureTrack See Creating a SureTrack Account on page 107 for instru...

Page 113: ...tion codes are 12 digit alpha numeric codes e g 123ABCAP4 US Figure 10 1 After obtaining a new upgrade plan you will receive a new SureTrack authorization code Each time you purchase a qualifying diagnostics upgrade plan you will be provided a new SureTrack authorization code The authorization code will expire as noted in the upgrade plan details To log in with a new authorization code see Logging...

Page 114: ... following illustrated instructions Step numbers are provided in each illustration follow the sequence to completion Figure 10 2 Figure 10 3 1 LOGIN ShopKey5 com Users Get to Know ShopKey Pro Click the Login button above and enter your ShopKey5 username and password to access ShopKey Pro Don t know your username and password Click here for information on retrieving them More about this Update Impr...

Page 115: ... Name Last Name Phone Number State Zipcode 3 Enter all required information 4 5 Done Congradulations Your account has been created Success X This account can be used to contribute to the community and manage your profile To link this account to your shop have your shop add you in Profile Manager Login Cancel Username Password Forgot password Click here to reset Remember username password Create a ...

Page 116: ... Question 2 Choose a question Question 1 Choose a question Select three security questions below These questions will help us verify your identity should you forget your password 9 10 Choose 3 security questions 11 Find the SureTrack Authorization Code on your sales receipt 12 digit alpha numeric code e g 123ABCAP4 US ...

Page 117: ...eTrack Authorization Code Enter all required information scroll down 13 Click Save 15 Close the browser window or tab 16 Open www shopkeypro com and login Login Cancel Username Password Forgot password Click here to reset Remember username password Create a new Individual Account LOGIN ShopKey5 com Users Get to Know ShopKey Pro Click the Login button above and enter your ShopKey5 access ShopKey Pr...

Page 118: ...ro start page and then complete the login process Figure 10 12 Once successfully logged in you will be directed to the 1Search Limited results page See SureTrack Screens on page 116 Figure 10 11 If you have previously selected the remember me checkbox in the login screen you will skip the login and be automatically directed to the 1Search Limited results page Figure 10 12 Username Password Remembe...

Page 119: ...thorization Code on page 106 1 Log in to ShopKeyPro com using your current username and password 2 At the ShopKey Pro start page select your username Figure 10 13 then select Profile Manager from the dropdown menu Figure 10 13 3 Log in to the Profile Manger Figure 10 14 using your current username and password 4 Enter your new Authorization code Figure 10 14 Figure 10 14 5 Review and update the re...

Page 120: ...lowing instructions if your SureTrack account has expired and you have purchased a qualifying upgrade plan Your new upgrade plan comes with a new SureTrack authorization code To find your new authorization code see Finding your SureTrack Authorization Code on page 106 1 Log in to ShopKeyPro com using your using your current username and password When your SureTrack account has expired and you try ...

Page 121: ...ter your current username and password The SureTrack Profile Manager window opens 7 Enter your new Authorization code Figure 10 17 Figure 10 17 8 Review and update the rest of your profile and make sure all required fields are filled out 9 Select Save 10 Exit the Profile Manager by selecting your username near the top right and select Logout 11 When the login screen displays login using your curre...

Page 122: ...parts and procedures most frequently used to fix the selected code or symptom ProView provides graphical displays showing the direct relationship between a code or symptom to the component used to fix them Component Tests includes instructions on how to test the component and descriptions of component operation component locations test locations connector end views and even sample waveforms TSB s ...

Page 123: ...ble OEM recalls and campaigns 4 Help provides SureTrack and ShopKey Pro online help topics 5 Contact Us provides options for contacting ShopKey Pro customer service 6 Settings provides general setting options and information 7 Logout logs you off of ShopKey Pro 8 User ID options menu displays username selecting opens Profile Manager and other options 9 Main Menu dropdown Options are Home 1Search L...

Page 124: ...bs to navigate to related information e g Index SureTrack ProView etc varies per application Quick links Technical Service Bulletins TSBs is the only available option Repair Totals indicator displays the total number of repairs that all displayed data was based on Top 10 lists display the most popular repairs and lookups by existing users for the selected vehicle select an item from any list to vi...

Page 125: ...hat best match the exact search criteria ranked in order with the closest match at the top SureTrack Results provides probable components related to the search criteria ranked in order from the most likely to the least likely component Select an item from either list to view the results see SureTrack Results Page on page 119 Figure 10 20 ...

Page 126: ...pair orders and the experiences of professional technicians Common Repair Procedures Graph graphical display of the specific parts and procedures most frequently used to fix the selected code or symptom Component Tests includes instructions on how to test the component and descriptions of component operation component locations test locations connector end views and even sample waveforms TSB s OEM...

Page 127: ...ct relationship between a code or symptom to the component used to fix them Figure 10 22 Information may include Radial Graph showing the relationship of the code or symptom to possible at fault components Component Frequency Graphs showing the most commonly replaced component for that code or symptom Common Replaced Parts Graphs showing the mileage at which the most common component is replaced ...

Reviews: