


Scanner - Automotive
Viewing and Saving Data (PIDs)
35
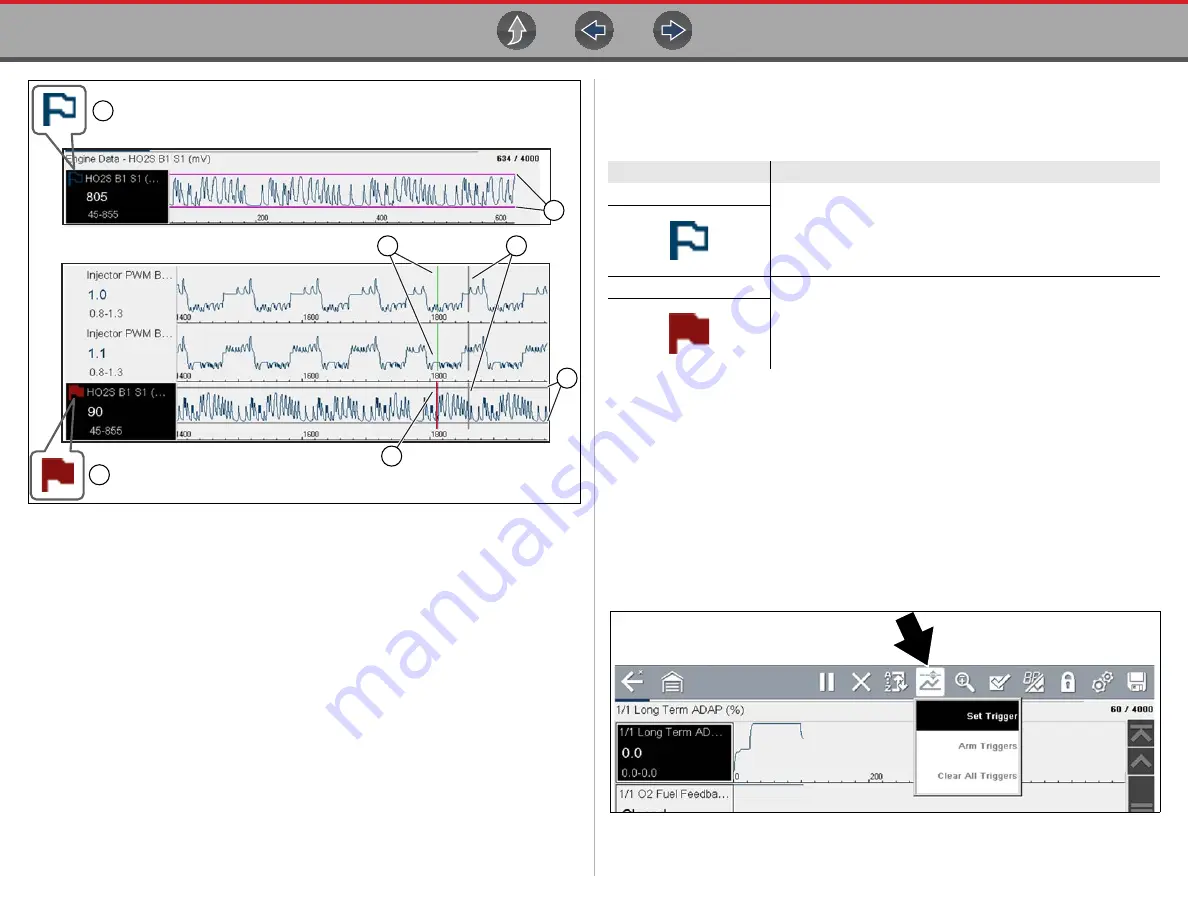
Figure 6-24
1— Armed PID Trigger Indicator
- A blue outlined flag indicates the PID trigger
is armed.
2— Upper and Lower Limit Lines (Armed)
- Colored limit lines indicate the
trigger is armed but not activated.
3— Trigger Activation Point Reference Cursor
- Green cursors lines are
displayed on all the other PID graphs to indicate their relationship to where
the trigger occurred.
4— Pause Cursor
- A vertical gray cursor line is displayed (all PIDs) as a marker
in the where the data was paused and the file was saved.
5— Activated PID Trigger Indicator
- A red flag indicates the PID trigger has
activated.
6— Trigger Activation Point Cursor
- A red cursor line is displayed in the PID
data where the trigger was activated.
7— Upper and Lower Limit Lines (Not Armed and Activated)
- Gray limit lines
are displayed when the trigger is armed but not activated and after the trigger
has been activated.
PID Trigger Status Icons
The icons (below) are used to help you quickly identify the status of individual PID
triggers:
z
Setting triggers:
To use triggers, they must be turned on (set/configured), and then armed. Use the
following procedures to setup PID triggers.
1.
Highlight the PID to setup with a trigger.
2.
Select the
Trigger
icon.
Selecting the
Trigger
icon (
) displays trigger menu options:
-
Set Trigger
—opens setup screen for upper/lower limits (trigger points)
-
Arm Trigger
—arms the trigger to capture data
-
Clear All Triggers
—deletes all previously set triggers
Figure 6-25
Trigger menu
6
1
5
2
7
4
3
Icon
Description
Trigger Armed
Trigger has been set (configured) and is armed.
Trigger Activated
Trigger has been activated (upper or lower limit has been met).


