9
2. Rapidly open and close the cyl-
inder valve. This will purge
dust and foreign matter from the
valve.
CAUTION
Take care to point the
valve outlet away from
yourself or other people,
as escaping high pressure
gas may be dangerous.
4. Fit the gas hose from the welding
machine to the regulator outlet
fitting and tighten it with a
wrench. Open the cylinder valve.
When welding steel, the gas flow
rate is 30 CFH.
NOTE
The MM350XL must be turned
"ON" and the MIG torch
trigger depressed, before
the gas flow rate can be
adjusted.
TORCH CONNECTION
1. Open the access door of the Feed
unit to its fullest extent.
NOTE
Prior to inserting the MIG
torch into the torch panel
mount, apply anti-spatter
spray to the "O" rings.
2. Back out the thumb screw located
on the drive bracket inside the
machine. Insert the MIG torch
into the torch panel mount and
TIGHTEN THE THUMB SCREW SE-
CURELY.
WARNING
SEVERE DAMAGE TO THIS
PRODUCT MAY RESULT.
TIGHTEN THUMB SCREW BE-
FORE EACH USE.
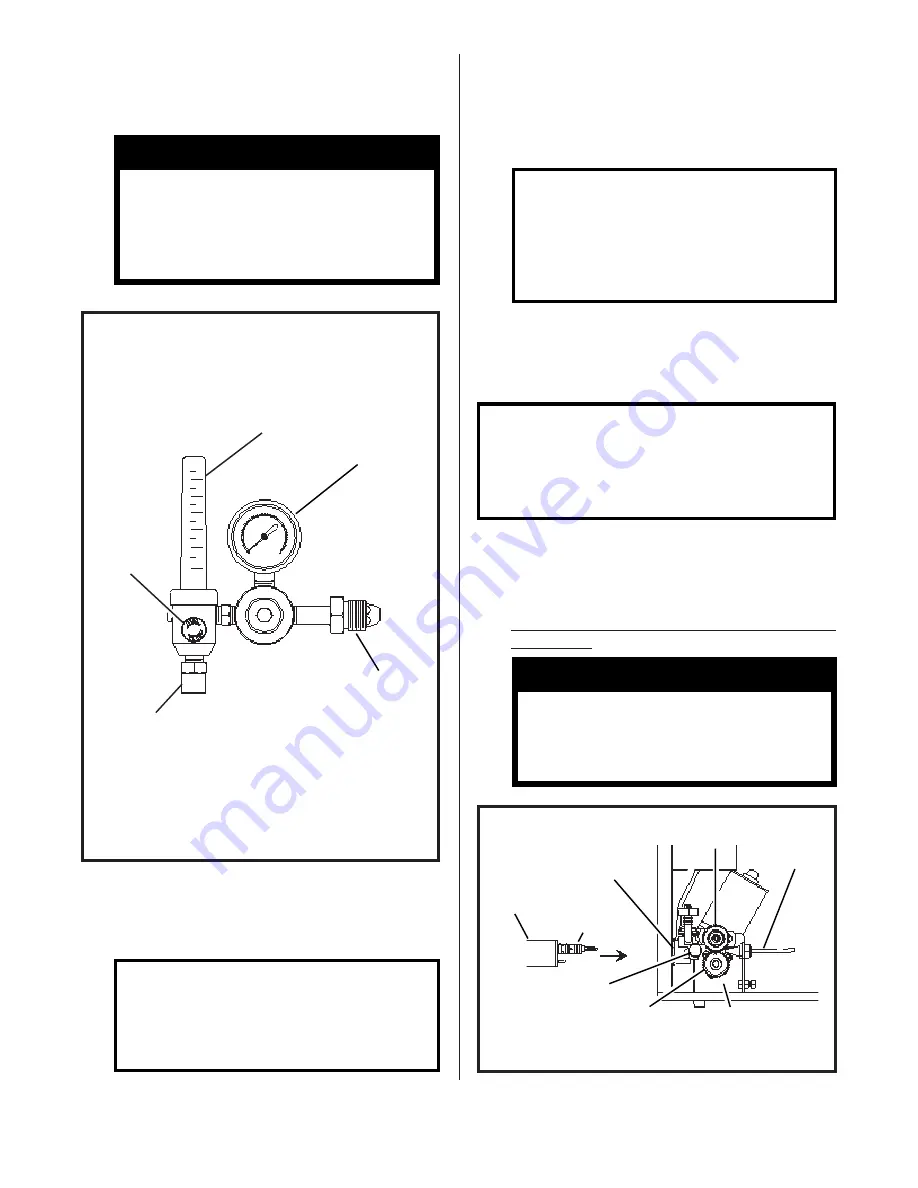
FIG. 9. GAS FLOW ADJUSTMENT
GAUGE -
INDICATES
TANK
PRESSURE
OUTLET
FITTING
TO
WELDING
MACHINE
GAS FLOW
ADJUSTING
KNOB
INLET
FITTING
TO
TANK
FLOW TUBE
INDICATES
FLOW RATE
IN C.F.H.
3. Attach the gas regulator - flow-
meter supplied with this unit,
to the cylinder valve using a
suitable wrench.
NOTE
If this unit is to be used
with 100% CO2 shielding
gas, an optional gas regu-
lator coupler is required.
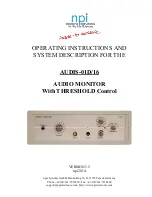
FIG. 10. TORCH CONNECTION
DRIVE
ROLL
TORCH
PANEL
MOUNT
THUMB
SCREW
PRESSURE
ROLL
INLET
GUIDE
MIG
TORCH
DRIVE
BRACKET
"O"
RINGS


