background image

14

15

TREAD

READER

TM

 HANDHELD • QUICK GUIDE

ÐäôÉðçïîäÉîöíáäòÉèîÉóäôôèîæó

ÐäôÉäíàèìÉàããòäóóÉèîÉóäôôèîæó

ÐäôÉøäáóèôäÉàããòäóóÉèîÉóäôôèîæó

ËïÉÈïæï

Ààôä

’|’|Z|¨Z‡±

Ïäæèóôòàôèïî

ÁÖ|¨ÍÈÁ

Êèìäàæä

‡’¨¯°

×äàò

’|‡|

ÊàëäqÊïãäì

ÀïïòóÉÌâôà÷èà

Ìðäòàôïò

ÑúòäÉôòäàãÉãäðôçÉòäóöìôóµ

Íàóó

ÂòïîôÉÈäåôÉËÐÂ

íí

¯e’ÉÉÉÉÉÉÉɯe²ÉÉÉÉÉÉÉɯeÉÉÉÉÉÉÉɯe’

ÏäàòÉÈäåôÉËÐÏ

íí

¯eÉÉÉÉÉÉÉÉ°e²ÉÉÉÉÉÉÉɱe¨ÉÉÉÉÉÉÉÉ°e°

ZÉ¿çäâëÉåïòÉøïòîÉóöóðäîóèïîÉàîãÉøçääìÉíèóàìèæîíäîô

ÂòïîôÉÏèæçôÉÌÐÂ

íí

¯e|ÉÉÉÉÉÉÉɯe¨ÉÉÉÉÉÉÉɯe°ÉÉÉÉÉÉÉɯe¨

ÏäàòÉÏèæçôÉÌÐÏ

íí

°e’ÉÉÉÉÉÉÉÉ°eÉÉÉÉÉÉÉÉ°e°ÉÉÉÉÉÉÉɯe´

ÐôïððèîæÉãèóôàîâäɸɱí

ÑçèóÉèóÉàîÉèîâòäàóäÉïåÉ|Éï÷äòÉîäøÉôúòäó
ÐôïððèîæÉãèóôàîâäÉøçäîÉíïóôÉøïòîÉôúòäÉOôôäãÉôïÉàììÉðïóèôèïîóÉïîÉàÉ÷äçèâìäÉôòà÷äììèîæÉàôɲ|ëðçÉèîÉøäôÉâïîãèôèïîó

ÑçèóÉôúòäÉôòäàãÉãäðôçÉòäðïòôÉèóÉæäîäòàôäãÉáúÉÑòäàãÏäàãäòÉÑúòäÉÊäàóöòäíäîôÉôäâçîïìïæúOÉóöððìèäãÉáúÉÐèæíà÷èóèïîÉÈôãe

ÍìäàóäÉòäåäòÉôïÉøøøeóèæíà÷èóèïîeâïíÉåïòOÉôúòäÉòäðïòôÉòäâïííäîãàôèïîóÉàîãÉóôïððèîæÉãèóôàîâäÉâàìâöìàôèïîóe

‡‡e¯e‡e‡°É#â䯲’á.

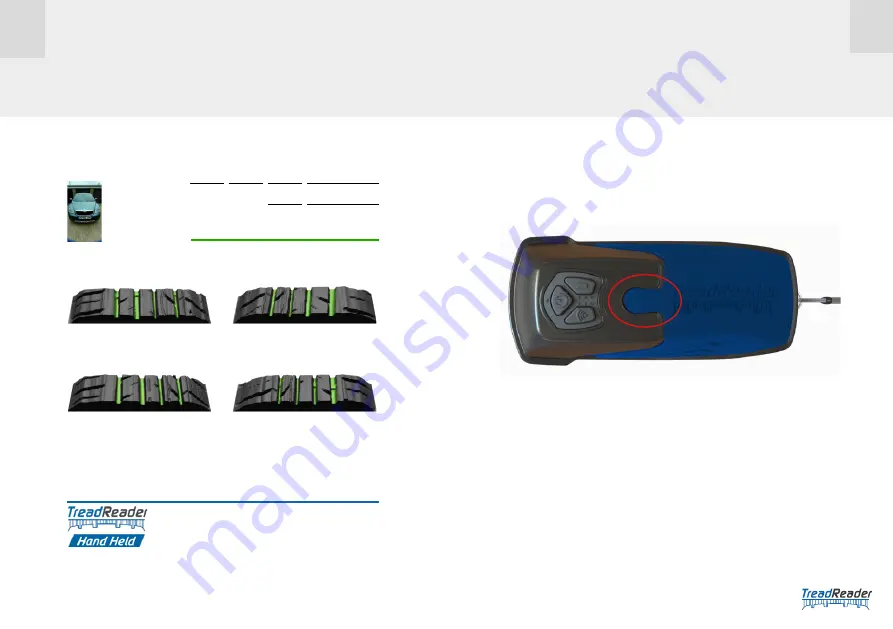
To check the battery power, press and hold the 

battery button

 on the scanner keypad. 

The battery status is then displayed as either green, amber or red. It is 

recommended to recharge the scanner battery as soon as the red battery LED 

is illuminated. 
To recharge the scanner, plug the USB 3 cable into the recharging port on the lid 

of the scanner by pulling back the circular rubber cover. Only use the charging 

adaptor provided with this product.

To clean the optical window, release the wheel assembly on the underside of the 

scanner by pushing the two retaining clips. This allows the wheel assembly to 

pivot on a hinge away from the base of the scanner. Note: the wheel assembly 

may only be opened 90 degrees to the base of the scanner.
Do not attempt to open the wheel assembly further as this may damage the scanner. 

The optical window is now exposed and may be cleaned with a soft damp cloth. Do 

not use cleaning fluids. Daily cleaning of the optical window is recommended. 

To close the wheel assembly, rotate it back to the base of the scanner and apply 

pressure to engage the two retaining clips. To empty stones or grit, which have 

entered between the wheel assembly and the base of the scanner, though the gap 

directly above the viewing window, open the wheel assembly according to the 

14

 • CHARGING

15

 • MAINTENANCE AND CLEANING

Summary of Contents for 60100001

Page 1: ...TREADREADERTM HANDHELD 3D SCANNER QUICK GUIDE ...

Page 2: ...d and leds 09 Switching the scanner on and off 10 How to connect to the smartphone tablet 11 Login upload to TREADMANAGERTM in the app 12 Entering vehicle registration 13 Scanning a tire 14 Charging 15 Maintenance and cleaning 16 Calibration check 17 Factory reset 18 Further information 02 03 03 04 05 06 06 07 07 08 10 12 12 15 15 16 18 18 Redefining tire measurement CONTENT ...

Page 3: ...n TreadReader product literature technical information and warranty statements TREADREADERTM accepts no liability for use of its products in applications other than those for which they are designed It is the responsibility of the driver or vehicle owner or operator to ensure tires have sufficient tread depth are defect free and are in a roadworthy condition 01 WARNINGS 03 DISCLAIMER 04 SAFE USE O...

Page 4: ...mm 0 008 0 C to 50 C 32 F to 122 F 5V DC rechargeable Li Ion battery Measurement accuracy Operating temperature Power This product comprises 1 x TREADREADERTM 3D hand held scanner 1 x Mobile device software license TREADREADERTM hand held scanner app is downloaded from App Store 1 x Rigid plastic carry case 1 x Calibration check piece 1 x USB 3 charging cable and power adaptor 12 month calibration...

Page 5: ...s to control the scanner Switch on the hand held scanner Launch the app on your phone or tablet The app home screen gives an option of direct mode or network mode Select either direct mode or network mode If prompted for the wi fi password the default password is 12345678 1 Connect the scanner in the direct mode 2 Hide keyboard to access settings menu using the Android back button 3 In the setting...

Page 6: ... cloud icon will upload any scans completed 11 LOGIN UPLOAD TO TREADMANAGERTM IN THE APP 1 Once the top and bottom left LED lights up press connect on screen Do NOT release the wi fi button 2 The app will display the network you have chosen in the top left of the screen 3 You will be asked to choose your desired network stand alone router 4 Press and hold the scanner wi fi button to broadcast the ...

Page 7: ... bar and manually enter the reg number To use the ALPR built into the app select the shutter icon and take a picture of the vehicle s number plate Note this can only be used in network mode A summary report can be saved or printed in PDF file format The summary report shows the company logo and vehicle information 3D tire scans and tread depths produced by the hand held scanner with an overall sta...

Page 8: ...tus is then displayed as either green amber or red It is recommended to recharge the scanner battery as soon as the red battery LED is illuminated To recharge the scanner plug the USB 3 cable into the recharging port on the lid of the scanner by pulling back the circular rubber cover Only use the charging adaptor provided with this product To clean the optical window release the wheel assembly on ...

Page 9: ...tion check button 4 The check will then be performed and the results displayed on screen to the user 5 If the calibration check is successful the device may continue to be used 6 If the calibration check is unsuccessful the scanner MUST be re calibrated Calibrationshouldbecheckedatleastmonthly Inthe event this product fails a calibration check contact TREADREADERTM or an authorized distributor for...

Page 10: ...corporated a unique breadth of solutions to outfit any shop from floor to ceiling Bluetooth Android iOS Windows are registered trademarks of their respective owners Product images are for illustrate purposes only and may differ from the actual product Snap on reserves the right to modify any content without prior notice ...

Reviews: