background image


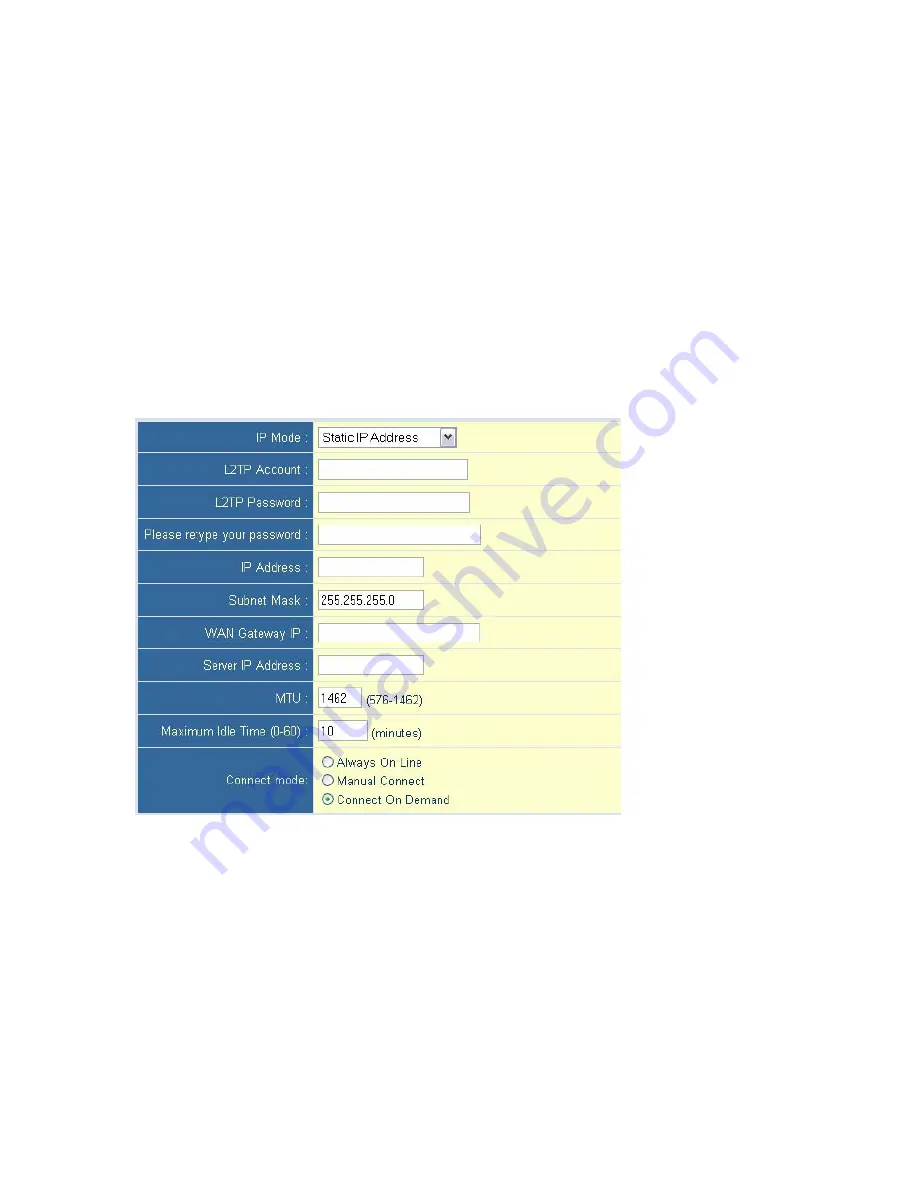
7.5.7 L2TP  

Layer 2 Tunneling Protocol is a common connection method used for xDSL connections in Europe. It can 
be used to join different physical networks using the Internet as an intermediary. If you have been provided 
with the information as shown on the screen, enter the assigned IP address, subnet mask, default gateway 
IP address, user ID and password, and L2TP Gateway. Configure the Connect mode option to the desired 
settings. “Always On Line” signifies that the broadband router will maintain your Internet connection 
consistently and automatically connect to the Internet after any disconnection. “Manual Connect” signifies 
that the broadband router will establish an Internet connection only when the administrator logs into the 
web management and manually presses the “Connect” button. While using the “Connect On Demand” 
option, if the connection is inactive for longer than the Maximum Idle Time, it will be dropped and will 
automatically re-establish the connection as soon as you attempt to access the Internet again.  


28 

Summary of Contents for Barricade SMCBR14UP

Page 1: ......

Page 2: ...erformance merchantability or fitness for a particular purpose Information in this User Guide is subject to change without notice and does not represent a commitment on the part of SMC SMC assumes no responsibility for any inaccuracies that may be contained in this User Guide SMC makes no commitment to update or keep current the information in this User Guide and reserves the right to make changes...

Page 3: ...ued compliance for example use only shielded interface cables when connecting to computer or peripheral devices Any changes or modifications not expressly approved by the party responsible for compliance could void the user s authority to operate this equipment This device complies with Part 15 of the FCC Rules Operation is subject to the following two conditions 1 This device may not cause harmfu...

Page 4: ...y particular attention to cords at plugs convenience receptacles and the point where they exit from the product Situate the product away from heat sources such as radiators heat registers stoves and other products that produce heat To prevent fire or shock hazard do not expose this unit to rain or moisture Do not allow water or any foreign objects to enter the interior This may cause a fire or ele...

Page 5: ... Installing TCP IP 12 6 2 Setting up TCP IP 12 6 3 Obtaining an IP Address 13 6 4 Configuring a Macintosh Computer 13 6 5 Verifying Your TCP IP Connection 14 7 CONFIGURING YOUR BROADBAND ROUTER 15 7 1 Browser Configuration 15 7 2 Web Management 15 7 3 Setup Wizard 16 7 3 1 Time Zone 16 7 3 2 Broadband Type 16 7 3 4 Cable Modem 17 7 3 5 Fixed IP xDSL 17 7 3 6 PPPoE xDSL 18 7 3 7 PPTP 19 v ...

Page 6: ...etup WAN 24 7 5 1 Dynamic IP 24 7 5 2 PPPoE 25 7 5 3 PPTP 26 7 5 4 Static IP 27 7 5 6 BigPond 27 7 5 7 L2TP 28 7 6 Advanced Setup LAN 29 7 7 Advanced Setup NAT 30 7 7 1 Virtual Server 30 7 7 2 Special Applications 31 7 8 Advanced Setup FIREWALL 32 7 8 1 Network Filters 32 7 8 2 URL Blocking 33 7 8 3 MAC Filter 34 7 8 4 Schedule Rule 35 7 8 5 Advanced 36 7 8 6 DMZ 37 vi ...

Page 7: ...ing a LPR Print Server on Windows XP and Windows 2000 43 8 2 Installing the Printe Server Monitor for Windows XP 2000 NT 49 8 3 Installing the Printer Server on Windows 98 SE ME 53 8 4 Installing an LPR Print Server on Linux 58 8 5 Installing an LPR Print Server on Mac OS 9 62 8 6 Installing an LPR Print Server on Mac OS X 10 3 64 9 TROUBLESHOOTING 66 10 TERMINOLOGY 68 11 TECHNICAL SPECIFICATIONS ...

Page 8: ...rnet Explorer 5 0 or above or Netscape Communicator 4 0 or above installed on one PC at your site for configuring the router 2 Equipment Checklist After unpacking the Barricade Cable DSL Broadband Router check the contents of the box to be sure you have received the following components 1 Barricade Cable DSL Broadband Router 1 EZ Installation Wizard and Documentation CD 1 Ethernet CAT5 UTP Straigh...

Page 9: ...tion Universal Plug and Play UPnP Supported Enables devices such as PCs routers and printers to be plugged into a network and ensure automatic recognition Virtual Server Supported Lets you make your Website FTP site and other services on your LAN accessible to Internet users User Defined Application Sensing Tunnel Lets you define the attributes to support special applications that require multiple...

Page 10: ...cription Power Power indicator Green Steady Power is being applied to this device M1 System status indicator Orange Blinking M1 is flashing once every second to indicate that the system has power Steady The WAN port is connected WAN Wan port activity Green Blinking The WAN port is sending or receiving data Steady An active station is connected to the LAN port Link Act 1 4 Link status Green Blinkin...

Page 11: ...id dusty and or humid areas 1 Setup LAN Connection Connect an Ethernet cable from your computer s Ethernet port to one of the LAN ports of the router 2 Step WAN Connection Insert one end of the Ethernet cable into the WAN port on the back panel of your router and the other end to the cable DSL modem You may connect an analog modem optional to function as a backup connection 3 Power Up The router a...

Page 12: ...e OK button to return to the Network window 6 The TCP IP protocol will be listed in the Network window Click OK to complete the installation procedure 6 2 Setting up TCP IP Windows 95 98 Me You may find that the instructions here do not exactly match your version of Windows This is because these steps and screenshots were created in Windows 98 Windows 95 and Windows Millennium Edition are very sim...

Page 13: ... Click the OK button again to save these new changes 7 Reboot your PC 6 3 Obtaining an IP Address Windows 95 98 Me 1 Click Start Run 2 Type WINIPCFG and click OK 3 From the drop down menu select your network card Click Release and then Renew Verify that your IP address is now 192 168 2 xxx your Subnet Mask is 255 255 255 0 and your Default Gateway is 192 168 2 1 These values confirm that the Route...

Page 14: ...tion link between your computer and the Router has been successfully established If you get the following message Pinging 192 168 2 1 with 32 bytes of data Request timed out there may be something wrong in your installation procedure Check the following items in sequence 1 Is the Ethernet cable correctly connected between the Router and the computer The LAN LED on the Router and the Link LED of th...

Page 15: ...rowser you use and follow the appropriate steps Internet Explorer 5 or above For Windows 1 Open Internet Explorer Click Tools and then select Internet Options 2 In the Internet Options window click the Connections tab 3 Click the LAN Settings button 4 Clear all the check boxes and click OK to save these LAN settings changes 5 Click OK again to close the Internet Options window Internet Explorer Fo...

Page 16: ...p left navigation panel The first item is Time Zone For accurate timing of client filtering and log events you need to set the time zone Select your time zone from the drop down list 7 3 2 Broadband Type The following screen lets you select a WAN type Click one of the five options and then click Next 16 ...

Page 17: ...nnect the PC with the registered MAC address to the Router and click the Clone MAC Address button This will replace the current Router MAC address with the already registered Ethernet card MAC address If you are unsure of which PC was originally set up by the broadband technician call your ISP and request that they register a new MAC address for your account Register the default MAC address of the...

Page 18: ...le Time it will be dropped Default 10 Configure the Connect mode option to the desired settings Always On Line signifies that the broadband router will maintain your Internet connection consistently and automatically connect to the Internet after any disconnection Manual Connect signifies that the broadband router will establish an Internet connection only when the administrator logs into the web ...

Page 19: ...uter will maintain your Internet connection consistently and automatically connect to the Internet after any disconnection Manual Connect signifies that the broadband router will establish an Internet connection only when the administrator logs into the web management and manually presses the Connect button While using the Connect On Demand option if the connection is inactive for longer than the ...

Page 20: ...the desired settings Always On Line signifies that the broadband router will maintain your Internet connection consistently and automatically connect to the Internet after any disconnection Manual Connect signifies that the broadband router will establish an Internet connection only when the administrator logs into the web management and manually presses the Connect button While using the Connect ...

Page 21: ...is used for the time date parental rules you can configure with the Barricade s Advanced Firewall This information is also used for your network logging Once you set you time zone you can automatically update the Barricade s internal clock by synchronizing with a public time server over the Internet To configure this setting choose one of the options below each option allows a different method of ...

Page 22: ...he default password for this account is password 7 4 3 Remote Management Use this section to configure the remote management feature of your Barricade Router so the web management can be accessed from the Internet WAN You can restrict access to a single IP or a range of IP addresses If the specified IP address is 0 0 0 0 any host can connect to the router to perform these tasks You can use the sub...

Page 23: ...tion The broadband router is also able to send the log files to a specific email address Simply enter the IP address of your mail server in the SMTP Server box enter the email addresses of the recipients who will receive the email log and put in your username and password Note that you can also customize the subject title of the email Check to be sure the radio button for Enable is checked and the...

Page 24: ...by your ISP If your ISP used the MAC address of an Ethernet card as an identifier when first setting up your broadband account only connect the PC with the registered MAC address to the Router and click the Clone MAC Address button This will replace the current Router MAC address with the already registered Ethernet card MAC address If you are unsure of which PC was originally set up by the broadb...

Page 25: ...Time it will be dropped Default 10 Configure the Connect mode option to the desired settings Always On Line signifies that the broadband router will maintain your Internet connection consistently and automatically connect to the Internet after any disconnection Manual Connect signifies that the broadband router will establish an Internet connection only when the administrator logs into the web man...

Page 26: ...to the desired settings Always On Line signifies that the broadband router will maintain your Internet connection consistently and automatically connect to the Internet after any disconnection Manual Connect signifies that the broadband router will establish an Internet connection only when the administrator logs into the web management and manually presses the Connect button While using the Conne...

Page 27: ...u have been provided with this information choose this option and enter the assigned IP address gateway IP address DNS IP addresses and subnet mask 7 5 6 BigPond If you use the BigPond Internet Service which is available in Australia enter your username and password and apply the changes 27 ...

Page 28: ...the desired settings Always On Line signifies that the broadband router will maintain your Internet connection consistently and automatically connect to the Internet after any disconnection Manual Connect signifies that the broadband router will establish an Internet connection only when the administrator logs into the web management and manually presses the Connect button While using the Connect ...

Page 29: ...namic IP address range may be specified Default 192 168 2 100 199 Once the IP addresses e g 192 168 2 100 199 have been assigned these IP addresses will be part of the dynamic IP address pool IP addresses from 192 168 2 2 99 and 192 168 2 200 254 will be available as static IP addresses Remember not to include the address of the Router in the client address pool Also remember to configure your cli...

Page 30: ... packets to protect your intranet This means that all network hosts are invisible to the outside world However some of the hosts can be made accessible by enabling the Virtual Server mapping A virtual server is defined as a Service Port All requests to this port will be redirected to the computer specified by the Server IP The virtual server can work with scheduling rules as well This gives you mo...

Page 31: ...rvice you are running TCP is connection oriented protocol and UDP is connectionless Since most services are connection oriented you will most likely need to select TCP For example FTP and HTTP are connection oriented services while DNS and many streaming radio servers are connectionless 7 7 2 Special Applications Some applications require multiple connections such as Internet games video conferenc...

Page 32: ...rs The Broadband Router firewall includes comprehensive Outbound and Inbound Network Packet Filters The firewall does not significantly affect system performance The packet filter lets you control which packets are allowed to pass through the router The Outbound Filter applies to all outbound packets The Inbound Filter applies only to packets addressed to a virtual server or DMZ host You can selec...

Page 33: ...nabled or disabled 7 8 2 URL Blocking URL Blocking blocks LAN computers from accessing pre defined Websites The difference between the Domain Filter and URL Blocking is that the Domain filter requires you to enter a suffix com or org while URL Blocking requires you to enter only a keyword In other words the Domain Filter can block specific Websites while URL Blocking can block hundreds of Websites...

Page 34: ...cked MAC Address This is the unique address of a specific client IP Address Expected IP address of the corresponding client You can keep this text field blank if you do not know the address The DHCP pull down menu lets you select specific clients Select clients from the DHCP clients list and click Copy to to copy the MAC addresses to the selected ID chosen from the ID pull down menu Previous Page ...

Page 35: ...t of services is enabled Use this section to configure up to 10 Schedule Rules to limit network access based on time and day To create a schedule rule click the Add Schedule Rule link below Enter a rule name into the text field next to Name of Rule 1 Click Save Settings to save your settings 35 ...

Page 36: ...n SPI Discard Ping from WAN and PPTP and IPSec Passthrough types When Discard Ping From WAN is enabled computers on the Internet will not get a reply back from the Broadband Router when it is being ping ed This may help to increase security When SPI is enabled the router will extensively record specific packet information passed through the router such as IP address port address ACK and so on The ...

Page 37: ...MP lets you manage a computer network remotely by polling and setting terminal values and monitoring network events Enable SNMP You can check Local Remote or both options to enable the SNMP function If Local is checked the router responds only to requests from the LAN If Remote is checked the router responds only to requests from the WAN Get Community Setting this option allows the router respond ...

Page 38: ...nd dynamic routing functions RIPv1 is a protocol where the IP address is routed through the Internet RIPv2 is an enhanced version of RIP v1 with added features such as Authentication Routing Domain Next Hop Forwarding and Subnet Mask Exchange Enable Static Routing by selecting the radio button next to Enable Static Routing Allows you to specify up to 8 routing rules You can enter the destination I...

Page 39: ...worked router remotely To use this feature the target network adapter must be Wake on LAN enabled and you have to know the MAC address of the adapter The address should look similar to this 00 11 22 33 44 55 Depressing the Wake up button tells the router to send the wake up frame to the target adapter The ping diagnostics feature allows you to configure an IP address to ping from the router You ca...

Page 40: ...namic DNS Dynamic DNS provides users on the Internet a method to tie their domain name s to computers or servers DDNS allows your domain name to follow your IP address automatically by having your DNS records changed when your IP address changes Before you can enable the Dynamic DNS you need to register an account with one of the Dynamic DNS servers that are listed in the Provider field 40 ...

Page 41: ...erywhere in between Enable UPnP by checking ON in the screen above UPnP allows the device to automatically dynamically join local network obtain an IP address convey its capabilities and learn about the presence and capabilities of other devices Dynamically open ports for UPnP aware software such MSN messenger advanced features voice remote control 7 15 Tools The Toolbox menu allows you to view yo...

Page 42: ...screen to see the connection status for Barricade s WAN LAN interfaces firmware and hardware version numbers any illegal attempts to access your network as well as information on all DHCP client PCs currently connected to your network 42 ...

Page 43: ...00 The instructions will highlight any important differences Step 1 Printers and Faxes Dialogue First display the Printers and Faxes dialogue by selecting Start Control Panel Printers and Faxes Use Start Settings Control Panel Printers and Faxes if you are using Windows 2000 or Windows XP in Classic mode Next in Windows XP select Add a Printer from the left hand pane of the window or Right Click o...

Page 44: ...s Next to move on Step 3 Create a new printer port This dialogue is critical to the operation of the Print Server The Windows 2000 page looks very different but provides exactly the same options Select Create a new port and select Standard TCP IP Port from the Type of Port list Press Next to launch the wizard that sets up the TCP IP port 44 ...

Page 45: ...ess of the Print Server in the Printer Name or IP Address field The default address of your router should be 192 168 2 1 as shown on the dialogue above The Port Name is automatically generated as the IP Address is entered but it can be changed to something more meaningful Press Next 45 ...

Page 46: ... Select Custom and then press the Settings button he following dialogue will appear to allow you to set the protocol and Queue Name T T The Queue should be entered as LP for a DB25 parallel printer or LPUSB for a USB printer Check the LPR Byte Counting Press OK to continue 46 ...

Page 47: ...nformation dialogue Press Next to display the following Press Finish to close t tep 6 Select Printer Driver A page will be di er for e printer he wizard S splayed similar to that shown below which allows the selection of the correct driv th 47 ...

Page 48: ... printing a test page ther pages should be left as the values that appear automatically however it is strongly recommended that Printer Name screen orable name for the printer is recommended P S O you print a Test Page Pressing Finish at the end of the wizard will finish the installation and a test page will be printed if that was selected NOTE If the test page does not print please restart your c...

Page 49: ...een installed and are working Screen shots shown have been taken from Windows XP but differ only slightly W al ng the Printer Monitor Software Insert the CD O Step 2 Select Install Printer Drivers Select Install Printer Server 2000 XP Users This will load another window This will load the printer port software required to op ate the print server from Windows XP 2000 NT lete the wizard and return t...

Page 50: ...and select Add Printer In Windows 2000 you must double click on the Add Printer icon Step 1 Printers and Faxes Dial First display the Printers an Start Settings Control P C Next in Windows XP select Add a Printer f ri The following dialogue will be displayed Press Next to move to the next step Step 2 Select Local Printer Select Local Printer and make sure Automatically detect and install my Plug a...

Page 51: ...Step 3 Select PTR mate port Step 4 Select Printer Driver A page will be displayed similar to that shown below which allows the selection of the correct driver for the printer 51 ...

Page 52: ...ss of t er has been selected or installed from disk pressing Next will step through to the Selecting a memorable name for the printer is recommended Press Next will step thro Step 6 Choose appropriate printing method gs Printers and configure the PRT mate port for your USB or parallel p he router 192 168 2 1 has changed please modify it accordingly 52 ...

Page 53: ...tor Software Step 1 Insert the CD Once inserted the CD will automatically load and display a screen similar to that shown below NOTE Step 2 Select Install Printer Drivers Select Install Print Server 98SE ME Users This will load another window This will load the printer port software required to operate the print server from Windows 98 ME SE Step 3 Installing the Software Follow the three simple pa...

Page 54: ...ntrol Panel Printers An example of this window is shown below Step 2 Add Printer Click on Add Printer This will load a wizard which ill install a new printer on the computer en below will be displayed elect Local printer and then press Next to move on w Press Next on the first screen and then the scre S 54 ...

Page 55: ...ce the printe e correct driver The exist rrect driver for the printer and then press Next to move on r should have been previously installed the wizard will confirm that this is th ing driver should be kept and then Next should be pressed 55 ...

Page 56: ... the start of this guide a PTR mate Port will now be available A Select the PTR mate Port and then press Configure Port tep 5 Configure Port S s should be 192 168 2 1 default and the appropriate printer interface for your printer move on The IP Addres Press OK to 56 ...

Page 57: ...h to complete the printer setup and this will also send the test page to the printer oes not print restart your computer before reading the troubleshooting document nter a memorable Printer name Press Next to move on E Step 7 Print a Test Page It P NOTE If the test page d 57 ...

Page 58: ...e will have different screens but the functionality will be similar In summary the in have to provide is as follows ue type LPD ue name LP for DB25 parallel printer or LPUSB for USB printer 192 168 2 1 Printers MUST be installed by user ROOT so you must login as ROOT before starti If no ROOT access is available then you must ask your system administrator to s for Print Server Installation Step 1 S...

Page 59: ...ote LPD Queue as shown above then press Next to continue Step 4 Enter Host and Queue information The IP of the Print Server is the Host default 192 168 2 1 The Queue should be entered as LP for a DB25 parallel printer or LPUSB for a USB printer Press Next to continue 59 ...

Page 60: ... for your printer If the driver for you printer is not dis ter manufacturer to obtain it ess Next to continue tep 6 Test the Printer It is recommended that you press Test to print a test page Once the test page has printed press Next to step through the rest of the screens in the wizard S 60 ...

Page 61: ...are optional but recommended tep 8 The last screen be configured Check the information The remaining screens in the wi st enter a Name for the printer as this will be used to select the printer by Press Next to display the last page of the wizard S Finished of the wizard gives a summary of the configuration that is about to and then press Finish Your printer is now installed 61 ...

Page 62: ...tep 2 Select Printer Ty elect Printer LPR and press OK tep 3 Modify Printer Settings The following page is important and requires two stages of configuration Select Change from within the PostScript Printer Description PPD file section stalling an LPR Print Server on Mac OS 9 NOTE These instructions assume Desktop Printer Utility C pe After a few seconds the following window will appear S S 62 ...

Page 63: ...as LP for a DB25 parallel printer or LPUSB for a USB printer Now press Verify This will confirm that the computer can communicate with the printer server NOTE This does not verify that the printer is actually working only that the IP address is correct Once verified then press OK to return to the previous window Step 4 Create the printer Press Create in the bottom right hand corner of the window T...

Page 64: ...lect printer ty Select IP Printing Enter the IP address of the Printer Server in the Printer Address field This is normally 192 168 2 1 unless you have changed it to something else ow shown below will be displayed pe and driver Installing an LPR Print Server on Mac OS X 10 3 assume that the printer has previously been in which is located in the Utilities folder within th ndow shown below will appe...

Page 65: ...he printer that is attached to the printer server from the list Now press Add to create the new printer After pressing Add the Printer List screen will be displayed and should include the new printer Step 4 Test the printer he new printer should be tested by trying to print a page from the computer T 65 ...

Page 66: ... you have an IP address that starts with 169 254 xxx xxx then see th If you have another IP address configured then see section C B I am getting an IP Address that starts with 169 254 xxx xxx etting this IP Address then you need to check that you are properly connected to the Ro that you have a good link light on the Router for the port this computer is connected to If nother cable ve a good link ...

Page 67: ...e right of the power input While the device is powered on use a paper clip to depress this button for about 5 7 seconds and then release Now you have completed the reset to factory defaults I Upgrading the firmware New firmware revisions will be made available as necessary when new product features or functionality is released You should check http www smc com on a periodic basis for these updates...

Page 68: ...f a network The portion of the network that transports information from one central location to another central location where it is unloaded onto a local system Base Station In mobile telecommunications a base station is the central radio transmitter receiver that nal urn is maintains communications with the mobile radiotelephone sets within its range In cellular and perso communications applicat...

Page 69: ...lision detection CSMA CD Fixed IP see Static IP Full Duplex Transmitting and receiving data simultaneously In pure digital networks this is achieved with two pairs of wires In analog networks or digital networks using carriers it is achieved by dividing the bandwidth of the line into two frequencies one for sending one for receiving ub H Central connection device for shared media in a star topolog...

Page 70: ...ng a crossover cable The MDI port does not cross the transmit and receive lines which is done by the regular ports MDI X ports that connect to end stations The MDI port connects to the MDI X port on the other device There are typically one or two ports on a device that can be toggled between MDI not crossed and MDI X crossed Medium Dependent Interface X crossed A port on a network hub or switch th...

Page 71: ...and what can be controlled turned off on etc If your Service Provider has assigned a fixed IP address enter the assigned IP address subnet mask and the gateway address provided by your service provider SPI Stateful Packet Inspection ensures that the data coming into your network was requested by an en node computer on your LAN The Barricade examines the incoming data an d d compares it to a databa...

Page 72: ...Pre Shared Key Enabled NetBIOS Broadcast Blinking LED when data is transmitted 4x Green LED for 100Mbps connection Blinking LED when data is transmitted Key management IKE Manual Aggressive Main mode for Remote gateway FQDN support Dynam support Encryption algorithm DES 3DES AES Authentication algorithm MD5 SHA 1 PFS supp Keying Mode Routing Static Route Dynamic Route RIP1 2 Power Input Power 5V 2...

Page 73: ...This digital apparatus does not exceed the Class B limits for radio noise emissions from digital apparatus as set out in the interference causing equipment standard entitled Digital Apparatus ICES 003 of the Department of Communications Cet appareil numérique respecte les limites de bruits radioélectriques applicables aux appareils numériques de prescrites dans la norme sur le matériel brouilleur ...

Page 74: ...cht über oder unterschreiten sowie den minimalen arbeitsplatzbezogene Schalldruckpegel nach DIN 45 635 Teil 1000 beträgt 70dB A oder weniger 1 Bitte lesen Sie diese Hinweise sorgf 3 Vor jede Aerosolreiniger Ambesten eignet sich ein angefeuchtetes Tuch zur Reinigu 4 Die Netzanschlußsteckdose soll nahe dem Gerät angebracht und leicht zugä 5 Das Gerät ist vor Feu 6 Bei der Aufstellu hervorrufen 7 Die...

Page 75: ...RANTY SHALL BE TAKEN TO AFFECT YOUR STATUTORY RIGHTS time warranty internal and external power supplies fans and cables are covered by a standard one year warranty from date of purchase SMC s Limited Warranty Statemen SMC Networks Europe SMC warrants its products to be free from defects in workmanship and materials under normal use and service for the applicable warranty term All SMC products carr...

Page 76: ... of any kind or for loss of revenue loss of business ction with the sale installation maintenance use ucts even if SMC or its authorized reseller has been no thi pat C SMC reserves the right to change specifications at any time without otice rademarks MC is a registered trademark and EZ Connect is a trademark of SMC Networks Inc Other product and ompany names are trademarks or registered trademark...

Page 77: ...39 02 739 14 17 Benelux 31 0 654 776 790 Fax 31 0 172 242 393 Central Europe 49 0 89 92861 0 Fax 49 0 89 92861 230 Nordics and Baltics 45 0 566 622 83 Fax 45 0 566 622 86 Eastern Europe 420 266 794 421 Fax 420 266 794 423 Sub Saharan Africa 27 012 661 02 32 Fax 34 93 477 3774 North West Africa 34 93 477 4920 Fax 34 93 477 3774 CIS 34 93 477 4920 Fax 34 93 477 3774 PRC 86 10 6235 4958 Fax 86 10 623...

Reviews: