


User Manual of Digital Video Recorder
34
/
Start continuous recording or motion detection recording of all channels.
/
Add IP camera automatically or manually.
Enter the playback interface and start playing back the video of the selected
channel immediately.
Four modes of output supported, including Standard, Bright, Gentle and Vivid.
Switch to the auxiliary output mode.
/
Auto hide/ lock the live view toolbar.
The
dwell time
of the live view configuration must be set before using
Start Auto-switch
. Refer to
Chapter
3.3
for dwell time settings.
If you enter Aux monitor mode and the Aux monitor is not connected, the mouse operation is disabled; you
need to switch back to the Main output with the
MAIN/AUX
button and
Enter
button on the front panel or
remote.
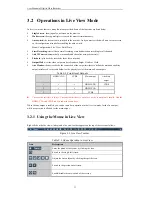
3.2.2
Using an Auxiliary Monitor
Certain features of the Live View are also available while in an Aux monitor. These features include:
•
Single Screen:
Switch to a full screen display of the selected camera. Camera can be selected from a
dropdown list.
•
Multi-screen:
Switch different display layout options. Layout options can be selected from a dropdown
list.
•
Next Screen:
When displaying less than the maximum number of cameras in Live View, clicking this
feature will switch to the next set of displays.
•
Playback:
Enter into Playback mode.
•
Output Mode
: Set the video output mode to Standard, Bright, Gentle or Vivid.
•
Main Monitor:
Enter Main operation mode.
In the live view mode of the main output monitor, the menu operation is not available while Aux output
mode is enabled.
3.2.3
Quick Setting Toolbar in Live View Mode
Click on the live view window, a quick setting toolbar will be shown on the bottom as follows:
Summary of Contents for H20HVR16A16I
Page 1: ...SmartWatch Hybrid Video Recorder H20HVR4A4I H20HVR8A8I H20HVR16A16I Operation Manual...
Page 11: ...User Manual of Digital Video Recorder 10 Troubleshooting 176 List of Compatible IP Cameras 180...
Page 12: ...User Manual of Digital Video Recorder 11 Chapter 1 Introduction...
Page 21: ...User Manual of Digital Video Recorder 20 Chapter 2 Getting Started...
Page 32: ...User Manual of Digital Video Recorder 31 Chapter 3 Live View...
Page 41: ...User Manual of Digital Video Recorder 40 Chapter 4 PTZ Controls...
Page 50: ...User Manual of Digital Video Recorder 49 Chapter 5 Recording Settings...
Page 58: ...User Manual of Digital Video Recorder 57 Figure 5 15 Record Schedule...
Page 70: ...User Manual of Digital Video Recorder 69 Chapter 6 Playback...
Page 89: ...User Manual of Digital Video Recorder 88 Chapter 7 Backup...
Page 99: ...User Manual of Digital Video Recorder 98 Reconnect device...
Page 100: ...User Manual of Digital Video Recorder 99 Chapter 8 Alarm Settings...
Page 103: ...User Manual of Digital Video Recorder 102 Figure 8 6 Copy Settings of Motion Detection...
Page 115: ...User Manual of Digital Video Recorder 114 Chapter 9 Network Settings...
Page 136: ...User Manual of Digital Video Recorder 135 Chapter 10 HDD Management...
Page 150: ...User Manual of Digital Video Recorder 149 Chapter 11 Camera Settings...
Page 155: ...User Manual of Digital Video Recorder 154 Chapter 12 Device Management and Maintenance...
Page 165: ...User Manual of Digital Video Recorder 164 Chapter 13 Others...
Page 175: ...User Manual of Digital Video Recorder 174 Chapter 14 Appendix...