background image


14 


Exit: Closes TouchDev. 

3.


Calibration: 


Standard calibration: 

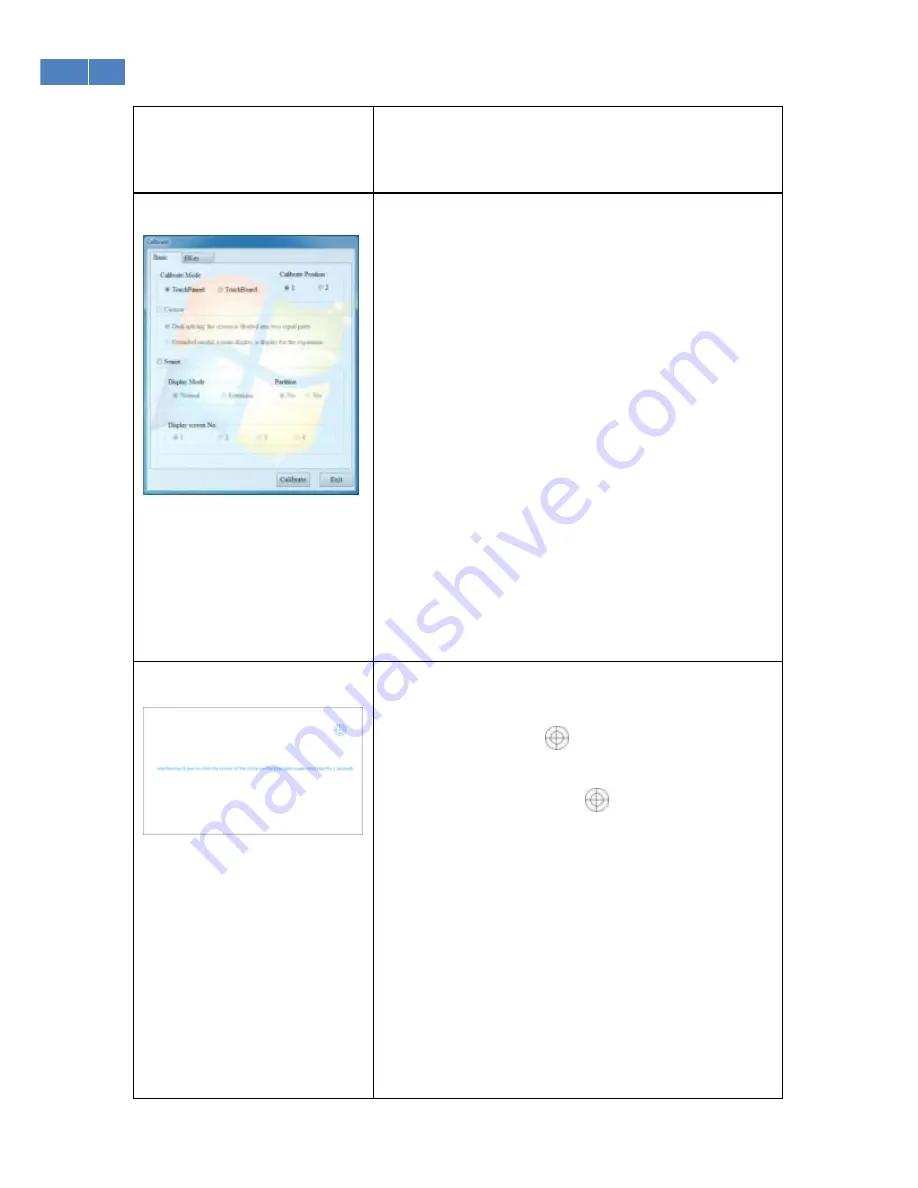
As  shown  in  the  figure  on  the  left,  there  are  “custom”  and 

“advanced”  options  for  calibration.  If  neither  one  of  the  two 

options  is  selected,  calibration  will  be  standard.  Standard 

calibration  is  suitable  when  connecting  only  one  electronic 

white board. 

“Calibrate  mode”  includes  “TouchPanel”  (touch  screen)  and 

“TouchBoard” (electronic white board). “Touchboard” supports 

positioning  of  non-rectangle  screen,  and  “TouchPanel”  only 

supports  positioning  of  rectangle  screen.  When  adopting  a 

projector, choose “TouchPanel” mode. 

Under  “calibrate  position”  you  will  find  two  positions  “1”  and 

“2”: in the first the display icon is close to the 4 angles of the 

screen; in the second, the display icon is close to the center of 

the screen. (Note: the first is recommended.) 

4.


Screen calibration


After selection, click “calibration”. The interface as shown in the 

figure on the left will appear. Use a touch pen or your finger to 

touch  the  center  of  icon“

”.  (During  positioning,  the  touch 

pen  must  be  vertical  to  the  screen  surface,  and  pen  point 

coincide with the center of icon “

”.) 

The  positioning  icon  will  move  to  the  4  angles  of  the  screen 

upon touch. For “Touchboard” mode, the icon will also appear 

in the center of the screen. 

Custom calibration: 

Custom  mode,  when  selected,  supports  two  kinds  of 

positioning.   

1)  In  “custom”  mode  two  electronic  white  boards  must  be 

connected at the same time. (Custom mode is not supported in 

the case of one electronic whiteboard.). 

Summary of Contents for SMA serie

Page 1: ...ch Monitor User Manual Please read this manual very carefully before using your device and store in a safe place for future reference Take down the model number for reference Model No Serial No ______...

Page 2: ...atures 5 Control Panel 6 Interface 7 Remote Control 8 Instructions 9 Installing the Wall Mount 13 Installing and Using the Touch Screen Software 14 Specifications PC 18 Specifications Touch Screen 18...

Page 3: ...se shelf a sloping floor or an insecure wall Turn off the power and contact the local dealer if the monitor falls to the ground or gets damaged Keep the monitor away from rain and do not install in pl...

Page 4: ...3 Physical appearance may vary slightly depending on the model Moving the monitor Two persons or more are required to handle the monitor Hold the top and bottom frame firmly to move the monitor...

Page 5: ...e object selected It uses high quality FULL HD LED panel with features of high brightness high contrast ratio color optimization function bit by bit image dynamic and static screen enhancing function...

Page 6: ...5 Control Panel PC power indicator lights up in models with built in PC...

Page 7: ...6 Interface...

Page 8: ...7 Remote Control...

Page 9: ...e turned off with one button as follows Initial State State after pressing POWER single button solution PC is OFF monitor is ON Monitor will be turned off Both PC and TV are On PC will be turned off f...

Page 10: ...source as default setting When you connect an external PC to the HDMI port on the front control panel the source will be automatically switched to HDMI 1 When the built in PC optional and the HDMI por...

Page 11: ...HDMI cable for video and audio signals connect the USB cable for touch screen functionality HDMI and USB cables may or may not be included in your supply Check with your dealer in advance Connecting...

Page 12: ...VD to the monitor via VGA HDMI YPBPR AV USB etc see fig The figure is intended for reference only You may have to prepare some connecting cables Connecting to a projector You can connect the monitor t...

Page 13: ...12 Installing the Wall Mount...

Page 14: ...efault the software will automatically execute the icon can be found on the desktop s lower right hand corner If you accidentally close the software click start program find and select TouchDev then r...

Page 15: ...rst the display icon is close to the 4 angles of the screen in the second the display icon is close to the center of the screen Note the first is recommended 4 Screen calibration After selection click...

Page 16: ...supported Upgrading method related authorized documents are needed before upgrading Click in features to show the upgrading box Click upgrade to search for the authorized documents for upgrading 6 Con...

Page 17: ...The following operations may be performed on the screen Click object on the screen Double click click the same object twice quickly on the same screen Drag press the object and drag it Right key press...

Page 18: ...ort IEEE802 11b g n 150 300Mbps Max area 100m security encryption optional Bluetooth Support V3 0 EDR Max 3Mbps reliable distance 10m optional Touch Screen Specifications Touch technology Non contact...

Page 19: ...MVB MOV MJPEG VC1 DivX FLV Working Temperature 0 to 40 Working Humidity 10 to 90 No condensation Storing Temperature 20 to 60 Machine Size 1296 5x792 5x81mm 1550x944x96 5mm 1626x979x102mm Packing Size...

Page 20: ...hat content of such material in the parts is below the limit of SJ T11363 2006 indicates that the content of such material in the parts is above the limit of SJ T11363 2006 The substance marked with f...

Reviews: