Slinex SM-07MN User Manual Download Page 7

SM-07MN

11

12

Notes:

1)  If several monitors are connected into one system, user can view the image from the door panels and 

cameras on any monitor inside this system. The image will be transferred from the «Master» monitor 
outdoor panels and cameras to the «Slave» monitors.

2)  If someone press call button on the door panel while monitoring is active then the image from this 

outdoor panel appears on the monitor screen and call melody starts. Press «Answer»


            button to 

start conversation.

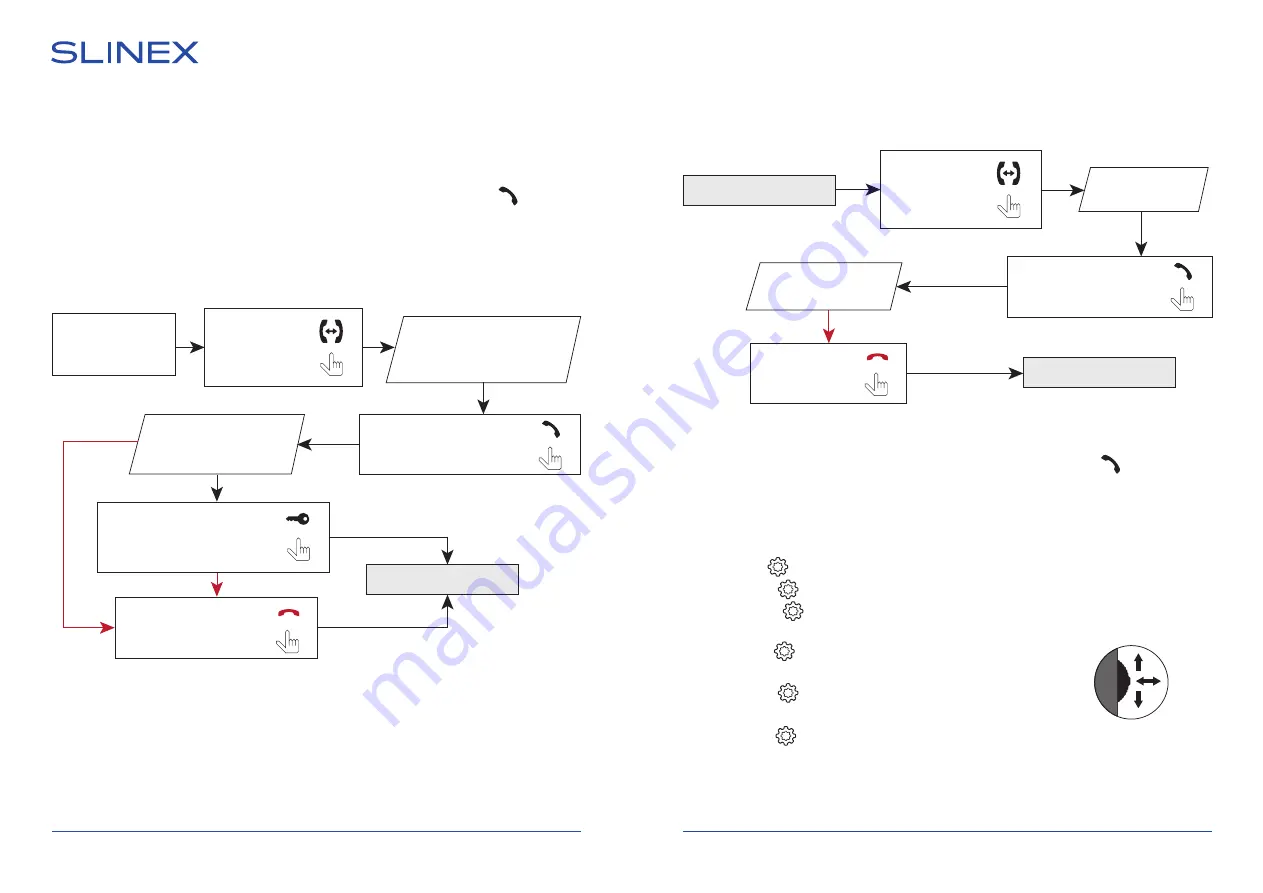
5.3. Incoming call redirection

Two monitors connected into one system are used.

Note:

If incoming call is successfully redirected to the other monitor then current monitor will enter standby 
mode.

Melody starts ringing on
the other monitor inside

the system and visitor image 

appears on the monitor screen

Conversation with the 

visitor on the other 

monitor begins

Incoming call from the 

door panel and the 

user starts conversation

Press  «Intercom» 
button to start
call redirection

20 seconds

Press «Answer» button on the 
other monitor to start
conversation with the visitor

Standby mode

Press «Unlock» button to open
lock connected to the current
door panel, relay built into the 
panel will open the lock

Press «Hang up» button to
stop conversation or
incoming call

5.4. Intercom

Two monitors connected into one system are used.

Melody starts

ringing

Standby mode

Note:

If somebody press call button on the door panel while intercom is active then the image from the door 
panel appears on the monitor screen and call melody starts. Press «Answer»


             button to start 

conversation with the visitor.

6. Settings

Settings joystick            situated on the right side of the monitor case. It has several functions:

•  press the              joystick in stanby mode to enter monitor settings;
•  move the          joystick up or down to change current parameter 

of the monitor settings; 

•  press the            joystick again to choose current parameter and move 

it up or down to change current parameter value;

•  press the          joystick one more time to save current parameter 

value;

•  press the              joystick in monitoring or conversation mode to make 

a snapshot or start video recording (depending on record settings). 
Press the joystick again to stop video recording.

Standby mode

Press  «Intercom» 
button to start
intercom 
conversation

Conversation with the 

other monitor starts

Press «Answer» button on 
the other monitor to start
conversation

Press «Hang up» 
button to stop 
conversation

Move down

Move up

Press

Summary of Contents for SM-07MN

Page 1: ...Design Uniqueness Innovations Design Uniqueness Innovations User manual Technicalsupport Thank you for choosing our equipment 7 video intercom SM 07MN...

Page 2: ...or the device surface cleaning Use soft wet cloth or tissue to remove strong dirt Don t overpower outlets It can cause fire or electric shock Nature protection Don t throw away the device with other i...

Page 3: ...nge the value of current parameter by moving joystick up or down and then push the joystick again to save current parameter value press the joystick in monitoring or conversation mode to save a photo...

Page 4: ...square of one wire and RG 59 or RG 6 coaxial cable for the video signal c Shielded or non shielded twisted pair not recommended distance up to 25 meters 82 ft non shielded twisted pair can be used Pow...

Page 5: ...circuits Door panels cameras power supplys locks and motion sensors described on the schemes are optional devices and aren t included into monitors kit Up to 4 monitors can be connected into one syste...

Page 6: ...to open lock connected to the current door panel relay built into the panel will open the lock 5 Operation 5 1 Incoming call Standby mode Standby mode Melody is ringing on the monitor and door panel...

Page 7: ...nnected to the current door panel relay built into the panel will open the lock Press Hang up button to stop conversation or incoming call 5 4 Intercom Two monitors connected into one system are used...

Page 8: ...ttings menu Time date and time settings Time display date and time screensaver display in stndby mode Off 1 3 5 10 min Information Software version current software version of the monitor Release date...

Page 9: ...vel from 00 to 09 depending on the time of a day and also ringing time of the melody 10 45 seconds Silence mode incoming call melody and keyboard muting On or Off Main menu Ring Main menu Ring 6 4 Wor...

Page 10: ...eyboard sound On or Off key press sound 6 5 Alarm settings Press Alarm icon in the main menu to enter alarm settings Following parameters are available in the Alarm menu CAM alarm additional cameras a...

Page 11: ...and detect motion without any external sensors using any camera image changes with the time Camera power that is used for motion detection should be constantly on to let the monitor observe image chan...

Page 12: ...the main menu to enter snapshots and records playback Following parameters are available in the Files menu Record files records playback Snapshot files snapshots playback Record files Main menu 0005...

Page 13: ...ftware connected equipment or stored data In the event a product has been discontinued manufacturer shall either repair the product offer to replace it with a comparable product or provide a refund at...

Reviews: