background image

Supplies and Imprintables

Foils

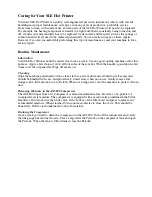
Imprinting foils are available in a variety of colors and formulations. Your SLE Foil Color Chart 
gives you the wide selection of colors available. Some foil can be used adequately on a wide variety 
of material while others are specially formulated to print on designated substances. Foils for printing 
on paper stocks, however, are the most common. When in doubt, a test print will verify whether the 
intended foil is compatible with the material you are working with.

Most common formulation of foil:


P-series – Metallic foil for general applications, satin ribbon and paper stocks.


H-series – Metallic foil for paper napkins, rough surfaces and larger type.


A-series – Pigment foil for a wide variety of applications.


S-series – Metallic foil for fabrics, satin pillows and book covers.


L-series – Specially formulated for leather articles


K-series – Kopyfoil.

 
It is not possible to say for sure which foil is the best for the particular material you are printing on. 
If you have any doubts, our laboratory will be glad to help. Just send us a few samples of the item 
you are working on together with a self-addressed stamped envelope. Our technicians will test your 
samples and respond by return mail.

Type Sets, Spacers and Emblems

What is Available?

A set of type usually contains the alphabets, punctuation marks and numerals. 

You can order full sets or half sets: Capitals or Lower Cases. Numerals and punctuation 
marks usually come with the capitals. 

Magnotypes are complete words or phrases cast in a single piece to make type setting less 
time consuming. Available in the more popular type styles and point sizes.

Be sure to order Spacers that match the point size of your type set. 

Emblems are small graphic designs that compliment your type set. SLE has hundreds of 
emblems available for every festive occasion. 

Dies are available either from our available stock designs or custom made from you own 
black-and-white camera-ready artwork.  

Please consult your SLE catalog for available Emblem & Die designs, Type styles and point 
sizes.

Use Best Looking Size of Type for the Job

You cannot expect the best looking effect when using the same size type for both short and 
long names. 

The size of the type should be in proportion to the length of the name and size of the 
merchandise. For example - short name in 18 Pt. Goudy Cursive may be well proportioned on 
billfolds, but a long name would crowd the space. It would look better in 12 or 14 Pt.

On paper napkins use as large a type as possible - it looks better and is easier to imprint.

A first name or monogram in Park Ave. type is very smart on small, informal notes, but 
would appear "lost" on a large sheet of stationery. 

On Christmas Cards, when imprinting longer names, select the more condensed type such as 
12 Pt. Americana, 18 Pt. Murray Hill, etc. For short names use a larger size type or the name 
will look too small.

Since you cannot control the size of the merchandise, or the length of the names, it is best to 
have two sizes of type in each of the more popular styles - one for long names and one for 
short names. 

On very short names use brass spacers between each letter.

Summary of Contents for 800 Series

Page 1: ...User Guide SLE Hot Printers 800 Series ...

Page 2: ...al Imprinting Applications How to imprint on ribbons How to imprint on napkins How to imprint on matchbook covers How to imprint on pencils How to imprint on stationery invitations or announcements How to imprint on Emboss a plates How to imprint on larger items How to imprint on Mylar balloons How to imprint on leather articles How to imprint on favor tags and confetti cards How to get foil impri...

Page 3: ... 5 Inch Hand Operated Machine MODEL AM 800B 3 5 Inch Air Operated Machine MODEL M 800A 5 Inch Hand Operated Machine MODEL AM 800A 5 Inch Air Operated Machine MODEL M 800D 6 Inch Hand Operated Machine MODEL AM 800D 6 Inch Air Operated Machine What is Foil Imprinting Foil imprinting or Hot Stamping is a process of permanently imbedding text or images onto a surface like paper plastic or leather with...

Page 4: ...sion cord do not exceed the extension cord rating Make sure that the total amperage of all products plugged into the wall outlet does not exceed the outlet rating and that outlet is properly fused according to its electrical ratings Toxic inflammable material should not be placed near the machine Do not attempt to imprint on any object or product containing toxic inflammable material Dress appropr...

Page 5: ...e and before servicing or storage To release the pressure turn and press the valve underneath the Air Filter Regulator Disconnect electrical power to machine and compressor when not in use Unplug machine from the wall outlet before cleaning and servicing ...

Page 6: ...ng to KnowYour SLE Hot Printer Handle Handle Lock Screw Rear Foil Bracket Power Foil Spool Tension Temperature Ribbon Printing Heater Foil Take up Spool Foil Spool Clip Foil Rack Ram Bar Heating Temperature ...

Page 7: ...Model AM 800E Super Quiet Compressor Pneumatic Control Cycle Reset Power on Stop Button Dwell Timer Activation Electronic Cycle Mode Cycle Mode Pressure Pressure Gauge Power on Switch Air Filter Petcock ...

Page 8: ...nation with the Open Chase Type Holder Adapter Sleeves fit into the Heater Platen of your SLE Hot Printer to keep Type Holders in place To install an Adapter Sleeve slide into the Heater Platen from either side and lock into place by flipping the Butterfly Clips on both sides To remove an Adapter Sleeve use the eraser end of a pencil and push the sleeve out Be sure to use the Holding Pad as the Ad...

Page 9: ... to imprint larger items like satin pillows scrapbooks and wedding albums quickly and easily In addition it helps speed up imprinting of greeting cards and stationery Billfold Clamp used to hold small leather items in place for imprinting Book Clamp used to hold bibles photo albums or scrapbook covers in place for imprinting Holding Pad serves to protect you from the heat when handling hot items s...

Page 10: ...ion of imprinting ribbons a cycle mode allows the machine to operate automatically and only one hand is needed to feed the ribbon Your SLE Hot Printer comes in two boxes Box one contains the machine the Pneumatic Control Box and accessories Box two contains the compressor To set up your air operated machine 1 Set up the compressor according to the instructions included in the box Place the compres...

Page 11: ...vanced with each impression 1 Remove the outer Foil Holding Socket from the Rear Foil Bracket by turning it clockwise and pulling outward 2 Remove the outer plastic Foil Holding Disc Leave the inner disc on the Rear Foil Bracket 3 Remove the label from the foil and mount the foil onto the Rear Foil Bracket with the foil unwinding downward from the front of the roll 4 Replace the outer Foil Holding...

Page 12: ...ting up or changing foil on air operated units always turn off power to the Pneumatic Control Box Setting Foil Pull The purpose of setting the foil pull is to make sure that each printing impression is made on new foil Proper adjustment of the foil advancing mechanism will automatically advance the right amount of foil thus preventing waste 1 Loosen the thumbscrew locking the Foil Rack Assembly at...

Page 13: ...e Machine Handle down slightly with your right hand while pulling the used foil off the spool using your left hand 4 Snap the metal Foil Clip from the Foil Take up Spool Discard the used foil 5 Wrap the end of the new foil dull side facing in around the spool 6 Replace the Foil Clip over the foil SETTING THE TEMPERATURE Before you begin imprinting you need to set the temperature of your SLE Hot Pr...

Page 14: ...nt it is recommended that you set the temperature slightly lower in the beginning and increase as necessary TEMPERATURE TABLE Regulator Knob Setting 1 3 3 5 5 7 Temperature F 190 230 88 C 110 C 230 260 110 C 127 C 260 280 127 C 138 C Applicable Substrates for reference only Mylar leather PVC Ribbon paper Plastic wood 1 Plug in your SLE Hot Printer and turn on the power The Green and Red lights com...

Page 15: ...to be printed The normal way of setting Type is to place each piece of type into a Type Holder that holds the type together SLE offers several Type Holders each designed to perform specific tasks in the most efficient manner Choose the appropriate Type Holder based on the requirement of your specific print job Type is set line by line in the same sequence as they appear in the copy This means you ...

Page 16: ...vers can best be printed using the 2 Line Type Holder The 1 Line or 2 Line Type Holder is used in combination with a corresponding Adapter Sleeve 1 Insert the Adapter Sleeve into the Heater Platen and lock it by flipping the Butterfly Clips on the side of the Heater Platen 2 Hold the Type Holder with the handle pointing towards your left Set your type onto the Type Holder from left to right with t...

Page 17: ...e left 2 Place one or more lead rules into the holder to achieve the desired starting distance from the side of the holder 3 Beginning from left to right position the first character of the first word with the nick facing upward The letters will appear upside down Use the tweezers furnished with your accessories to facilitate the handling and placement of the individual type 4 Continue adding char...

Page 18: ...ng at the bottom of a page such as on greeting cards insert the Type Holder from the right side of the Heater Platen 15 Remove the Handle from the Type Holder Allow the type to heat up before imprinting PRINTING WITH ENGRAVINGS Some imprinting job may include a graphic design or engraving Used in combination with standard typesetting special engravings can add the professional touch that appeals t...

Page 19: ...ted with texture Medium to heavy textures might be successfully printed provided the type size is not too small and that the type style has been designed with thin light lines The printing surfaces of such type are sharper making it easier to penetrate heavier textures than a type design with heavier strokes In addition the printing area will have a definite influence on how much pressure to apply...

Page 20: ...tly bring the handle back to the starting position Do not let handle snap back 4 Check the copy for errors in spelling 5 If the position of the imprint is not satisfactory release the Side Screw and adjust the Gauge bar to re position the article to be imprinted For Air operated units Pressure is controlled by setting the pressure regulator on the compressor Clockwise increase pressure Counter clo...

Page 21: ... instruction book over again very carefully and look at the Training Video If this does not help write to us at 258 Fifth Avenue City of Industry CA 91746 Describe what seems to be the trouble Enclose samples of your product a section of the used foil and mark down the temperature used Our Service Department will help you by return mail ...

Page 22: ...ll Adjust the Foil Rack Inappropriate foil The foil you are using may be inappropriate for the material being marked Refer to the section in this manual on proper foil selection Some foil releases at different temperature than others Be sure to get the temperature just right for the foil you are using Some foil requires a shorter dwell time than others especially when using fine line type Brillian...

Page 23: ...e Because of various uncontrollable factors such as vibration uneven die mounting etc it may become necessary to adjust the level of the machine table in order to achieve even impressions 1 Release the Locking Screw underneath the Wooden Base 2 Make a test imprint on a card 3 Based on the result of the test imprint decide which corner of the Printing Table needs adjustment Too strong an impression...

Page 24: ...ly is in proper contact with the Gear on the Foil Take up Spool In case adjustment is needed loosen the two hex screws shift the Foil Calibration Plate forward or backward and lock the screws again when proper contact is established Foil has difficulty pulling forward Make sure that the foil rolls freely on the Rear Foil Bracket Adjust the position of the Foil Holding Socket as necessary Foil Take...

Page 25: ...ting are 12 14 or 18 points Use P series or A series foil for these Type sizes 4 Insert the Type Holder into the Adapter Sleeve from the left 5 Insert the Stop Pin into the side of the Ram Bar The stop pin cuts down the amount of work you do by reducing the distance your arm travels 6 Adjust the foil pull 7 Secure the Ribbon Spindle onto the wooden base on the right side of the machine 8 Install a...

Page 26: ...nd place it on the table 12 inches from the left edge of your printing table This is your marker When pulling the ribbon use your left thumb and index finger and grab the ribbon at the edge of the printing table Pull the ribbon until your left thumb reaches the marker 17 When finished imprinting cut the ribbon into individual pieces or rewind onto the spool using the Ribbon Spindle NOTE If there i...

Page 27: ...arts blinking 6 Activate machine by pressing once on the two Activation Buttons 7 Pull ribbon towards the left using your thumb and index finger 8 To adjust the printing speed turn the Cycle Time Knob on the control panel Clockwise slower Counter clockwise faster 9 Stop machine by pushing the Stop Button 10 When finished imprinting switch off cycle mode by sliding the Cycle Mode switch backward CA...

Page 28: ...he most common type sizes used for napkin printing are 18 24 or 36 points For best results use H series or A series foil for napkin printing 3 Insert the Type Holder into the Machine 4 Secure the Napkin Guide on the Printing Table using the Gauge Bar 5 Place the napkin in the Napkin Guide 6 Make imprints using firm medium dwell Adjust temperature as necessary 7 Remove the napkins NOTE Some foil ma...

Page 29: ...3 Insert the Type Holder into the Adapter Sleeve 4 Secure the Matchbook Guide on the Printing Table using the Gauge Bar 5 Wrap a rubber band around the front of the Printing Table to assist in holding the matchbook in place 6 Open the flap of the matchbook slide underneath the rubber band and place onto the Matchbook Guide 7 Bring the handle down and imprint with a short dwell 8 Remove the imprint...

Page 30: ...e on typesetting Use P series foil for this project 3 Insert the Type Holder into the machine 4 Secure the Pencil Attachment onto the Printing Table 5 Load the pencil into the attachment from left to right eraser end first until it is flush with the right side of the attachment 6 Pull the Handle down gently to print Imprinting pencils takes a gentle touch Use only one finger pressure and let the h...

Page 31: ...eft side of the Adapter Sleeve When imprinting at the bottom of a page such as on greeting cards insert the Type Holder from the right side of the Adapter Sleeve 4 Slide the Gauge Bar onto the Printing Table and lock into the desired position 5 Measure the width of the article to be imprinted 6 Divide the width by two and place the Gauge Bar Clip at this number on either side of the zero on the Ga...

Page 32: ...1 Set the temperature to about 280 degrees 2 Set the 1 Line or 2 Line Type Holder according to the instructions on typesetting The most common type sizes for imprinting on Emboss a Plates are 12 and 18 points Use A series black foil for this project 3 Insert the Type Holder into the Adapter Sleeve 4 Secure the included Emboss a Plate Guide on the Printing Table using the Gauge Bar 5 Place the Embo...

Page 33: ...the Extended Printing Table onto the regular Printing Table from the front Secure in place by tightening the clamping screw on the right side 2 Select the proper foil for the article to be imprinted For satin pillows or albums use S series foil For paper articles use H series foil 3 Set the proper temperature for the article to be imprinted 4 Set the Type Holder or Engraving Holder according to th...

Page 34: ...eces of cut foil instead of using the automatic foil advancing feature of your machine Choosing the proper type size It is difficult for some customers to visualize how the lettering they ask for is going to look on the finished product For example they may ask for extra long names on billfolds when just the initials would look neater and be easier to imprint On rough leather a larger type that ma...

Page 35: ... foil to form a better bond Do not move the article in any way after the blind impression When imprinting rough leather the trick is to stamp in the name several times until you get a perfectly clear and smooth impression before applying the foil Applying the foil Lay a piece of foil dull side down over the impression and stamp using a firm quick dwell Check the used foil to see if you got a full ...

Page 36: ...omputer Output For paper output from a computer or a photocopier you can obtain the same elegant look of foil imprinting without even setting metal type or engravings This can be accomplished by using the K series specialty foil Kopyfoil and the Kopyfoil Attachment The K series foil essentially seeks out areas on your output where the original printing is in black ink and converts it to brilliant ...

Page 37: ... of the Guide as necessary 7 Place a piece of Crysteramics in the Guide 8 Imprint with a light short dwell 9 Remove the Crysteramics and soak in a bowl of lukewarm water for one to two minutes or until the backing paper has absorbed enough water to allow it to separate easily from the clear film 10 Pick up the Crysteramics and carefully position it on the surface of your article Use your finger fr...

Page 38: ...s Magnotypes are complete words or phrases cast in a single piece to make type setting less time consuming Available in the more popular type styles and point sizes Be sure to order Spacers that match the point size of your type set Emblems are small graphic designs that compliment your type set SLE has hundreds of emblems available for every festive occasion Dies are available either from our ava...

Page 39: ...help you create elegant gifts and favors The selection is constantly updated to reflect what is popular in the market Ribbons Favor Boxes Emboss a Plates Magnetic Address Books Crysteramics Matchbooks Notepads Toothpick Packages Favor Tags Coasters Napkin rings ...

Page 40: ...ndle up and down a few times to let the oil penetrate Wipe off excess oil Cleaning Wipe the machine periodically with a clean cloth to prevent dust and oil build up All accessories should be handled with care and protectively stored away when not in use Gently remove foil sludge with a little alcohol on a soft cloth When not being used cover the machine to protect it from dust Releasing Moisture i...

Page 41: ...ic of foil imprinting you will attract many new customers Arranging good looking displays of imprinted samples is the best way to promote extra sales You will experience many purchases made on impulse by customers who see your samples and realize the value of a personalized gift Whenever you make up an especially attractive order of personalized ribbon book matches paper napkins etc always remembe...

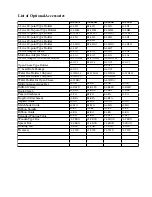
Page 42: ...der A8 OC1 B8 OC1 A8 OC1 D8 OC1 E8 OC1 2 Lead Rule Package A8 OC2 A8 OC2 Wafer Die Holder 108 point E8 WH108 B8 WH108 E8 WH108 D8 WH108 Wafer Die Holder 160 point E8 WH160 E8 WH160 Wafer Holder for Open Chase A8 WHOC A8 WHOC Multi purpose Gauge Bar A8 GB B8 GB E8 GB D8 GB Billfold Clamp A8 BLFD B8 BLFD E8 BLFD E8 BLFD Book Clamp A8 BBL B8 BBL E8 BBL E8 BBL Pencil Attachment A8 PG B8 PG E8 PG D8 PG...

Page 43: ...ht Lb 19 16 20 20 Overall Dimension in W x D x H 7 5 x 13 8 x 15 5 7 5 x 12 5 x 13 7 5 x 13 8 x 15 5 7 5 x 13 8 x 15 5 Printing Width in 5 0 3 5 6 0 6 0 Printing Depth 2 3 1 5 2 3 1 5 Vertical Clearance 2 3 inch Color White Specifications are subject to change for improvement 1 inch in 25 4mm l pound lb 0 454kg ...

Reviews: