- 11 -
- 10 -
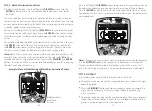
5. Notch Discrimination Pattern
6. PINPOINT
Notch Discrimination—Use the
(↑)
or
(↓)
DISCRIM
buttons with the
ENTER
button to eliminate trash objects from detection such as foil or
pull-tabs.
The metal detector has 12 cursors or "notches" of discrimination, shown on
the lower line. Any cursors can be switched on or off as desired. There are two
primary methods for modifying the Notch Discrimination pattern to eliminate
a specific type of trash or unwanted item.
For the first method, use the
(↑)
or
(↓)
DISCRIM
buttons to select the target
metal cursor on the left or right. Next, press the
ENTER
button to eliminate or
select the cursor on the lower line, directly below the line of the target metal
cursor.
The second method of modifying the Notch Discrimination pattern is to press
the
ENTER
button only. When an unwanted target is detected, simply press
the
ENTER
button to eliminate the target metal cursor. The next time when
this item is encountered, the detector will not make a response to it.
Note:
Notch Discrimination can also be used to find specific metal items. For
example, if you lost an earring, scan the other earring with the
A/M
mode
selected and note its target metal cursor. Then use the
DISCRIM
and
ENTER
buttons to switch off all the cursors on two lines except the one for the earring
to detect and find out the earring.
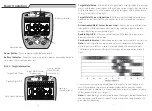
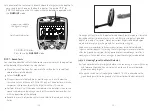
Press the
(↑)
or
(↓)
DISCRIM
buttons to position the target metal cursor on
the upper line above the one you want to eliminate (see the figure above).
Press the
ENTER
button to eliminate this cursor from the lower line (see the
figure below). And this item is now eliminated, which means the detector will
not respond to it.
Note:
Changes made to the Notch Discrimination pattern when the detector
is in the
CUSTOM
mode will be saved when the detector is switched off.
Changes made to all other modes will not be saved, which means it will
return to the factory settings every time when the detector is switched off.
In this mode, it can help to find the target metal much faster.
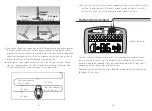
Sweep the search coil around the suspected location at a constant height
above the ground.
Press the
PINPOINT
button and slowly sweep the search coil above the
target area while keeping at the same height above the ground (e.g.
0.78-1.18 inches).
Sweep the search coil side-to-side and front-to-back like a cross to locate
the position with the strongest signal, that is, the loudest sound and the
greatest number of segments on the upper line.
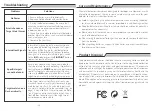
Example: Manual Modification of Notch Discrimination Pattern
Modify patterns
with these
buttons.
Summary of Contents for TX-650
Page 1: ......


