background image

- 5 -

- 4 -

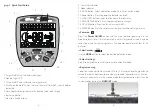
2. Quick Start Guide

 Power on.

1

4

5

6

7

8

9

14

15

13

12

11

10

2

3

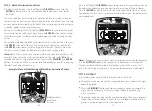
1. Target Metal Value: Indicate metal types

2. Double Digits/P-P

3. Target Metal Cursor: Indicate the target metal

4. Discriminated Metal Cursor: Indicate the metal, for which is eliminated or   

     detected

5. Coin Depth Indicator: Indicate the depth of coin-sized targets

6. Battery Indicator

7. Non Iron: Exclude irons

8. Sensitivity Indicator

9. Mode Indicator

10. MODE Button: Select a detection mode (i.e. discrimination mode)

11. Power Button: Press to power the detector on or off

12. SENSITIVITY Button: Increase or decrease the sensitivity

13. P-P/PINPOINT Button: Press to precisely locate a target

14. DISCRIM Button: Press to eliminate target metals

15. ENTER Button: Press to set or cancel the discrimination of target metals

Press  the 

Power  ON/OFF

  button  and  the  metal  detector  powers  on  in  the 

mode used last time. It will automatically adjust for ground minerals and be 

ready to be used for searching metals. The detector operates with four (4) AA 

batteries.

Use the 

MODE

 button to select the desired detection mode.

Adjust settings of the sensitivity or discrimination if needed.

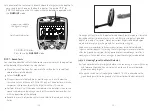
Lower the search coil to a distance of 0.78 to 1.18 inches above the ground and 

sweep the search coil from side to side at a speed of approximately 2.23 mph. 

The search coil must be in the motion mode for target detection, but it can be 

in non-motion during the 

PINPOINT

 mode.

Select modes.

Adjust settings.

Begin scanning.

2.23 mph

2.23 mph

0.78-1.18 inches

Summary of Contents for TX-650

Page 1: ......

Page 2: ...he detector will be more sensitive to elec tromagnetic interference By reducing the sensitivity the interference will be reduced correspondingly When detecting metals move the search coil at a constan...

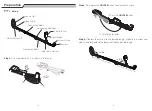
Page 3: ...ector 180 as shown in the gure Step 2 Press down the UNLOCK button to release the handle Adjustable Shaft Press the UNLOCK button Unfold the detector Unfold Pull to the desired position Pull to the de...

Page 4: ...target 14 DISCRIM Button Press to eliminate target metals 15 ENTER Button Press to set or cancel the discrimination of target metals Press the Power ON OFF button and the metal detector powers on in...

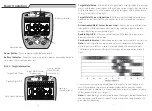
Page 5: ...Digits P P Display a value from 0 to 99 to identify targets more precisely than the metal cursor Coin Depth Indicator Show the depth of a coin or a target of a similar size Note Targets larger than a...

Page 6: ...such as aluminum cans NON IRON Mode Designed to nd valuable targets such as brass silver and gold and eliminate all kinds of iron trash Use the or SENSITIVITY buttons to increase or decrease the sensi...

Page 7: ...rget metal cursor Then use the DISCRIM and ENTER buttons to switch o all the cursors on two lines except the one for the earring to detect and nd out the earring Press the or DISCRIM buttons to positi...

Page 8: ...f the detector Record the results of your bench tests and refer to them when hunting in elds Upper Line Indicate the signal strength P P PINPOINT Button Press to use the PINPOINT mode Coin Depth Indic...

Page 9: ...t arc at a sweeping speed of about 2 23 mph Four bars indicate that batteries are fully charged Replace batteries when there is only 1 bar remaining The detector will still perform well until the batt...

Page 10: ...s for optimum performance Troubleshooting Care and Maintenance Product Disposal Problems No Power Erratic Sounds or Target Metal Cursor Speci c targets cannot be found Target metal cursors ash erratic...

Page 11: ...de a one year warranty for our products If you have any problems or need any help when using the product please don t hesitate to contact us and we will help you solve the problems as soon as possible...

Reviews: