background image

Astro Time-Lapse 

Astra Time-Lapse 

photography faces the same challenges as astrophotography 

in general. Namely, due to the dimness of the subject (the night sky), longer 

exposures are required to record sufficient detail, and tracking is needed to 

prevent star trailing during those exposures. But there are some differences 

as well. 

For astrophotography, the region of sky that is being photographed moves 

over the course .of the exposure sequence. We generally repeat the process 

to  obtain  a  sequence  of  images,  all  of  the  same  subject,  and  all  framed 

identically. This means that our camera is pointing in a different direction at 

the end of the sequence compared to where it was pointing at the beginning. 

This occurs because our subject has moved and the camera has moved along 

with it. 

In 

Astra Time-Lapse 

we take multiple images as well, and the camera moves 

with each exposure. But, unlike in astrophotography, SAM returns the camera 

to the starting point after each exposure is completed. 

Now,  when the  frames  are sequenced into a  video,  you  see the night  sky 

moving  about  a fixed  terrestrial  reference  point.  By  finding  locations  with 

beautiful foreground settings you can produce breathtaking videos of the sky 

moving over your location. [Visit our YouTube channel to see some examples]. 

Special Requirements For Astrophotography and Astro Time-Lapse 

In  order  to  track  the  movement  of  the  night  sky  the  camera  has  to  be 

continuously moved to offset the rotation of the Earth in order to hold the 

subject perfectly steady on the sensor. The rotation of the camera needs to 

take place about an axis that is parallel to Earth's rotational axis, and therefore, 
the two axes must be aligned in order for tracking to work correctly. 

18 

A time-lapse video consists 

of hundreds to thousands 

of individual photos taken 

over a long span of time 

then replayed in a short 

video, revealing natural 

dynamics that occur much 

to slowly for us to perceive 

otherwise. 

Look through 

the Polar View 

Finder and align 

on Polaris, making 

• 

Polaris

adjustmentswith 

your tilt/pan head 

or ball mount. 

Polar Alignment 

Polar Alignment refers to the procedure for aligning SAM's rotational axis 

with the  Earth's rotational axis. If we extend  Earth's rotational axis out 

into space it intersects an imaginary point called the Celestial Pole. In the 

Northern hemisphere we refer to that point as the North Celestial Pole, 

or  NCP for  short.  In the Southern hemisphere it is the South  Celestial 

Pole or SCP. 

Because the celestial poles are imaginary points, there is nothing to see 

at their  locations. This can make pointing  at them a bit of a challenge! 

However, there are a couple of celestial land marks nearby the poles that 

help us along. In the north it is Polaris, the North Star.  In the south it is 

the star Sigma Octanis. 

Polar Alignment in the Northern Hemisphere 

To polar align SAM with the NCP follow this procedure. It is best to do this 

at dusk when you can just see Polaris, but before it is completely dark so 

that you can more easily see what you are doing. Also, it's always good 

practice to save the dark for taking your pictures, not for setting up your 

equipment. The following steps assume you have a tilt/pan head or ball 

mount attached to your tripod: 

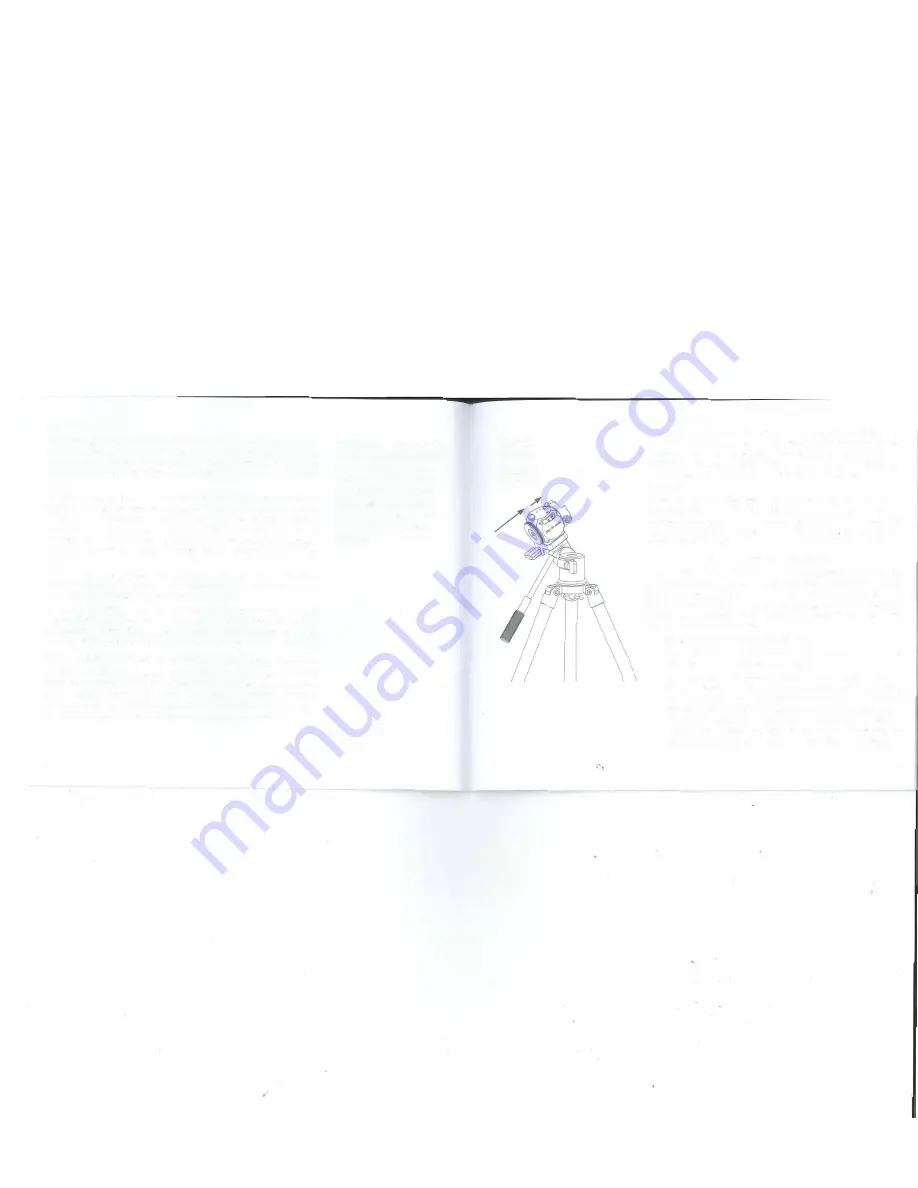
Set up your tripod and be sure that it is secure. 

Attach  SAM  to  the  tilt/pan  or  ball  head. The  Polar  View  Finder 

should be on top and the saddle facing north. 

Now, angle the tilt/head or ball mount up and rotate so that you 

can see Polaris in the field of view of the Polar View Finder. This is 

all you will need to do when using short focal length lenses and/or 

exposures that are only a few seconds long. If you are using longer 

focal length lenses (e.g., greater than 100 mm or so) or exposures 

exceeding 30- 60s then you may get better results by following the 

steps outlined in Appendix I: Advanced Polar Alignment Procedures. 

19 

Summary of Contents for star adventurer mini

Page 1: ...r Adventurer Mini User Guide Astrophotography Time Lapse hotography DSLR Camera Control Quite Possibly The Most Compact and Versatile Camera Tracking Platform in the Known Universe Skv waiclier l3e z...

Page 2: ...s could result in explosion or fire Keep out of reach of children Failure to do so could result in injury Moreover note that small parts constitute a choking hazard Consult a physician immediately if...

Page 3: ...ar Alignment in the Southern Hemisphere Star Adventurer mini Console for Astrophotog raphy Astrophotography Progress Screen Using SAM for Astra Time Lapse Photography Astra Time Lapse Progress Screen...

Page 4: ...g Mounting Assembly This optional acccessory enables coarse and fine pointing in two directionsfor precise aiming control See Appendix IV for details Part Number AP RlC AP R3C AP RlN AP R2N AP R3N AP...

Page 5: ...s per second to indicate motor speed errors exceeding 5 and or motor stalls that last over 5 seconds Speed errors can be caused by overloading the mount and by low battery levels To correct a speed er...

Page 6: ...Settings SynScanWiFl_a1281e 4 82V Time Lapse Photography with the Star Adventurer mini Console Now that you have SAM set up with your camera gear attached it s time to learn how to use the Star Adven...

Page 7: ...sunset enter a value of 1 for Video Time Span If you want to compress that hour into a 45 second long video set your Video Length to 45 It s that easy SAM s powerful app will calculate the other neces...

Page 8: ...rn off WiFi at the start of a task to save power WiFi can be restored at any time by pressing and holding the power button until the green LED WiFi indicator light comes on Profiles Save Edit To save...

Page 9: ...tation connection to create much longer exposures like a minute or two or ten With a sufficiently long exposure your camera will collect enough light to reveal hidden details that are much too faint f...

Page 10: ...ime then replayed in a short video revealing natural dynamics that occur much to slowly for us to perceive otherwise Look through the Polar View Finder and align on Polaris making Polaris adjustmentsw...

Page 11: ...il you can see the star Polaris in the field of view This simple polar alignment will be adequate for most purposes OOO Bell 9 1 30 PM Back Astrophotography Exposure Sec Photo Interval Sec Photos 120...

Page 12: ...Video Time Span Hr 10 53 Video Length Sec 10 Frame Rate fps 30 NTSC Photos 300 Tracking Rate Sidereal WiFi Off on Run Profiles Save No Saved Profiles SynScanWiFi_a1281e Run Edit 4 76V Using the Star...

Page 13: ...real WiFi Off on Run When enabled SAM will automatically turn off WiFi at the start of the task to save power WiFi can be restored at any time by pressing and holding the power button until the green...

Page 14: ...device functions as detailed below Language Choose the default language for the Star Adventurer mini Console Night Mode Tap and choose On or Auta to get a black background with red text This mode is...

Page 15: ...ss while using SAM control SAM via the internet or to save battery power When you select STA mode SAM will join an existing WiFi network To use STA Mode select it then set the SSID and Password for th...

Page 16: ...t by matching the view in the polar scope eyepiece to the view given by the Polar Clock Utility provided in the Star Adventurer mini Console NOTE Because the Equatorial Wedge is such a highly recommen...

Page 17: ...cope llluminator and Polar Scope making sure that you do not disturb the position of the tripod Now you can attach your 32 HOOO Bel 9 Back 1 30 PM Polar Clock Utility Location Ni 1md iH IJI Southern H...

Page 18: ...f required Attach SAM to the Equatorial Wedge _ _ i RI rein T Ji l LiStr lJ I 1 Sl1m Oct1nlJ ___ ooo Bell 9 1 30 PM Back Polar Clock Utility Location Northern Hemisphere t IMIM 1 114 Local longitude 1...

Page 19: ...adjustable If this happens you will need to unscrew the eyepiece from the polar scope manually centre the glass reticule as best you can then reinsert the screw that had lost contact 36 Aim your polar...

Page 20: ...e near the eyepiece NOTE Two of the screws are hidden from view in this photo CAUTION DO NOT over tighten the screws as you may crack the glass reticule inside the eyepiece of the polar scope Level Mo...

Page 21: ...econd mounting screw Attach a second ball mount and camera and double your photographic productivity With its versatile design the Fine Tuning Mounting Assembly is a must have accessory particularly i...

Page 22: ...r Then click on Update Press and hold the power button for about 5 second to turn off the power The next time you power up SAM the new firmware will take effect If you encounter a power loss during th...

Page 23: ...ately 10 field for precision polar alignment to NCP and SCP Power Internal 2 x AA batteries External via micro USB Duration of operation Up to 24 hour with 2 x AA batteries Temperature Range 10 40 C D...

Reviews: