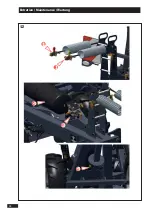
Profi ter de cette opération pour contrôler l’état des garnitures
de frein, du tambour, des ressorts de rappel, pour dépoussiérer
les freins, nettoyer et graisser le palier de l’axe de commande du
frein.
Démontage :
- Démonter la roue.
- Desserrer le frein (veiller à ce que le véhicule soit
parfaitement immobilisé).
- Démonter le chapeau de moyeu .
- Démonter la goupille ou l’épingle de retenue de l’écrou de
fusée.
- Enlever l’écrou de fusée.
- Extraire l’ensemble moyeu/tambour à l’aide d’un arrache
moyeu si nécessaire : les bagues extérieures des roulements,
les joints de retenue de graisse située à l’intérieur du moyeu
(selon les modèles), la bague intérieure et la cage du petit
roulement viennent en même temps. Contrôler ces pièces.
Les bagues extérieures des roulements et joints de retenue
de graisse peuvent rester à l’intérieur du moyeu pour le
nettoyage.
- Extraire de la fusée la cage et la bague intérieure du gros
roulement à l’aide d’un extracteur si nécessaire.
- Contrôler l’état du joint qui se trouve entre la fusée et le gros
roulement (ou de la bague de joint selon les modèles), si
nécessaire remplacer ces pièces, un extracteur peut être utile
dans le cas d’une bague de joint. Veiller à noter la position du
joint pour le remontage.
- Inspecter les portées de roulement et de joint de la fusée,
le fi letage de l’embout de fusée et rectifi er les éventuelles
inégalités ou bavures. Vérifi er et procéder de la même
manière pour le moyeu.
- Contrôler la face d’appui de l’écrou de fusée.
- Nettoyer et dégraisser toutes ces pièces avec un produit
adapté.
C
Nutzen Sie diesen Arbeitsgang, um den Zustand der
Bremsbeläge, der Trommel, der Rückstellfedern zu
prüfen, die Bremsen abzustauben, die Lagerung der
Bremsbetätigungsachse zu reinigen und zu fetten.
Ausbau:
- Rad abbauen.
- Bremse lösen (sicherstellen, dass das Fahrzeug nicht
wegrollen kann).
- Abdeckkappe an der Nabe abbauen.
- Entfernen Sie den Haltestift oder Sicheungssplint von der
Achsschenkelmutter.
- Achsschenkelmutter entfernen.
Ziehen Sie die Naben-/Trommelbaugruppe ggf. mit einem
Nabenabzieher heraus: Die Außenringe der Lager, die
Fettsicherungsdichtungen im Inneren der Nabe (je nach
Modell), der Innenring und der Käfi g des kleinen Lagers lösen
sich gleichzeitig. Überprüfen Sie diese Teile. Die Außenringe
der Lager und Fettdichtungen können zur Reinigung in der
Nabe verbleiben.
- Entfernen Sie den Käfi g und den Innenring des großen Lagers
vom Achsschenkel, ggf. mit einem Abzieher.
- Überprüfen Sie den Zustand der Dichtung zwischen
Achsschenkel und großem Lager (oder des Dichtrings, je nach
Modell), tauschen Sie diese Teile ggf. aus, bei einem Dichtring
kann ein Abzieher hilfreich sein. Notieren Sie sich unbedingt
die Position der Dichtung für den Wiedereinbau.
- Prüfen Sie die Lager- und Dichtungssitze des Achsschenkels,
das Gewinde des Achsschenkels und korrigieren Sie
eventuelle Unebenheiten oder Grate. Prüfen und verfahren
Sie mit der Nabe auf die gleiche Weise.
- Prüfen Sie die Aufl agefl äche der Achsschenkelmutter.
- Reinigen und entfetten Sie alle diese Teile mit einem
geeigneten Produkt.
C
Take the opportunity of this operation to check the condition
of the brake linings, the drum and the recall springs, to remove
dust from the brakes and clean and grease the brake command
shaft bearing.
Removing:
- Remove the wheel.
- Release the brake (make sure that the vehicle is perfectly
immobilised).
- Remove the wheel cover .
- Remove the pin or axle nut holding spindle.
- Remove the axle nut.
- Extract the hub/drum assembly with a hub puller if
necessary: the external bearing rings, the grease retention
seals located inside the hub (depending on the model), the
internal ring and the cage of the small bearing come out at
the same time. Check these parts. The external bearing rings
and the grease retention seals may remain inside the hub for
cleaning.
- Extract the cage and the internal ring of the large bearing
from the axle using an extractor if necessary.
- Check the condition of the seal which is between the axle
and the large bearing (or the seal ring depending on the
model). Replace these parts if necessary. An extractor may
be useful for a seal ring. Note the position of the seal to put
it back.
- Inspect the axle bearing and seal ranges and the threading
of the axle end piece and correct any inequalities or burrs.
Check and proceed in the same way for the hub.
- Check the axle nut support side.
- Clean and degrease all these parts with an adapted product.
C
59
FR
EN
DE
5
Entretien / Maintenance / Wartung
Summary of Contents for Methys HDS
Page 2: ......
Page 14: ...A 14 Livraison Delivery Lieferung ...
Page 16: ...1 1 2 2 3 3 1 1 1 1 2 2 2 2 3 3 3 3 C 16 Livraison Delivery Lieferung ...
Page 18: ...3 3 2 2 1 1 5 5 2 2 4 4 5 5 A 18 Mise en route Start up Inbetriebsetzung ...
Page 20: ...900mm H 1000 mm 1 2 3 4 5 6 7 B 20 Mise en route Start up Inbetriebsetzung ...
Page 22: ...900mm H 1000 mm 1 2 3 4 5 6 7 B 22 Mise en route Start up Inbetriebsetzung ...
Page 24: ...1 2 4 3 2 3 4 C 24 Mise en route Start up Inbetriebsetzung ...
Page 26: ...1 2 4 3 2 3 4 C 26 Mise en route Start up Inbetriebsetzung ...
Page 28: ...D 28 Mise en route Start up Inbetriebsetzung ...
Page 30: ...E 30 Mise en route Start up Inbetriebsetzung ...
Page 32: ...1 F 32 Mise en route Start up Inbetriebsetzung ...
Page 40: ...1 A 40 Réglages Settings Einstellungen ...
Page 42: ...1 2 3 1 B 42 Réglages Settings Einstellungen ...
Page 44: ...1 C 44 Réglages Settings Einstellungen ...
Page 46: ...A 46 Entretien Maintenance Wartung ...
Page 48: ...A 48 Maintenance Maintenance Wartung ...
Page 50: ...A 50 Entretien Maintenance Wartung ...
Page 52: ...B 52 Entretien Maintenance Wartung ...
Page 54: ...B 54 Entretien Maintenance Wartung ...
Page 58: ...1 1 2 2 C 58 Entretien Maintenance Wartung ...
Page 60: ...1 1 2 2 C 60 Entretien Maintenance Wartung ...
Page 62: ...3 3 4 4 2 2 1 1 3 3 D 62 Entretien Maintenance Wartung ...
Page 64: ...E 64 Entretien Maintenance Wartung ...
Page 66: ...3 3 2 2 4 4 1 1 1 1 F 66 Entretien Maintenance Wartung ...
Page 68: ...3 3 2 2 4 4 1 1 1 1 F 68 Entretien Maintenance Wartung ...
Page 70: ...1 3 1 4 4 G 70 Entretien Maintenance Wartung ...
Page 72: ...1 3 5 6 4 1 2 2 1 2 2 1 G 72 Entretien Maintenance Wartung ...
Page 74: ...5 H 74 Entretien Maintenance Wartung ...
Page 76: ...1 a 1 2 I 76 Entretien Maintenance Wartung ...
Page 78: ...3 3 2 2 1 1 J 78 Entretien Maintenance Wartung ...


