6
Installation
User Manual
SKOPE TME Series
Fitting the Illuminated Sign
New Zealand models only. The illuminated sign is packed inside the chiller
for transit purposes.
To fit the illuminated sign
Fitting the Shelves
The chiller is supplied with five layers of shelves, which may be positioned
at different heights to suit various products. Each shelf is held in place with
four shelf clips which engage in the shelf support strips. The support strips
are marked with a ‘+’ for easy location of shelf clips.
To fit the wire shelves
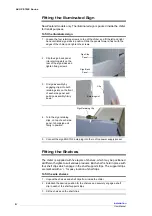
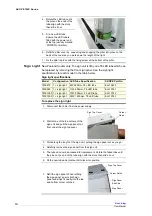
1. Loosen the four retaining screws on top of the chiller, and fit the left and right
hand ventilated sign sides in position. Slide the panels forward, flush with the
edges of the chiller, and tighten the screws.
2. Clip the sign back panel
into retaining slots on the
rear of the sign sides and
tighten fixing screws.
3. Fit sign assembly by
engaging clips into both
retaining slots on the front
of each side panel, and
pull sign assembly firmly
down.
4. Turn the sign retaining
clips, on top of each side
panel, to hold sign unit
firmly in position.
5. Connect the sign ENSTO 3 pole plug into the roof top power supply socket.
1. Unpack the shelves and shelf clips from inside the chiller.
2. Establish the desired position for the shelves and securely engage a shelf
clip in each of the shelf support strips.
3. Sit the shelves on the shelf clips.
Sign Side
Panel
Sign Back
Panel
Clip
Retaining slot
Sign Retaining Clip


