1
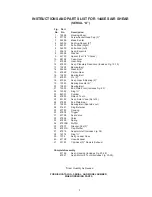
INSTRUCTIONS AND PARTS LIST
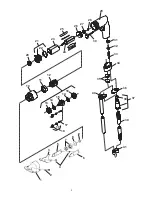
FOR 1446ES AIR SHEAR
(SERIAL “A”)
Form Z545
Date 2003August19/G
Page 1 of 4
Printed In U.S.A.
AIR SUPPLY
The efficiency and life of this tool depends on the proper
supply of clean, dry, lubricated air at about 90 lbs. P.S.I.,
although higher or lower pressures may be used. The use
of an air line filter, pressure regulator and lubricator is
recommended.
Before connecting the tool, blow the air line to remove
water and dirt which may have accumulated. This is
especially important for a new line or when the line has not
been used for some time.
HOSE AND HOSE CONNECTION
The air supply hose is 3/8" I.D. If extension hose is neces-
sary, use 1/2" hose, with couplings not less than 3/8" I.D.
LUBRICATION
An oil supply to the air motor is important. SIOUX air line
lubricators are recommended. Adjust to deliver 2 drops of
SIOUX Air Motor Oil No. 288 per minute. When air line
lubricator is not used squirt several drops of oil into the air
inlet before using. Shear head must be lubricated after
every 40 hrs. of operation, with SIOUX Grease No. 289A.
SAFETY
1.
Keep work area clean.
2.
Do not force tool.
3.
Secure work where possible- use clamps or vise.
4.
Keep tools sharp and in good shape.
5.
Disconnect tools when not in use.
6.
The use of accessories not provided or specified may
be hazardous.
7.
Use goggles or safety glasses.
WARNING
Designed to cut only up to 16 gauge steel, plastic and
associated materials up to 3/32" thick. Failure to grease
could void warranty. Sioux Tools cannot assume responsi-
bility for damage to or malfunction of a shear head used in
combination with any drill other than those regularly sup-
plied by Sioux Tools.
SHEAR HEAD MAINTENANCE INSTRUCTIONS
ADJUSTMENT
To adjust the curl of waste material, the left side knife
54500 has elongated holes. Adjustment may be necessary
after changing blades or material being cut. Loosen cap
screws 07102 and tap side knife 54500 either forward or
backward so that curl of waste does not hit shear housing
12598 of work material while cutting.
DISASSEMBLY
To remove 53609 shear head from power unit and dis-
mantle:
1.
Loosen both rear cap screws 07102 three complete
turns.
2.
Remove shear head assembly 53609 from motor by
pulling head firmly forward. Slight twisting action may be
required.
3.
Remove three cap screws 07102 completely from shear
housing 12598. Be careful not to lose rear spacer bush-
ing 54502 when removing rear cap screw.
4.
Remove center blade 54499 from shear housing 12598
by tapping blade gently rearward. Be careful not to lose
spacer bushing 54502 from hole in center blade.
5.
Side Knives 54500 and 54501 will now drop out of shear
housing.
ASSEMBLY
To assemble 53609 shear head and adapt to power unit:
1.
Place the left side knife 54500 into position in the shear
housing.
2.
Insert center cap screw 07102 through housing and blade
just far enough to slip spacer bushing 54502 over cap
screw.
3.
Place right side knife 54501 into position and push cen-
ter cap screw through right side knife. Start cap screw
into insert just enough to hold blades in place.
DO NOT TIGHTEN.
4.
Insert spacer bushing 54502 into hole in center blade
54499 and lubricate with a good grade of bearing grease.
5.
Install center blade 54499 into shear housing 12598 by
tapping blade gently forward using a drift to line up hole
in center blade with forward holes in housing.
6.
Insert and tighten forward cap screw 07102 making sure
spacer bushing 54502 in center blade stays in position.
Apply good grade of bearing grease to clevis in center
blade. WHEN SHEAR HEAD IS PROPERLY AS-
SEMBLED THE CENTER BLADE WILL PIVOT FREELY
IN HEAD.
7.
Insert rear cap screw 07102 into shear housing 12598
but do not completely tighten.
To install shear head assembly 53609 onto power unit:
1.
Make sure rear cap screw and center cap screw 07102
are loosened three complete turns.
2.
Place shear head onto unit and tighten cap screws 07102
snugly to lock head assembly in place. It may be neces-
sary to gently tap the shear head assembly into place if
it does not readily slip onto the power unit.


