background image

12

MP3/ PICTURE DISC PLAYBACK

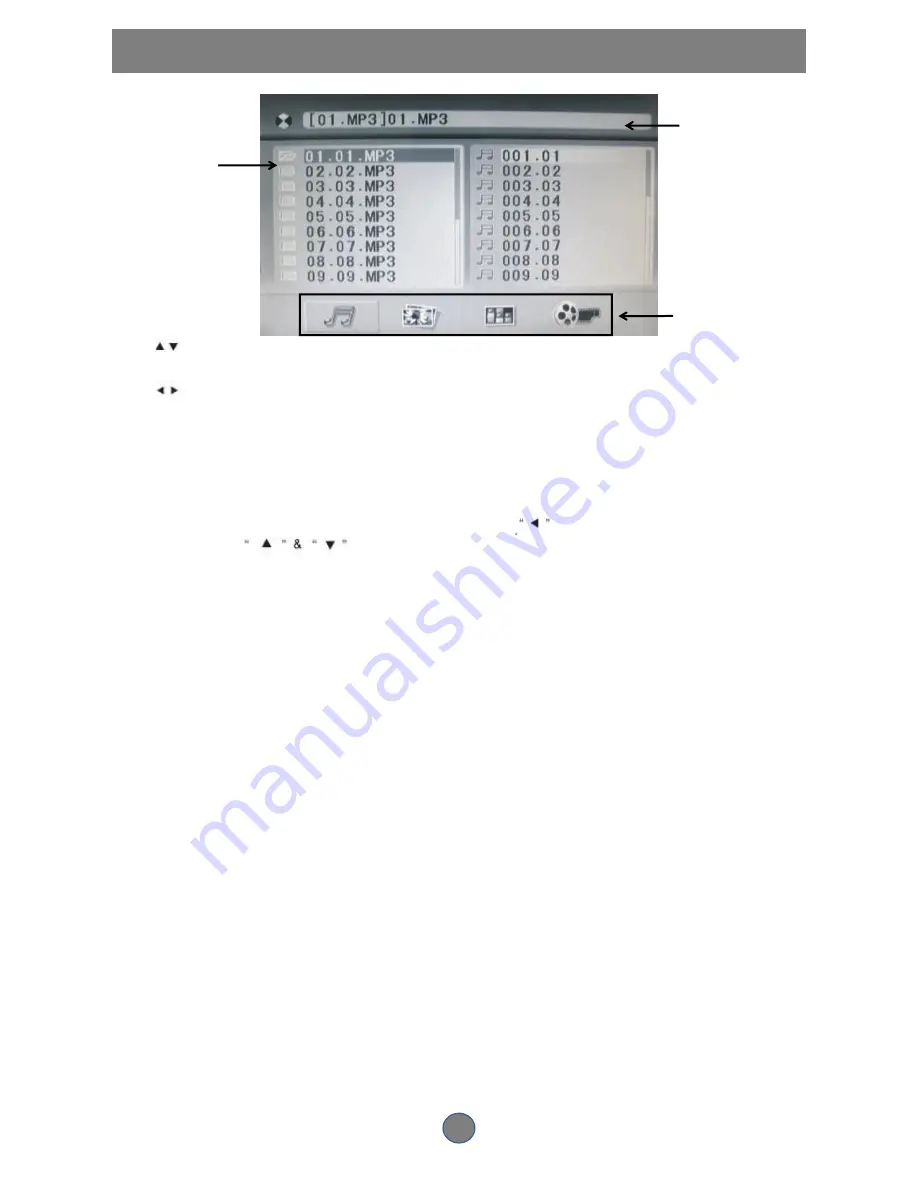
When a MP3/KODAK disc is loaded, the following will display on the screen:

Press

to select the file when the cursor appears in file window.

Press select to play the current file select by the cursor.
Press

to switch between the directory window and the file window.

Note:The player will not function correctly under the following condition:

1.The disc is badly scratched,damaged or dirty.

2.The disc is not finalized.

3.The recording format is not supported by the player.

Picture Disc play back instructions

Insert the disc,there will be a catalogue menu on the TV screen.Press

button to move the cursor to the left

catalogue. Next Press

buttons to move the cursor to the title you want and press"OK". Move

the cursor to the right catalogue and press"OK",you can display the picture you selected or press "PLAY" button to

display the images in order.

When playing, press "ZOOM" button, the picture can be enlarged or dwindled to the rate of

2,3,4,1/2,1/3,1/4.Press "ZOOM" button again, it will return to normal view. When Zoomed in or out, use the

direction buttons to change or navigate the enlarged image.

When playing, press the ”RETURN” button to go back to the catalogue menu. Using the direction buttons to

move the cursor to choose the catalogue. Then pressing ”PBC” button can start the six-picture playing function.

By using the number or direction buttons and pressing “PLAY” button ,it can continue to play orderly

When in six-picture condition, press the ”PREVIOUS” button or “NEXT” on the remote control, you can see the

picture of the next page up and down.

When in six-picture playing condition ,pressing ”RETURN” button can return to the six-picture condition, press it

again will return to the catalogue menu.

When in photo playing condition, press the “PREVIOUS””NEXT” can choose the previous or the next photo

When playing ,press the button “PROGRAM” to switch to the 17 pictures display mode.

Ripping instructions

Under the condition of OPEN or POWER OFF connect the USB and then put the CD DISC in and then play

When playing the CD, press RIPPING key and enter into the main operation interface, using the direction key

and ENTER key to change the record.

In the OPTIONS menu, The user can choose the exact song to record

In the START menu, after confirming the information without any mistake, press

Enter

key to enter into the

recording process

After finishing the record, exit by pressing

QUIT

and press USB/DISC key to read or play the recorded

contents

Current

directory name

File Switch Region:Displays

the file type of the playing

and the switching

The playing file is a JPEG

picture file.

Current MP3/JEPG file

name. If a JPEG file is

playing the name

should have a JPEG

extension.

Summary of Contents for HTS-517

Page 1: ......

Page 2: ...BOUT DVD 3 ABOUT PLAYER 4 5 SYSTEMCONNECTION 6 GETTING STARTED 7 8 FUNCTION BUTTONS 9 11 MP3 PICTURE DISC PLAYBACK 12 SETUP MENU 13 18 SYSTEMSETUP 13 14 LANGUAGE SETUP 15 AUDIO SETUP 16 VIDEO SETUP 17...

Page 3: ...100V or above 240V When the voltage is below 100V the machine may not work and its longevity will be affected adversely When the voltage is above 240V the machine may explode or cause a fire Maintain...

Page 4: ...a minute and then re insert the power plug Cleaning Maintenance Use a soft cloth or a cotton bud dipped in a diluted neutral cleanser to gently wipe the cover of the machine Do not use any abrasive cl...

Page 5: ...lated to the DVD disc s software Somefeatures cannotbeperformedif thedisc does notsupportthefeature or requires special settings Check the features printed on the disc s packaging or follow the on scr...

Page 6: ...01 DVD DOOR 02 OPEN CLOSE 03 DISPLAY WINDOW 04 PLAY PAUSE 05 POWER 06 USB 07 MIC Back Panel 01 SUBWOOFER 02 S R SURROUND RIGHT 03 F R FRONT RIGHT 04 AUX RIGHT 05 CENTER 06 S L SURROUND LEFT 07 F L FRO...

Page 7: ...PEAT 34 SUBTITLE AUTO 35 AUDIO MEMORY Notes 1 The remote control transmits a directional infrared beam Be sure to aim the remote control directly at the infrared sensor during operation When the senso...

Page 8: ...6 SYSTEM CONNECTION DONOT connect the AC power socket to the wall outlet before the system connection is completed AUX input Please connect from other audio output device...

Page 9: ...unit to avoid direct lighting Switch on the Player Press the main power switch on the DVD player Power on the TV set and the amplifier if connected Setup the System Select the corresponding setting o...

Page 10: ...he player is equipped with automatic disc quality detection software When the player detects a problem disc or a damaged disc the player may keep playing the disc at a lower quality or stop playing de...

Page 11: ...t menu may contain the setup of Screen Format Multi angle Viewing and Zoom functionality The picture quality will decrease as the picture size increases While playing a DVD press the TITLE button to r...

Page 12: ...the disc The OSD shows STOP When the PLAY button is pressed the disc will start from the beginning Previous and Next During play press the PREV key to go back to the start of the chapter Each time th...

Page 13: ...rmal play NOTE Some DVD discs do not allow A B function Repeat A B does not apply to MP3 discs Press this key when playing a DVD disc and the screen will show the title chapter and length in play Pres...

Page 14: ...e the catalogue Then pressing PBC button can start the six picture playing function By using the number or direction buttons and pressing PLAY button it can continue to play orderly When in six pictur...

Page 15: ...he screen 3 Press to go to the option list 4 Select the option desired using then press the OK button 5 Use to go back to the left menu item 6 Press the button SETUP to leave the setup menu main page...

Page 16: ...l see the entire frame of the movie but it will occupy a smaller portion of the screen WIDE 16x9WideScreen Choose this setting if your DVD player is connected to a wide screen TV PASSWORD ON When pass...

Page 17: ...ENGLISH The on screen display language is English RUSSIAN The on screen display language is Russian SELECT LANGUAGE If a language mentioned is recorded on the disc you can select sounds subtitles or...

Page 18: ...ed state broadcast source for stereo is active broadcast source for 5 1 the power output is 5 1 ECHO Use to adjust the echo effect MIC VOL Use UP DOWN button to adjust the microphone volume DOWNMIX Us...

Page 19: ...button on the remote to set contrast HUE Use UP DOWN button on the remote to set hue SATURATION Use UP DOWN button on the remote to set saturation SHARPNESS Use UP DOWN button on the remote to set sh...

Page 20: ...mode with digital dialog normalisation compresses input signal linearly RF REMOD RF remodulation mode with heavy decompression and digital dialog normalisation DYNAMIC RANGE When the compression mode...

Page 21: ...the system is correctly and securely connected Check if the connection cables are damaged Clean the disc Please press OPEN then press PROGRAM and ZOOM button to return to factory default settings Pic...

Page 22: ...e DVD to match the audio equipment used to play the corresponding disc type Check if the MUTE function of the TV or amplifier has been activated There will be no sound output during REVERSE PLAY PAUSE...

Page 23: ...put Colour System PA CD 20 Hz 20 kHz EIAT DVD 20 Hz 22 kHz 48K 20 Hz 44 kHz 96K L NTSC Video Output 1Vpp at 75 ohm Audio Output Stereo 2 VRMS Frequency Response S N Ratio 90dB THD 0 05 Output Terminal...

Page 24: ......

Reviews: