background image


Chapter 2. Installing and Set Up


2-1


This chapter explains the unpacking and set up of the printer. 
Before proceeding to this chapter, please make sure to read Chapter 1. Important Safety 
Instruction. 


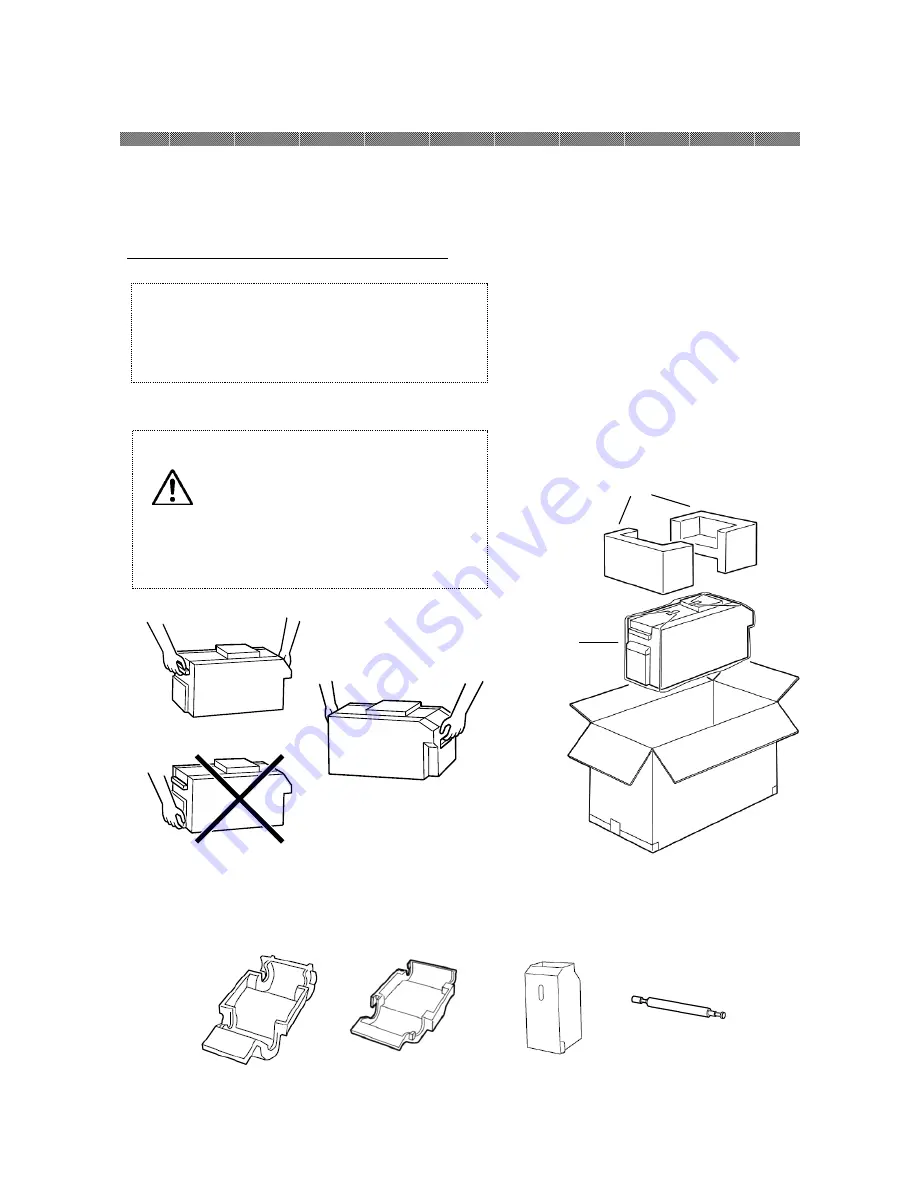
Unpacking and Checking the Accessories 

1. Open the box and remove the box containing the accessories and protection materials.


2. Take out the printer by holding front and back of   

the printer. 


3. 


Accessory details


Ri bbon  Cas s et t e 

( Color)  

Ri bbon  Cas s et t e 

( S P)  

        Dust Box 

Cleaning Roller 

Attention: Keep the packaging materials.    The 

box and protection materials are 
necessary when moving or 
transporting the printer.    Make sure 
that they are retained. 

Caution: This printer weighs about 21 Kg. 

Please handle it carefully. 
When  the  printer  is  taken  out  of 
packing box or when you want to carry 
it,  please  hold  the  handle  parts  in 
front and back of the printer. 
Transportation  and  installation  must 
be done by two or more personnel. 


Printer 

Cushioning material 

Summary of Contents for CHC-C320-5

Page 1: ...http www sinfo t jp Operation Manual Card Printer CHC C320 5...

Page 2: ...finding the fault in this manual your information to SINFONIA TECHNOLOGY will be highly appreciated I I I Introduction ntroduction ntroduction ntroduction This manual describes detailed instructions f...

Page 3: ...bbon 2 7 Setting the Card 2 8 Transporting the Printer 2 10 How to print 2 10 Chapter Chapter Chapter Chapter 3 3 3 3 Routine Maintenance Routine Maintenance Routine Maintenance Routine Maintenance 3...

Page 4: ...ot guaranteed Environments To use the printer safety please pay attention to the followings Attention Indicates the cause of the trouble and the environmental condition Caution Inappropriate handling...

Page 5: ...me very hot Ignoring this warning may cause electric shock fire or burns Warning The card will be released from the discharge port at a high speed Do not look into the outlet while in use It may cause...

Page 6: ...ribbon in cool place to avoid the direct Sunlight Temperature less than 30 C humidity less than 60 Do not leave the ink ribbon on the floor or in a dusty place It might cause foreign matter adhesion A...

Page 7: ...back of the printer 3 Accessory details Ribbon Cassette Color Ribbon Cassette SP Dust Box Cleaning Roller Attention Keep the packaging materials The box and protection materials are necessary when mov...

Page 8: ...intenance Card set unit open button Push this button to open the card set unit Power Switch This switch turns on off the power of the printer When press the marked side of the switch the power turn on...

Page 9: ...ng The printer is ready to make prints The card set unit or upper unit are opened Card jammed in printer Mechanical part is faulty Trouble of printer control board The ink ribbon loaded is not support...

Page 10: ...the power cable Never put heavy items on the power cable give a strong pull to the power cable or twist the power cable It may cause fire or electric shock Warning When it is not using the printer di...

Page 11: ...lled direction of the cleaning roller 4 Close the upper unit Caution Keep holding the upper unit until the upper unit is fixed Pull the upper unit open lever and slowly move it upward to open the uppe...

Page 12: ...bbon cassette 3 Place the ribbon cassette to the printer How to take out the ribbon cassette 4 Close the upper unit Place the ink ribbon on the curved part Push until you hear a click to confirm it is...

Page 13: ...Remove any slack in the ribbon before setting Be careful to do not get any dust etc on the ink ribbon When would reset the ink ribbon once used make sure that the boundary of used part and unused par...

Page 14: ...e card set unit 3 Remove only the underside of the card packing film 4 Pull the blue lever and set the card The side which will be printed first need to be settled first print side should be on Empty...

Page 15: ...Chapter 2 Installing and Set Up 2 9 5 Close the card set unit Do not touch the printing surface white side by finger Be careful not to get any dust etc on the card...

Page 16: ...nk ribbon and card from the printer before transporting the printer If the ink ribbon or card cannot be removed due to a fault consult with the distributor 2 Use a genuine box If the box used at the p...

Page 17: ...or ethyl alcohol 2 Using gauze dipped with isopropyl alcohol or ethyl alcohol clean the edge of the peeling roller 3 Using gauze dipped with isopropyl alcohol or ethyl alcohol clean the rubber section...

Page 18: ...Maintenance 3 2 4 Using gauze dipped with isopropyl alcohol or ethyl alcohol clean the rubber section of the cleaning roller Attention Printing should be performed after the alcohol dried up completel...

Page 19: ...If the dust collects on the openings clean it with vacuum cleaner Warning Continuous use under the abnormal condition such as high temperature smoke and strange smell can cause the fire and electric s...

Page 20: ...Card jam occurred Remove the card If card jam occurs frequently consult with the service center Trouble of printer control board The printer mechanical section is faulty If it occurs frequently consu...

Page 21: ...and the upper unit are closed Check if card is jammed in the printer The card set unit does not open Check if the printer is installed in a flat location Check if any object is placed in front of the...

Page 22: ...requently consult with the service center Card Jam 1 Open the card set unit and remove the ribbon cassette 2 Confirm the card jamming position and remove the card according to the following procedure...

Page 23: ...e of the printer move the card to the front side 2 If the card move to the position shown in the following figure pick up the top of the card and pull it up as tilt it slightly forward and remove it W...

Page 24: ...port side 1 Turn the knob green on the left side of the printer move the card to the front side 2 When the card is discharged from the port pull the card from front and remove it When cannot see the c...

Page 25: ...little from the gate pull it up and remove it 4 When the tip of the card is not appearing close the card set unit and turn the printer power off Turn the printer on again and restart printing When the...

Page 26: ...the following figure 3 When the card move to the position shown in the following figure pick up the top of the card and pull it up as tilt it slightly forward and remove it When the card is hold on th...

Page 27: ...se follow the instruction below 1 Turn off the power of the printer 2 Turn on the power 1 minute or more after turning off the power 3 When card Jam is displayed on the printer status lamps open the f...

Page 28: ...es uses and can radiate radio frequency energy and if not installed and used in accordance with the instruction manual may cause harmful interference to radio communications Operation of this equipmen...

Reviews: