background image

11

CAST

1.2.4 Referencias compatibles con Conversor señales digitales (Ref. 89000301-039)

Detector de presencia

Ref. 

75343-39

Detector de presencia para empotrar

Ref. 

10302-31

Interruptor para tarjeta codificada

Ref. 

75559-39

*Compatible con cualquier mecanismo que proporcione una salida a 230V.

1.2.5 Referencias compatibles con Conversor señales analógicas (Ref. 89000302-039)

Sensor de luminosidad y presencia

Necesita fuente de alimentación Ref. 81222-38 

Ref. 

9000570-039

Fuente de alimentación 10W

Ref. 

81222-38

Summary of Contents for Scena

Page 1: ...MANUAL Y GU A DE INSTALACI N SCENA MANUAL AND INSTALLATION GUIDE...

Page 2: ...dulo Regulador 0 10V 17 2 2 7 Modulo control de Persianas 17 2 2 8 Conversor se ales Anal gicas 18 2 2 9 Conversor se ales Digitales 18 2 2 10 Conversor DMX PWM 18 2 2 11 Conversor DMX DALI 19 2 2 12...

Page 3: ...iguraci n de escenas 38 5 9 Creaci n de secuencias 39 5 10 Creaci n de sensores 42 5 11 Configurar Sensores 44 5 11 1 Sensor pulsador 44 5 11 2 Sensor detector 44 5 12 Creaci n CLC 45 5 13 Simulaci n...

Page 4: ...4 CAST...

Page 5: ...scena Sequencias Control constante de luz Calendario Ocupaci n Simulaci n de presencia Gesti n consumo Y muchas mas Scena permite una programaci n r pida e intuitiva como se explicar en los siguientes...

Page 6: ...de colores predefinida que permite modificar su luminosidad saturaci n y matiz hasta otra basada en R G B Control Constante de la Luz CLC La luz necesaria en un espacio para trabajar con la luz necesa...

Page 7: ...scenas en funci n de calendario y horario ECO A partir de un consumo marcado se apagar n luminarias que se consideren no prioritarias Sensores Permite vincular mecanismos convencionales para realizar...

Page 8: ...039 no incluida en el producto Cotas de hueco 172 x 124 x 42 mm Ref 89000100 038 Ref 89000100 030 1 2 2 Touch Light Keypad Elemento opcional para control desde otro punto Posibilidad de personalizaci...

Page 9: ...nectados entre s se aumenta la potencia hasta 750W Ref 89000200 039 M dulo Interruptor Conmutador electr nico Compatible con Incandescencia y hal genas a 230V max 2300W Hal genas con transformador ele...

Page 10: ...un detector para control de luz constante a un grupo de luminarias Ref 89000302 039 Conversor DMX DALI Permite controlar a trav s de DMX luminarias con protocolo DALI Permite controlar hasta 6 salida...

Page 11: ...otrar Ref 10302 31 Interruptor para tarjeta codificada Ref 75559 39 Compatible con cualquier mecanismo que proporcione una salida a 230V 1 2 5 Referencias compatibles con Conversor se ales anal gicas...

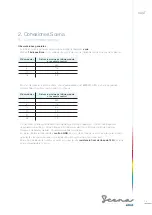
Page 12: ...nsola N de m dulos Distancia m xima del ltimo m dulo a la consola central 1 550 5 115 10 55 20 29 30 19 48 12 Un dispositivo puede ser Botonera Touch LightKeypad M dulo regulador 1 10V M dulo Regulado...

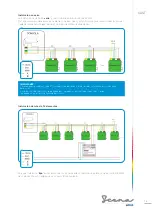
Page 13: ...forma mediante Alimentaci n del regulador a 230V F y N dependiendo del m dulo Salida m dulo a carga dependiendo del m dulo Entrada auxiliar de un pulsador Como se puede observar en la imagen la parte...

Page 14: ...IMPORTANTE Se recomienda el uso de un cable FTP categor a 5 de dos pares m nimo flexibles y multifilares para la conexi n del bus 485 El uso de un cable tipo unifilar y r gido puede llevar a problema...

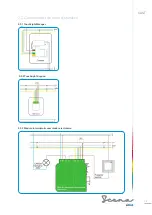
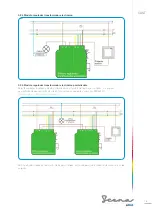
Page 15: ...15 CAST 2 2 Conexionado de cada dispositivo 2 2 1 TouchLightManager 2 2 2 TouchLight Keypad 2 2 3 M dulo interruptor conmutador electr nico...

Page 16: ...aumentar la potencia m xima admitida en un m dulo individual hasta los 750W Los equipos paralelizados deben ser dados de alta en la consola manualmente y como tipo PARALELO Ver en p gina 27 Alta manu...

Page 17: ...17 CAST 2 2 6 Modulo Regulador 0 10V 2 2 7 Modulo control de Persianas...

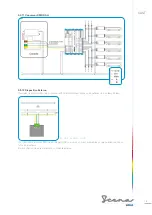
Page 18: ...18 CAST 2 2 8 Conversor se ales Anal gicas Sensor de luminosidad Ref 9000570 039 necesita fuente de alimentaci n Ref 81222 38 2 2 9 Conversor se ales Digitales 2 2 10 Conversor DMX PWM...

Page 19: ...itivo DMX que incorpore switch de direccionamiento es compatible con el sistema Scena B DMX A DMX GND Los dispositivos externos DMX que no tienen GND com n no son recomendables ya que pueden ocasionar...

Page 20: ...20 CAST 2 3 Ejemplo Conexionado Tipo Conectar la malla a un nico punto de la instalaci n y mantener la continuidad en el resto de la instalaci n...

Page 21: ...con dispositivos de SIMON SCENA con excepci n de los m dulos conversores DMX DALI y DMX PWM El proceso de alta de canales se puede realizar de dos formas alta autom tica o alta manual 3 1 1 Direccion...

Page 22: ...probar instalaci n mediante la pantalla TEST Scena reconocer y comprobar comunicaci n entre todos los m dulos salvo los conversores de protocolo DMX PWM y DMX DALI Verificar el funcionamiento individu...

Page 23: ...e un canal asignado mayor de 20 La persiana no responde a la regulaci n aplicada Comprobar que se ha realizado una calibraci n correcta Volver a calibrar Se ha ido la luz y la persiana no me responde...

Page 24: ...i n de Canales Para una sencilla programaci n se deben tener claros los siguientes puntos Todas las cargas instaladas que ser n controladas por Scena Direcci n de cada carga instalada El tipo de carga...

Page 25: ...s en el modo instalador Para ello es necesario realizar una pulsaci n larga en el icono ON OFF en la pantalla de inicio Modo instalador Seguidamente al seleccionar Login se pasar a una pantalla para l...

Page 26: ...ar en el ejemplo la lista nos ofrece ordenados los m dulos conectados con su nombre y su direcci n en caso de no haber buena comunicaci n o directamente que no hubiese comunicaci n el canal quedar a r...

Page 27: ...e se seleccionar Canales Agregar De esta manera se llega a la pantalla de introducir canales de manera autom tica v lido para m dulos Scena salvo conversores DMX PWM o DMX DALI o manual Si se seleccio...

Page 28: ...canales Dimmer canal que incorporar una luminaria regulable tipo regulaci n de fase principalmente hal genas Rele canal que incorporar una luminaria para su control de Encendido Apagado Reg 0 10 Cana...

Page 29: ...namiento del switch p gina 21 Seleccionar N mero en la pantalla de Canales Para aceptar es necesario confirmar en el icono de OK 5 4 Regulaci n tipo de canal Una vez finalizado el proceso de alta de t...

Page 30: ...empo de set y fade Set Tiempo que tarda en llegar a la m xima iluminaci n Subida de la se al Fade Tiempo que tarda en apagarse Bajada de la se al Tiempos m ximos de Set y Fade 5s Hab Temp Habilitar te...

Page 31: ...ite la calibraci n de las persianas simplemente apretando el icono de calibraci n As la persiana empieza a bajar hasta que de se al el final de carrera y haga parar la persiana a continuaci n realiza...

Page 32: ...puede modificar el valor individual del RGB y del Set y Fade time explicados en la p gina 29 En este caso se selecciona para modificar individualmente dentro del color seleccionado el nivel de Rojo R...

Page 33: ...a pasar de la zona izquierda donde aparece por defecto a la zona derecha para incluirlos en la funcionalidad del bot n Selecci n de los diferentes botones para una configuraci n completa de la botoner...

Page 34: ...de ambos dispositivos 5 direcciones utilizadas por la consola 5 6 5 5 Creaci n de grupos Un grupo es un conjunto de canales que se regulan de forma centralizada Por ejemplo controlar todas las lumina...

Page 35: ...activar desactivar el grupo pulsaci n corta Al realizar pulsaci n larga se accede al men general de ese grupo ver Regulaci n de grupos para m s info Si se desea eliminar alg n grupo se realizar siguie...

Page 36: ...inosidad saturaci n y matiz del color Sobre la pantalla Avanzada se puede modificar el valor individual del RGB y del Set y Fade time explicados con anterioridad en el apartado de canales 5 6 4 Grupo...

Page 37: ...de colores Amarillo Naranja Rojo Rosa Morado Lila Azul Azul marino Azul claro Verde Turquesa Verde Verde claro Para que la escena se active es necesario tener un canal o grupo RGB creado y se debe aso...

Page 38: ...oridad para borrar canales 5 8 Configuraci n de escenas Una vez creada la escena tal como sucede con los canales y grupos Scena permite configurar la escena de manera general y avanzada Si en la panta...

Page 39: ...larga sobre la que se desee modificar Dentro de una secuencia se podr modificar Tipo de secuencia Nombre de la secuencia Selecci n de canales que lo forman Tipo de la Secuencia nico La secuencia linea...

Page 40: ...o de subida Set time y de bajada no tiene tiempo con la escena estable de manera que la escena que se est apagando se sumara con la siguiente escena El efecto que se consigue es de continuo movimiento...

Page 41: ...abilitadas para ser usadas en secuencia Escena Tipo Secuencial Scena permite modificar la configuraci n de la secuencia tanto de una manera General como Avanzada En la pantalla general se permite acti...

Page 42: ...les y haber dado de alta un canal de tipo digital Si en la pantalla Sistema se accede a Sensores se acceder a una pantalla donde aparecer n los sensores Si se est en el modo instalador se podr dar de...

Page 43: ...o de sensor 3 A adir canales Relaciona ste sensor con su entrada a la consola es decir con el canal de entrada digital Para este paso es necesario haber dado de alta un canal de entrada digital que pe...

Page 44: ...E Aux Permite mediante pulsaci n prolongada cambiar el valor de regulaci n Dependiendo de la funci n que se desee incorporar se desplega r n diferentes pesta as para su configuraci n Como en la pantal...

Page 45: ...ensor Temporizar Para la acci n seleccionada Encender Apagar o Toogle temporizar su acci n Para la acci n final se debe pulsar la flecha derecha o izquierda y se podr n modificar los mismos par metros...

Page 46: ...m ximo de 9 caracteres nombre el grupo deseado De la A Z y del 0 9 Para confirmar pulsar OK 2 Elementos Relaciona los canales o grupos que se desee controlar con el sensor CLC Para introducir un cana...

Page 47: ...nte En la pantalla General se puede comprobar la captaci n del sensor y su estado En la pantalla Avanzada se pueden modificar algunos valores caracter sticos del sensor Se puede configurar la consigna...

Page 48: ...n de presencia y la duraci n de esta funci n al activarla Tiempo m ximo de duraci n del ciclo de presencia es de 1000 minutos La primera acci n una vez activado el modo presencia tarda entre 20 y 60...

Page 49: ...s de mantener pulsado el icono ECO permite habilitar o deshabilitar ECO adem s de establecer el umbral de poten cia a admitir Pantalla Avanzada En Avanzada se puede cambiar la prioridad de cada canal...

Page 50: ...r activar o desactivar el modo CLC Presencia o ECO Para dar de alta una programaci n en el Scena es necesario seguir los pasos que se describen a continuaci n Acceder desde la pantalla Sistema a Calen...

Page 51: ...maci n calendario creada con anterioridad En esta pantalla General se permite nicamente la visualizaci n de la programaci n Hora Inicio Hora de activaci n de las funciones introducidas Hora final Hora...

Page 52: ...va o borrar una excepci n 5 15 2 Vacaciones De la misma manera que si fuera en el Calendario se puede acceder a Vacaciones Con la misma funcio nalidad que una programaci n con calendario pero incluye...

Page 53: ...pulsa Canales saldr una lista con los canales dados de alta que se pueden incluir en la pantalla de Inicio es necesario crearlos previamente proceso detallado anteriormente Como se puede observar a co...

Page 54: ...aci n de Scena hace falta acceder desde la pantalla Sistema a Configuraci n Dentro de Configuraci n aparecen una serie de funciones para modificar algunos par metros de Scena Las funciones resaltadas...

Page 55: ...su pantalla de reposo Se puede programar el tiempo de apagado autom tico entre las opciones Off 1 o 5 minutos Scena permite que en su pantalla de reposo aparezca el logo SIMON Scena para ello se pued...

Page 56: ...talla Sistema es decir solo podr tener recorrido por la pantalla de Inicio Posici n A El usuario solo puede activar o desactivar el canal escena secuencia o programaci n que se le permita Posici n B E...

Page 57: ...es decir no deben estar dentro de carpetas en la memoria USB 5 18 7 Reset Permite resetear la configuraci n que se haya realizado en Scena Reset de Funciones Resetea las funciones creadas volviendo a...

Page 58: ...cer Comms y la direcci n en el aviso Fallo por potencia Si es un fallo por potencia aparecer AC y la direcci n en el aviso Refiere a un problema con el abastecimiento de la luminaria por ejemplo que s...

Page 59: ...rescencia y hal genas La instalaci n prototipo consta Consola Touch LightManager Botonera Touch LightKeypad Tira Led flex RGB Conversor DMX PWM para tira RGB Fuente Led StripFlex para el conversor DMX...

Page 60: ...60 CAST 2 Conexionado tipo...

Page 61: ...lo regulador transformador electr nico 1 M dulo de entrada digital 2 Botonera Autom tica No tiene switch ND Conversor DMX PWM 21 Conversor DMX DALI 31 4 Programaci n en la consola Para una programaci...

Page 62: ...la pantalla sistema La pantalla de Sistema permite al usuario acceder a todos los recursos de Scena que se pongan a su disposici n 4 1 Acceso modo instalador Una vez conocidas las pantallas b sicas d...

Page 63: ...l bot n de encendido pasamos a la pantalla Login se nos despliega una nueva opci n Test es un m todo de reconocer los dispositivos conectados y comprobar su comunicaci n con la pantalla Touch LightKey...

Page 64: ...sto quiere decir que ha reconocido los m dulos Scena que no son conversores de protocolo Para reconocer los dispositivos conversores de protocolo se realizar una b squeda manual Conversor DMX PWM Para...

Page 65: ...que se le pondr al ejemplo RGB Para aceptar es necesario confirmar en el icono OK N mero Seleccionar N mero en la pantalla de Canales N mero a introducir 20 N mero introducido en el switch 21 Como se...

Page 66: ...el conversor DMX DALI Selecci n de tipo Nombre del canal Direcci n DMX la seleccionada en el switch Tipo Seleccionar el tipo de regulaci n del canal En este caso Regulador externo Nombre Nombre que s...

Page 67: ...canales el icono seguidamente el canal y de nuevo el icono borrar 4 3 Configurar pantalla de Inicio La pantalla de Inicio permitir copiar los accesos directos que tendr el usuario posteriormente a enc...

Page 68: ...rada de la siguiente manera 4 4 Configurar entrada de pulsador Para relacionar la entrada pulsador con Scena se debe seguir los pasos siguientes Agregar Sensor en la pantalla Sensores Seleccionar el t...

Page 69: ...l previamente encontrado al configurar los canales ver p gina 66 en elementos se a a dir n las escenas canales o grupos que se desee controlar con el pulsador Acceder a Configurar sensores p gina 44 p...

Page 70: ...70 CAST MANUAL AND INSTALLATION GUIDE...

Page 71: ...tor Module 86 2 2 7 Blind control module 86 2 2 8 Analog signal converter 87 2 2 9 Digital signal converter 87 2 2 10 DMX PWM converter 87 2 2 11 DMX DALI converter 88 2 2 12 External device 88 2 3 Ex...

Page 72: ...ng scenarios 107 5 9 Creation of sequences 108 5 10 Creation of sensors 111 5 11 Configuring Sensors 113 5 11 1 Push button sensor 113 5 11 2 Detector sensor 113 5 12 CLC Creation 114 5 13 Presence si...

Page 73: ...73 ENG...

Page 74: ...onstant Light Control Calendar Occupancy Presence simulation Consumption Control And many more Scena is quick and intuitive to program as will be explained in the following paragraphs of this manual A...

Page 75: ...ned colours palette that enables us to change the luminosity saturation and hue through to another based on RGB 4 Constant Light Control CLC In order to work with no more light than absolutely necessa...

Page 76: ...ccording to calendar and time ECO After a determined consumption luminaires not considered a priority will be turned off Sensors Enables conventional mechanisms to be linked up in order to make change...

Page 77: ...t Recess dimensions 172 x 124 x 42 mm Ref 89000100 038 Ref 89000100 030 1 2 2 Touch Light Keypad Optional feature for control from another point Icons can be customised to order Active by default 6 pr...

Page 78: ...er the power is increased up to 750W Ref 89000200 039 Electronic Switch Type Circuit Breaker Compatible with Max 230V incandescent and halogens 2300W Halogens with electronic transformer max 550VA Hal...

Page 79: ...stant light from the console to a group of luminaires Ref 89000302 039 DMX DALI converter Enables us to control luminaires with DALI protocol via DMX Enables us to control up to 6 DALI outputs each wi...

Page 80: ...mountable presence detector Ref 10302 31 Switch for encrypted card Ref 75559 39 Compatible with any mechanism that provides a 230V output 1 2 5 References compatible with analog converter signals Ref...

Page 81: ...ached per console No of modules Maximum distance from the last module to the central console 1 550 5 115 10 55 20 29 30 19 48 12 A device can be LightKeypad touch button box 1 10V electronic transform...

Page 82: ...owering of the 230V F and N regulator depending on the module Module output to load depending on the module Push button auxiliary input As can be seen in the picture the communications part is connect...

Page 83: ...pair of power cables IMPORTANT It is recommended to use a category 5 FTP cable of minimum two flexible multicore pairs for the connection of bus 485 Use of a rigid unicore type cable can lead to prob...

Page 84: ...84 ENG 2 2 Connection of each Device 2 2 1 TouchLightManager 2 2 2 TouchLight Keypad 2 2 3 Electronic Switch Type Circuit Breaker module...

Page 85: ...ables us to increase the maximum power admitted in an individual module up to 750W Paralleled equipment must be manually registered on the console as PARALLEL type See Manual channel registration on p...

Page 86: ...86 ENG 2 2 6 0 10V Regulator Module 2 2 7 Blind control module...

Page 87: ...87 ENG 2 2 8 Analog signal converter Luminosity sensor Ref 9000570 039 requires power source Ref 81222 38 2 2 9 Digital signal converter 2 2 10 DMX PWM converter...

Page 88: ...DMC device incorporating an addressing switch is compatible with the Scena system B DMX A DMX GND External DMX devices that do not have a common GND are not recommended as they can cause system fault...

Page 89: ...89 ENG 2 3 Example of Standard Connections Connect the grid to a single point of the installation and maintain the continuity in the rest of the installation...

Page 90: ...rks with SIMON SCENA devices except for the DMX DALI and DMX PWM converter modules Channel registration can be done in two ways automatic registration or manual registration With pin 10 we select the...

Page 91: ...nstaller Check installation using the TEST screen Scena will acknowledge and check communication between all the modules except the protocol converters DMX PWM and DMX DALI Check that each device chan...

Page 92: ...it has been correctly calibrated Recalibrate it The light has gone off and the blind is not responding correctly It must be recalibrated or moved up to one of the two ends I have a 0 10 regulator and...

Page 93: ...is Creation of Channels For easy programming you must be sure about the following points All the installed loads that will be controlled by Scena Address of each load installed The type of load and re...

Page 94: ...wing us to modify parameters that have been left enabled in installer mode To do this we need to long press on the ON OFF icon on the start screen Installer mode Next on selecting Login we go to a scr...

Page 95: ...we can see in the example the list gives us the connected modules in order with their name and address If the communication is not good or there is no communication at all the channel is highlighted...

Page 96: ...screen and next we will select Channels Add We will then go to the screen for introducing channels automatically valid for Scena modules except DMX PWM or DMX DALI converters or manually Create chann...

Page 97: ...porate a phase regulation type adjustable luminaire mainly halogens Relay channel that will incorporate a luminaire for its ON OFF control Reg 0 10 Channel that will incorporate a 1 10V type luminaire...

Page 98: ...h operation page 90 Select Number on the Channels screen To accept we press the OK icon 5 4 Standard channel settings Once all the channels have been registered their settings will be adjusted individ...

Page 99: ...s problem Selection of the set and fade time Set Time it takes to get to the maximum luminosity Raising of the signal Fade Time it takes to go out Lowering of the signal Maximum Set and Fade times 5s...

Page 100: ...dministrator mode we can calibrate the blinds simply by pressing the calibration icon Thus the blind starts to lower until the limit switch signals and the blind stops Next it performs the same operat...

Page 101: ...ator mode we can modify the individual value of the RGB and of the Set and Fade time explained on page 98 In this case we select to modify individually within the colour by selecting the level of Red...

Page 102: ...text to move from the left zone where they appear as default to the right zone to include them in the button s functionality Selection of the different buttons for a complete configuration of the but...

Page 103: ...X addresses Example Address of both devices 5 addresses used by the console 5 6 5 5 Creation of groups A group is a set of channels regulated in a centralized fashion For example controlling all a roo...

Page 104: ...in the system Once created to activate deactivate the group short press A long press accesses this group s general menu see Adjusting groups for more info If we want to eliminate a group we follow th...

Page 105: ...n and hue of the colour On the Advanced screen we can modify the individual value of the RGB and of the Set and Fade time as already described in the channels section 5 6 4 Mixed group type Type Mixed...

Page 106: ...lours Yellow Orange Red Pink Purple Lilac Blue Navy blue Light blue Turquoise green Green Light green For the scenario to activate we need to have a channel or RGB group created and this must be assoc...

Page 107: ...ted just as with channels and groups Scena enables us to configure the scenario in a general and advanced mode If in the screen on which the list of scenarios appears we access one of them by long pre...

Page 108: ...y Type of sequence Name of the sequence Selection of channels that form it Type of Sequence Single The linear sequence a sequence of scenarios with a start and an end will be obtained S1 is the first...

Page 109: ...io will be activated for an up time set time and a down time There is no time with the scenario stable so that the scenario that is turning off will run into the following scenario The effect achieved...

Page 110: ...used in sequence Scenario Standard Sequential Scena enables us to modify the configuration of the sequence both in General and in Advanced fashion On the general screen the sequence can be activated o...

Page 111: ...nverter module and we need to have registered a digital type channel If we access Sensors in the System screen we access a screen on which the sensors will appear If we are in installer mode we can re...

Page 112: ...n NA and NC 3 Add channels Relates this sensor to its input at the console i e with the digital input channel For this step we need to have registered a digital input channel that enables us to connec...

Page 113: ...ng it changes the channel s status E Aux Enables us with a long press to change the setting value Depending on the function we want to incorporate different tabs open for its configuration As in the a...

Page 114: ...setting value of the channel group or scenario the sensor controls Time delay For the selected action Turn on Turn off or Toggle time delay its action For the final action we must press the right or l...

Page 115: ...9 characters for the desired group name From A Z and from 0 9 To confirm press OK 2 Elements Relates the channels or groups we want to control with the CLC sensor To enter a channel or group in the s...

Page 116: ...s in each case In the General screen we can check the sensor s capture and its status In the Advanced screen we can modify certain of the sensor s values We can configure the set point in Luxes that w...

Page 117: ...duration of this function by activating minutes for it Maximum presence cycle duration time is 1000m Once activated the presence simulation will last between 20 and 60 min Advanced screen In the Adva...

Page 118: ...enable or disable ECO and also establish the admissible power threshold Advanced Screen In Advanced we can change the priority of each channel and the power it is granted High Priority When the speci...

Page 119: ...we can also activate or deactivate CLC Presence or ECO mode To register a program in Scena we must follow the below steps Accessing the Calendar from the Programs screen Configuration Immediately afte...

Page 120: ...configuration To do this we long press on the calendar program previously created In this General screen we can only view the program Start Time Time the functions entered activate End time Time the f...

Page 121: ...made In the Advanced screen we can program the date add a new one or delete an exception 5 15 2 Holidays In exactly the same way as for the Calendar we can access Holidays With the same functionality...

Page 122: ...with the example if we press Channels a list will appear with the registered channels that can be included in the Start screen these must be created previously as detailed above As we can see below a...

Page 123: ...access Configuration from the System screen In Configuration a series of functions appear for modifying certain of Scena s parameters The functions in bold can only be accessed in installer mode See p...

Page 124: ...tings Scena enables us to configure its standby screen We can program the automatic turn off time to the options Off 1 or 5 minutes Scena can show the Simon Scena logo on the idle screen This can be e...

Page 125: ...e System screen i e he can go through the Start screen Position A The user can only activate or deactivate the channel scenario sequence or program for which he has permission Position B The user can...

Page 126: ...they must not be in folders in the USB memory 5 18 8 Reset Enables us to reset the configuration we have entered in Scena Functions Reset Resets the functions created returning to the predetermined co...

Page 127: ...in the Scena modules Communication fault If it is a communication fault Comms and the address in the alert will appear If it is a power fault AC and the address in the alert will appear As in the abo...

Page 128: ...e from RGB control to fluorescence ballasts and halogens The prototype installation includes Touch LightManager Console Touch LightKeypad Button Box Led RGB flex strip DMX PWM converter for RGB strip...

Page 129: ...129 ENG 2 Standard Connection...

Page 130: ...ccount the elements and converters that must have addressing higher than 20 to avoid interference Therefore Device Address Switch pins to ON Electronic transformer regu lator module 1 Digital input mo...

Page 131: ...in the console manually To carry out the programming in Scena Scena general Standby load and start screens respectively By pressing the list icon we access the System screen The System screen enables...

Page 132: ...is a method for acknowledging the devices connected and checking their communication with the Touch LightKeypand screen As we can see in the example the list gives us the connected modules in order wi...

Page 133: ...002 and BOT 000 which means it has acknowledged the Scena modules that are not protocol converters To acknowledge the protocol converter devices a manual search will be performed DMX PWM converter To...

Page 134: ...will be given e g RGB To accept we press the OK icon Number Select Number on the Channels screen Number to enter 20 Number entered in the switch 21 As explained in the manual the console requires an a...

Page 135: ...e will create the channel for the DMX DALI converter Type selection Channel name DMX address the one selected in the switch Type Select the type of channel regulation Name Name it will be given e g DA...

Page 136: ...to select the icon followed by the channel and then the delete icon again 4 3 Configuring the Start screen The Start screen enables us to copy the direct accesses the user will have after turning on t...

Page 137: ...n press add As we can see in this example the Start screen would be configured as follows 4 4 Configuring the bush button input To relate the push button input with Scena we must follow the steps belo...

Page 138: ...g options will be available In Channels we will select the channel previously found when we configured the channels see page 135 In elements we will add the scenarios channels or groups we want to con...

Page 139: ...100 Fax 933 440 803 Servicio de Atenci n al Cliente Tel 902 109 700 Fax 933 440 807 sat simon es www simon es Gesti n de ventas Tel 902 444 469 Fax 902 627 899 Showroom abierto al p blico Tel 933 440...

Reviews: