background image

120

IT

ES

FR

BE

GB

RUS

RO

2.3

CONNECTING UP 

SYSTEM

To protect the heat system from being

damaged by  corrosion, incrustation or

deposits, after installation it is extremely

important to clean the system using suita-

ble products such as, for example, Sentinel

X300 or X400. 

Complete instructions are provided with

the products but, for further information,

y o u   m a y   d i r e c t l y   c o n t a c t   S E N T I N E L

PERFORMANCE SOLUTIONS LTD.

For long-term protection agains corrosion

and deposits, the use of inhibitors such as

Sentinel X100 is recommended after clea-

ning the system. 

It is important to check the concentration

of the inhibitor after each system modifica-

tion and during maintenance following the

manufacturer’s instructions (specific tests

are available at your dealer). 

The safety valve drain must be connected

to a collection funnel to collect any dischar-

ge during interventions. 

WARNING: Failur e t o clean the heat

system or add an adequate inhibitor inva-

lidates the device’s warranty.

Gas connections must be made in accor-

dance with current standards and regula-

tions. When dimensioning gas pipes from

the meter to the module, both capacity

volume (consumption) in m

3

/h and gas

density must be taken into account. 

The sections of the piping making up the

system must be such as to guarantee a

supply of gas sufficient to cover the maxi-

mum demand, limiting pressure loss

between the gas meter and any apparatus

being used to not greater than:

– 1.0 mbar for family II gases (natural gas);

– 2.0 mbar for family III gases (butane or

propane).

A sticker inside the module includes identifi-

cation and gas type data specific to the

module.

2.3.1

Condensation drain 

installation. 

A siphoned drain must be connected to the

civil drain by a pipe with minimum 5 mm

per meter gradient for condensation collec-

tion.  

Only normal plastic civil drain pipes are

suitable to convey condensation to the

building's sewer drain.

2.3.2

Gas pipe filter

The gas valve is fitted with a standard filter.

This filter is not capable of filtering all impuri-

ties and to prevent poor gas valve operation

or failure of any gas valve safety feature, it is

advisable to fit a suitable filter on the gas

supply pipe. 

2.5

FILLING THE SYSTEM

Cold system filling pressure must be 1 bar.

The system must be filled slowly so that air

bubbles are released through the specific

escapes.

2.6

EXHAUST

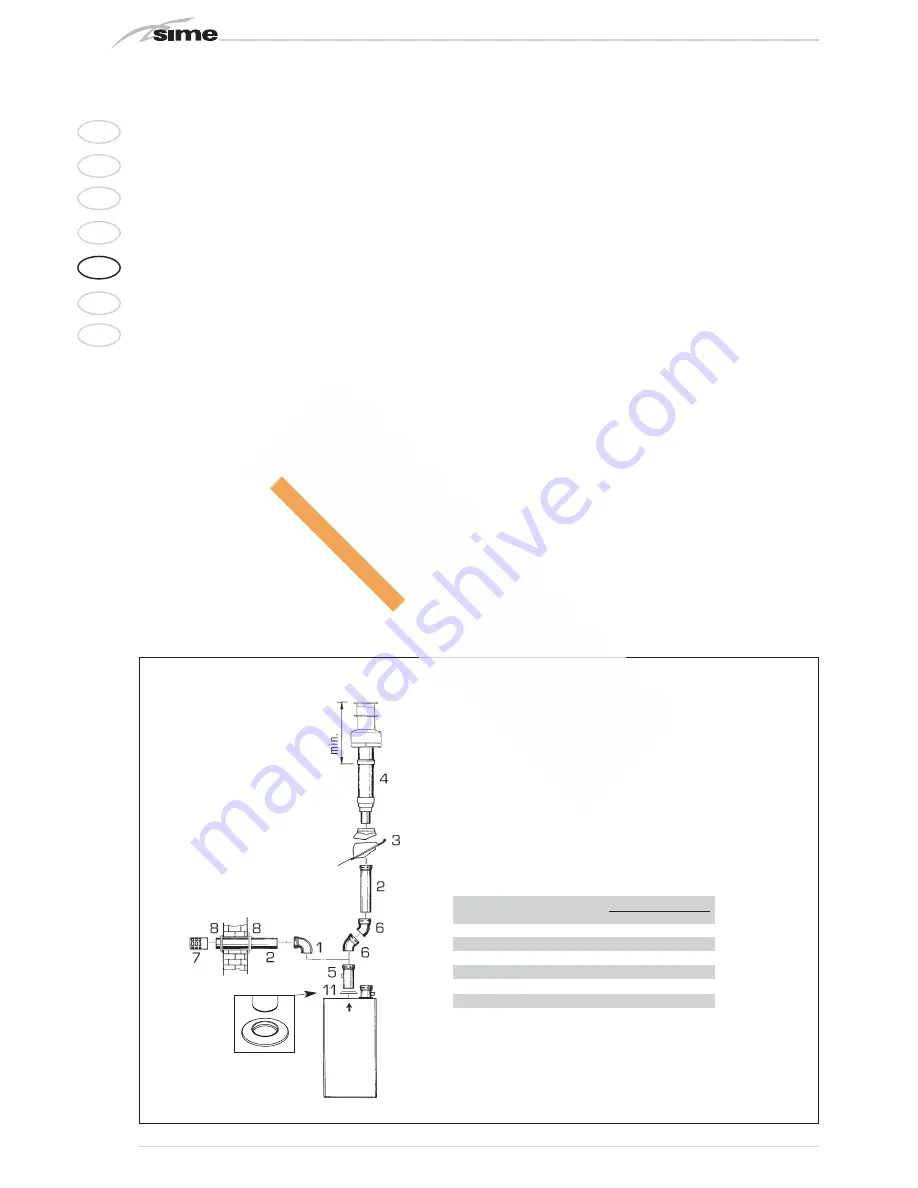
The boiler is supplied with a 80mm gasket,

which must be fitted over the exhaust ter-

minal prior to the flue being installed. (11

fig. 4-4/a-4/b). 

2.6.1

Type B  

(fig. 4)

If the inlet is not connected, the boiler

should be regarded a Class B device. When

installing the boiler in locations where it

needs to be protected from water, replace

the intake terminal inserted in the flange

with terminal code 8089510. For informa-

tion on how to configure the boiler in this

mode see figure 4.

The maximum overall length of ø 80

exhaust flues is determined by the load

losses of the single accessories installed

and should not exceed 16 mmH

2

O (“60

BFR”) and 28 mmH

2

O (“100 BFR”). 

2.6.2

Type C 

(figg. 4/a-4/b)

The boiler becomes a Class C device when

the intake terminal is removed from the

flange and the intake is connected to sepa-

rate exhaust ducts (fig. 4) or with coaxial

exhaust (fig. 4/b).

ø 80 ACCESSORY LOAD LOSS TABLE

WARNING: Before installing accessories, lubricate

the internal part of gaskets with silicon-based pro-

ducts. Avoid using oils and greases. 

KEY

90° MF polypr. curve (6 pcs.) code 8077450

2 a Polypr. extension L.1000 (6 pcs.) code 8077351
2 b Polypr. extension L. 500 (6 pcs.) code. 8077350
3

Hinged tile code 8091300

4

Roof Terminal kit L 1285 code 8091205

5

Polypropylene extension L. 250 with test outlet code 6296513

6

45° MF polypr. curve (6 pcs.) code. 8077451

7

Exhaust terminal code 8089501

8

Internal-external ring nut kit code 8091500

11

Rubber gasket ø 80 (supplied as standard)

Load loss (mm H

2

O)

“60 BFR”

“100 BFR”

90° MF polypropylene curve

1,30

3,00

45° MF polypropylene curve 

0,70

2,00

Polypr. extension L. 1000

0,60

1,20

Polypr. extension L. 500

0,30

0,60

Roof exit terminal  L. 1381

1,20

4,30

Exhaust terminal

1,30

3,60

Polypropylene extension L. 250

0,15

0,30

Type B

Fig. 4

600

Summary of Contents for PLANET DEWY 100

Page 1: ...ro perly installed Make sure that any shutoff valves are open Make sure that the system is charged with water and is thoroughly vented Check that the circulating pump is not locked Purge the system bl...

Page 2: ...Filling system G 1 2 UNI ISO 228 1 R3 Tank return G 1 UNI ISO 228 1 S3 Condensation outlet 25 CA Inlet 80 CS Outlet 80 ATTENTION the boiler is supplied as Class B device To install the boiler as Class...

Page 3: ...panel 16 Safety valve 4 BAR 1 3 2 PLANET DEWY 100 BFR 1 2 3 4 5 6 7 8 18 13 9 10 11 14 17 15 Fig 2 a KEY 1 Gas valve 2 Condensation drain siphon 3 Fan 4 Air pressure switch 5 Ignition electrode 6 Det...

Page 4: ...es temperature minimum 50 30 C C 32 32 Smokes flow kg h 97 166 CO2 maximum minimum G20 9 0 9 0 9 0 9 0 CO2 maximum minimum G31 10 0 10 0 10 0 10 0 Maximum pressure exhaust manifold output Pa 110 170 A...

Page 5: ...trol unit code 8096301 supplied by Sime upon request a maximum of four boilers can be controlled The control unit kit is supplied with assembly and use instructions 2 INSTALLATION 45 146 R3 500 865 58...

Page 6: ...poor gas valve operation or failure of any gas valve safety feature it is advisable to fit a suitable filter on the gas supply pipe 2 5 FILLING THE SYSTEM Cold system filling pressure must be 1 bar Th...

Page 7: ...the internal section of the gaskets with silicon products and generally avoid the use of oils and greases TABLE OF LOAD LOSSES OF ACCESSORIES Fig 4 a KEY 1 80 curve 90 MF 6 pcs code 8077450 2 a 80 ext...

Page 8: ...orizontal terminals must be LEVEL WARNING In the versions 60 BFR he insertion of a 90 additional curve reduces the available length by 2 meters end the insertion of a 45 additional curve reduces the a...

Page 9: ...m use cables of sec tion 0 25 mm2 for longer lengths up to 50 m use cables of section 0 5 mm2 To gain access to boiler connector 3 remo ve the control panel cover and connect the external temperature...

Page 10: ...mer NOTE Connect the room thermostat TA to terminals 5 6 after removing the bridge Fan control board SV MAX and MIN trimmers are sealed and must never be tampered with CONNECTOR SPARE PART CODES J2 co...

Page 11: ...CR Remote Control Logic optional SV Fan board TF Exhaust thermostat PA Air pressure switch SB Boiler probe PB Boiler pump TRA Ignition transformer NOTE Connect the room thermostat TA to terminals 5 6...

Page 12: ...ump PI System pump R R1 R2 Relay CR CR1 CR2 Relay contact TA Room thermostat VR Non return valve M C H flow R C H return Note The relay R disconnects the heating pump when the requirements of both ser...

Page 13: ...must be installed in the main living room For installation follow the assembly instructions inserted in the package At this point with the selector knob on the installer can adjust the basic paramete...

Page 14: ...e imposed value With the activation of the adaptation the pre set value transmitted to the boiler regulator is adapted to the effective heat need The adaptation functions with both the atmospheric gui...

Page 15: ...ssible to switch over to reduced pre set value of the antifreeze ambient temperature short circuit 0 0 0 or interruption _ _ _ The display shows the current status of the external contact 64 Operating...

Page 16: ...ting pressure The addition of a bridge will cancel both the programmed technical delay and the minimum pressure operating period at ignition In this case the time between shut down and the next igniti...

Page 17: ...No flame detection At ignition the electrode continues to spark even though the burner is on After 10 sec it stops sparking the burner turns off and the block led turns on This may be due to a faulty...

Page 18: ...Y 1 Gas valve 2 Condensation drain siphon 3 Boiler pump not supplied 4 Fan 5 Heating probe SM 6 Safety thermostat 95 C 7 Exhaust thermostat 8 Primary exchanger 9 Diaphragm 10 Differential pressure swi...

Page 19: ...AR safety valve 18 Non return valve not supplied 19 Hydraulic compensator supplied in the kit 20 Drain tap not supplied 21 Expansion vessel 8 liter supplied in the kit 22 Air relief valve not supplied...

Page 20: ...n 0 2 from the table values the following corrections must be made To correct CO2 to the MIN power use the OFF SET screw 2 Drawing 6 To correct CO2 to the MAX power use the shutter 1 Drawing 6 Drawing...

Page 21: ...he spe cial opening fig 20 4 4 1 Chimney sweep function To check single module combustion rotate the selector to position until the yellow led starts to blink fig 21 At this time the module will start...

Page 22: ...d the yel low heating led turns on simulta neously If the water return tempera ture is lower than about 55 C com bustion product condensates further increasing heat exchange efficiency GAS CONVERSION...

Page 23: ...l the green 1 bar led turns on If all leds are off request an authorised engineer Safety exhaust thermostat triggered fig 5 If the safety exhaust thermostat triggers the red 35 C led blinks To attempt...

Page 24: ...n 5 Operating mode button availability 6 Cover with instruction compartment 7 Temperature knob 8 Presence button Fig 8 KEY 1 Display time 2 Heating programme 3 Unit C 4 Presence button display 5 Exter...

Page 25: ...to function independently of the display Day hour room temperature External temperature Hot water service temperature Only with outside sensor fitted Info key reference key grey colour The operating...

Page 26: ...service temperature parameter press the and keys at the same time for at least 5 seconds and then go along the entered lines with the key until parameter 61 is reached Regulate the value with and Bef...

Page 27: ...ter 3 1 standard Hot water according to the daily heating programme In the comfort periods of the heating the temperature of the boiler unit is regulated at the value set via para meter 61 2 sservice...

Page 28: ...Setting the time To set the current day of the week 1 Monday 7 Sunday To set the current hour To set the current minute Once the hour is completed the setting of the hour changes 12 13 14 With and ke...

Reviews: