42
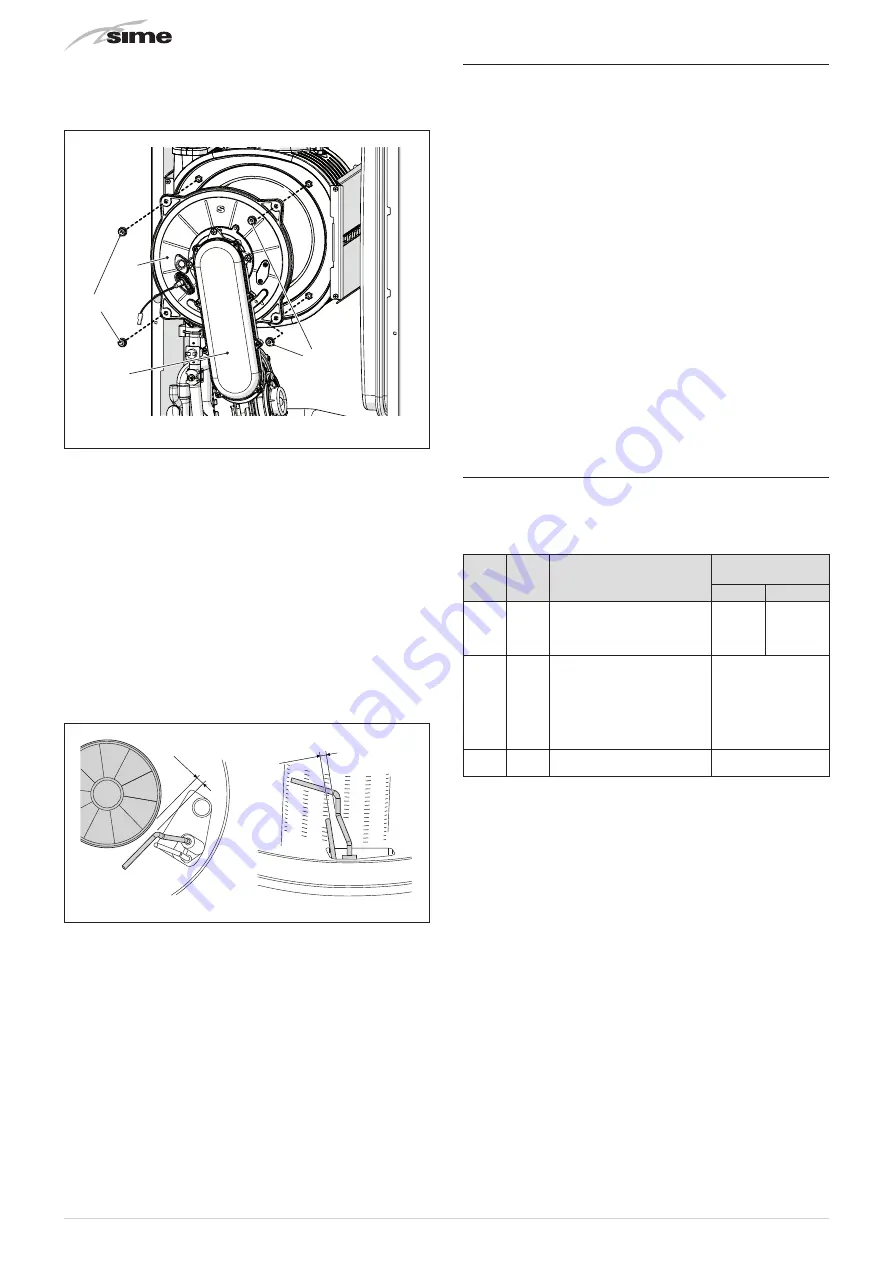
– Unscrew the four nuts (11) securing the combustion cham-
ber door (12)
– pull the fan-sleeve-door assembly (13) forwards and remove
it.
11
11
13
12
Fig. 44
m
CAUTION
Work carefully when removing the assembly (13) to pre-
vent any damage occurring to the internal insulation of
the combustion chamber and the door seal.
8.3.2
Cleaning the burner and the combustion
chamber
The combustion chamber and the burner do not require any
particular maintenance. Simply brush them with a soft brush.
8.3.3
Checking the ignition/detection electrode
Check the state of the ignition/detection electrode and replace
if necessary. Check the measurements as per the drawing
whether the ignition/detection electrode is replaced or not.
6
+0,5
-0,5
4,5
+0,5
-0,5
Fig. 45
8.3.4
Final operations
After having cleaned the combustion chamber and the burner:
– remove any carbon residue
– check that the seal and the insulation of the door (12) to the
combustion chamber are undamaged. Replace if necessary
– refit the assembly by carrying out the same operations for
removal but in the reverse order and tighten the screws (11)
of the door to the combustion chamber
– reconnect the connections to the fan and the electrode.
8.4
Checks
8.4.1
Checking the flue
Check that the flue is undamaged and complete.
8.4.2
Checking the expansion vessel pressure
Close the flow and return valves and drain the boiler. Check the
expansion vessel pressure is not less than
1 bar
. If this is not
the case, pressurize it to the correct value (see sectionExpan-
8.4.3
System Inhibiter concentration
Check and if required correct the inhibiter concentration.
Once the checks described above have been completed:
– refill the boiler as described in section "SYSTEM Filling page
– check that the siphon has been filled correctly
– Start the boiler, activate the "Chimney sweep function" page
39 and carry out combustion analysis as detailed in Appendix
2
– refit the front panel securing it with the two screws which
were removed previously
– complete the service record in this manual.
8.5
Circuit Board Replacement
Should the circuit board be replace, the engineer
MUST set
the parameters
as indicated in this table and in the sequence
shown.
Type
No.
Description
Setting for
Murelle
Pro HE MkII
30
35
tS
0.1
Index showing boiler power
in kW
2 = 30
3 = 35
2
3
tS
0.2
Hydraulic configuration
0 = combi
1 = N/A
2 = N/A
3 = N/A
4 = N/A
5 = N/A
0
tS
0.3
Gas Type Configuration
0 = G20; 1 = G31
0 or 1
To enter "Parameter setting and display" see page 37.
Once the parameters in the table have been set, you must car-
ry out the entire phase of "Automatic self-calibrating proce-
If the
gas valve
and/or the
ignition/detection electrode
, and/or
the
burner
, and/or the
fan
are replaced, the engineer must still
carry out the entire phase of "Automatic self-calibrating pro-


