07
07
Install graphic card and expansion cards as needed
Instale la tarjeta gráfica y la tarjeta de expansión como se requiere.
Setzen Sie Grafikkarte und Erweiterungskarte, wenn benoetigt, ein
Installez la carte graphique et les cartes d'extension selon vos besoins
Installare la card grafica e la expansion card come richiesto
Установите
графическую
карту
и
карты
расширения
.
必要なグラフィックスカードおよび拡張カードをインストールします。
그래픽카드나
기타
필요한
확장카드
등을
설치하십시요
.
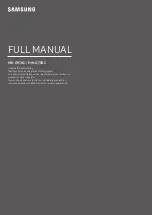
08
Install your power supply as shown with the included screws. (Power supply can
be installed in either direction depending on thermal requirements)
Instale la fuente de alimentación como se muestra con los tornillos incluidos (la
fuente de alimentación puede ser instalada en ambas las direcciones según los
requisitos de refrigeración).
Bringen Sie das Netzteil mit den enthaltenen Schrauben wie gezeigt an. (Sie koennen
das Netzteil in zwei verschiedene Richtungen einbauen, um die Kuehlung an Ihre
verwendeten Komponenten anzupassen)
Installez votre alimentation comme montré avec les vis fournies. (L'alimentaion
peut être installé dans n'importe quel sens selon les contraintes thermiques)
Installare l’alimentatore come mostrato con le viti incluse.(l’alimentatore può
essere installato in entrambi i sensi a seconda dei requisiti termici).
Установите
блок
питания
,
как
показано
на
рисунке
,
и
закрепите
его
прилагающимися
шурупами
. (
Блок
питания
может
быть
ориентирован
в
любом
направлении
в
заисимости
от
требований
к
охлаждению
).
電源を図のように付属のネジで固定します。
(電源は冷却方法に合わせてどちらの向きでも取り付け可能です)
파워서플라이를
그림과
같이
나사를
이용하여
설치하십시요
. (
파워
서플라이는
냉각팬의
위치
혹은
방법에
따라
2
가지
방향으로
설치
가능합니다
. )
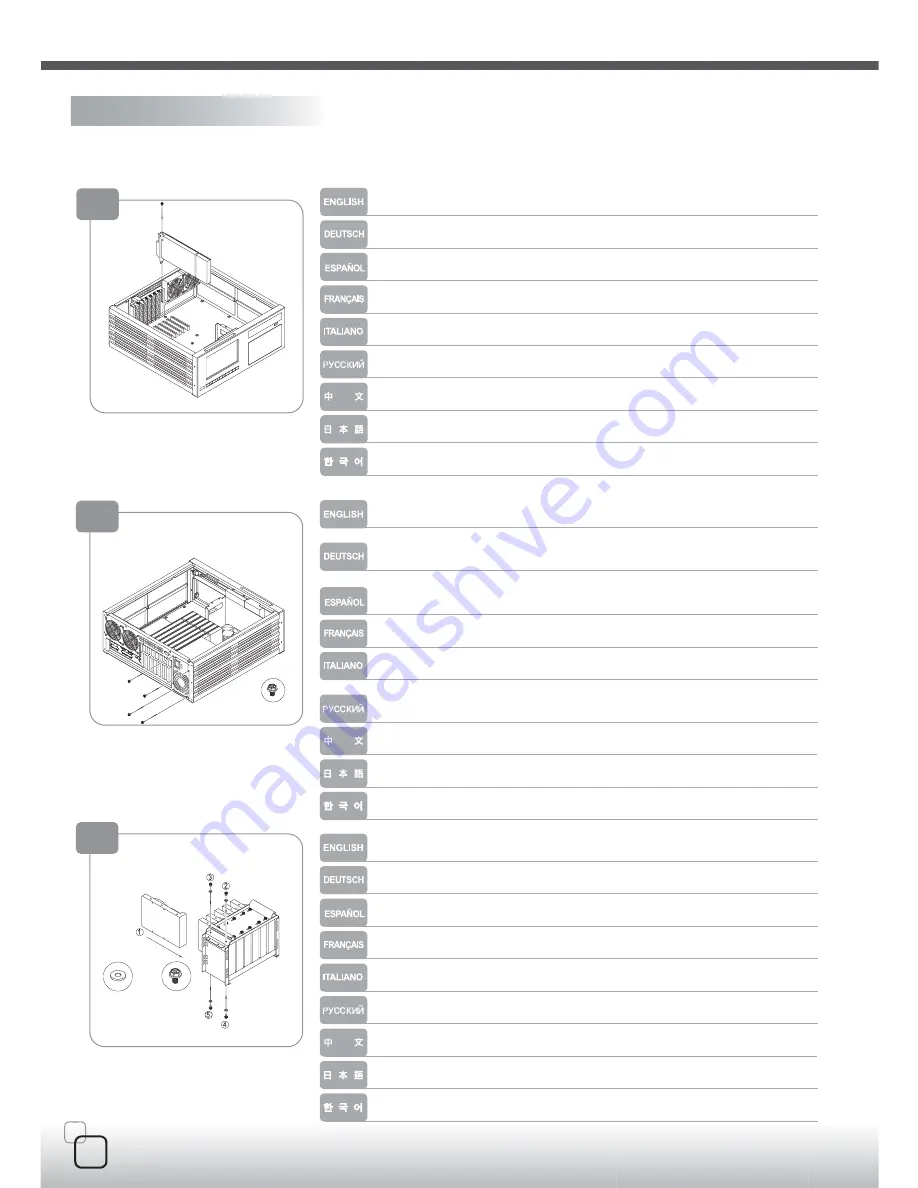
09
Secure hard drives into the hard drive cage (picture 4) with the included screws
and vibration dampening pads
Sujete los discos duros en sus caja (foto 4) con los tornillos incluidos y las placas
anti-vibración
Befestigen Sie die Festplatte mit den enthaltenen Schrauben und
Vibrationsdaemmungspolstern im Festplattenkaefig (Bild 4)
Fixez les disques durs dans leur casier(image 4) avec les vis et les fixations anti
vibrations fournies
Fissare gli hard disk nel loro box (foto 4) con le viti incluse ed i cuscinetti
anti-vibrazione.
С
помощью
шурупов
и
антивибрационных
подкладок
,
входящих
в
комплект
поставки
,
закрепите
жесткие
диски
в
корзине
для
жесткого
диска
(
рисунок
4).
ハードディスクドライブをハードディスクドライブケージに付属のネジと防振パ
ッドで取り付けます(図4)
하드디스크를
하드드라이브
케이지
(
그림
4)
에
동봉된
나사와
진동방지
패드를
이용해
고정시키십시요
.
I
nstallation Guide
請依需求安裝顯示卡與擴充卡
請依圖示安裝電源供應器 (電源供應器可依據散熱需求正反方向安裝)
將硬碟裝入硬碟架(圖四)中,並以內附螺絲與避震墊鎖固
Summary of Contents for CW03
Page 2: ...03 Remote control CDs...