


SECTION 1
GENERAL
The operating instructions mentioned here are partial abstracts
from the Operating Instruction Manual. The page numbers of
the Operating Instruction Manual remain as in the manual.
8
Customizing Your Monitor
Introducing the On-screen
Display System
Most adjustments are made using the MENU OSD.
MENU OSD
Press the
button to display the MENU OSD.
This MENU OSD contains links to the other OSDs described
below.
1
COLOR
Displays the COLOR OSD for adjusting the color
temperature.
2
CENTER
Displays the CENTER OSD for adjusting the centering
of the picture.
3
SCREEN
Displays the SCREEN OSD for adjustingthe vertical and
horizontal convergence, etc.
4
ZOOM
Displays the ZOOM OSD for enlarging and reducing
the picture.
5
OPTION
Displays the OPTION OSD for adjusting the OSD
position and degauss the screen, etc.
6
SIZE
Displays the SIZE OSD for adjusting the picture size.
7
LANG
Displays the LANGUAGE OSD for selecting the
language.
8
GEOM
Displays the GEOMETRY OSD for adjusting the picture
rotation and pincushion, etc.
9
EXIT
Closes the MENU OSD.
MENU
EXIT
CENTER
SIZE
GEOM
COLOR
LANG
ZOOM
SCREEN
OPTION
OK
MENU
Horizontal
Frequency*
Vertical
Frequency*
Before adjusting
• Connect the monitor and the computer, and turn them on.
• Select “
LANG” in the MENU OSD, then select
“ENGLISH” (English) (see page 15).
Customizing Your Monitor
BRIGHTNESS/CONTRAST
26
26
80.0kHz/ 75Hz
Adjusting the Picture Brightness
and Contrast
Once the setting is adjusted , it will be stored in memory for
all input signals received.
1
Press the
¨
(brightness)
.
/
>
or
>
(contrast)
?
/
/
buttons.
The BRIGHTNESS/CONTRAST OSD appears.
2
For brightness adjustment
Press the
¨
.
/
>
buttons.
>
. . . for more brightness
.
. . . for less brightness
For contrast adjustment
Press the
>
?
/
/
buttons.
/
. . . for more contrast
?
. . . for less contrast
The OSD automatically disappears after about 3 seconds.
To reset, press the
?
(reset) button while the OSD is on.
The brightness and contrast are both reset to the factory
settings.
*
The horizontal and vertical frequencies for the received input
signal appear in the BRIGHTNESS/CONTRAST OSD.
5
Getting Started
Getting Started
F
EN
D
ES
I
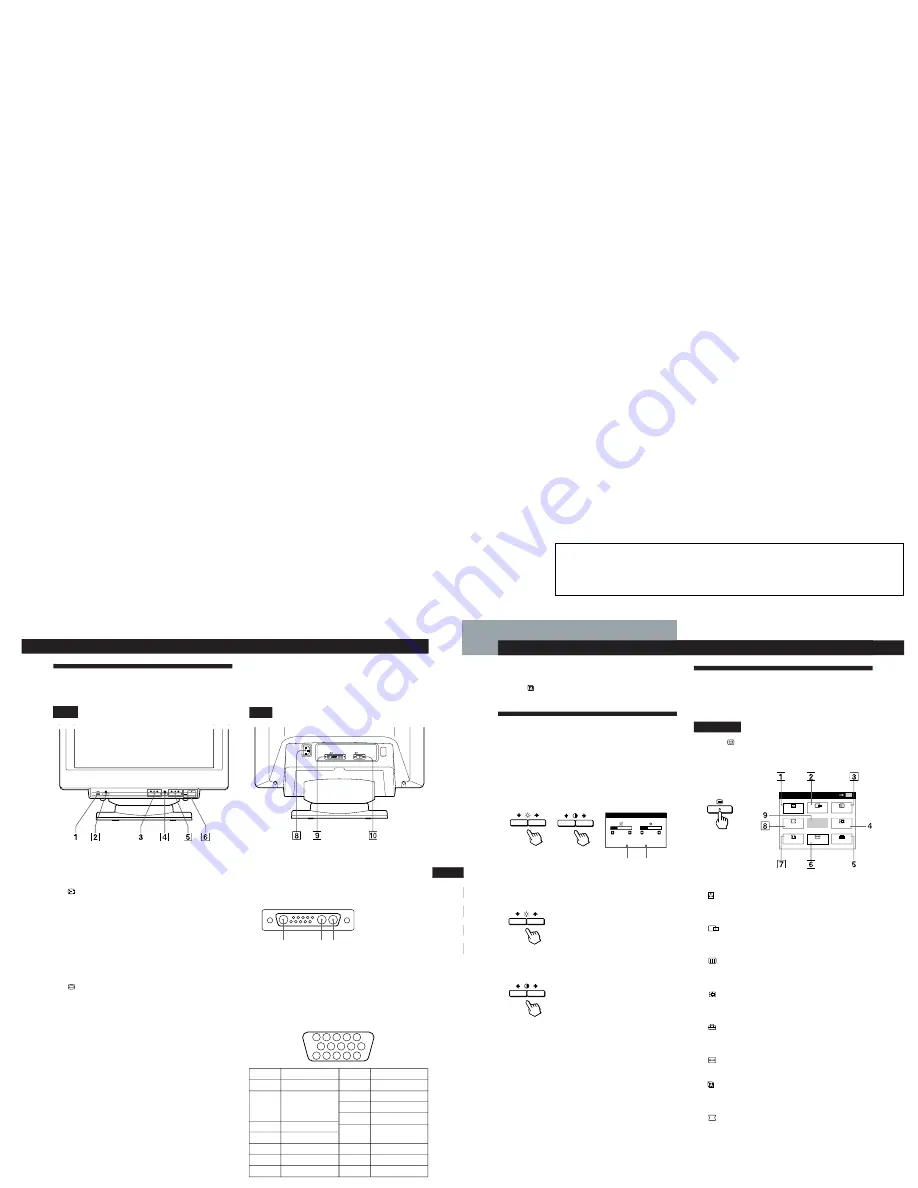
Identifying Parts and Controls
See the pages in parentheses for further details.
Front
1
?
(reset) button (page 16)
Resets the adjustments to the factory settings.
2
(auto sizing and centering) button
(page 6)
Automatically adjusts the size and centering of the
images.
3
¨
(brightness) (
.
/
>
) buttons (pages 7 –
16)
Adjust the picture brightness.
Function as the (
.
/
>
) buttons when adjusting other
items.
4
(menu) button (pages 7 -16)
Displays the MENU OSD.
5
>
(contrast) (
?
/
/
) buttons (pages 7 – 16,
20)
Adjust the contrast.
Function as the (
?
/
/
)
buttons when adjusting other
items.
6
u
(power) switch and indicator (pages 17,
20)
Turns the monitor on or off.
The indicator lights up in green when the monitor is
turned on, and lights up in orange when the monitor is
in power saving mode.
Rear
8
AC IN connector
Provides AC power to the monitor.
9
Video input 2 connector (13W3)
Inputs RGB video signals (0.714 Vp-p, positive) and
SYNC signals.
A1:Red
A2:Green
A3:Blue
N o t e
If you use a computer or video board of high output level (about 1.0
Vp-p), you may not be able ot obtain the optimum display. In such
case, try decreasing the picture contrast, or use a computer or video
board with a lower output level.
!º
Video input 1 connector (HD15)
Inputs RGB video signals (0.714 Vp-p, positive) and
SYNC signals.
*
Display Data Channel (DDC) Standard of VESA
Pin No.
1
2
3
4
5
6
7
Signal
Red
Green
(Composite
Sync on Green)
Blue
ID (Ground)
DDC Ground*
Red Ground
Green Ground
Signal
Blue Ground
DDC + 5V*
Ground
ID (Ground)
Bi-Directional
Data (SDA)*
H. Sync
V. Sync
Data Clock(SCL)*
Pin No.
8
9
10
11
12
13
14
15
5 4
3 2 1
6
7
8
9
10
11
12
13
14
15
A1
A2 A3
(13W3)
(HD15)
1-1


