background image

UM_FULL_55SL_REV_A

2

2-WAY LCD REMOTE CONTROL - SLRF90

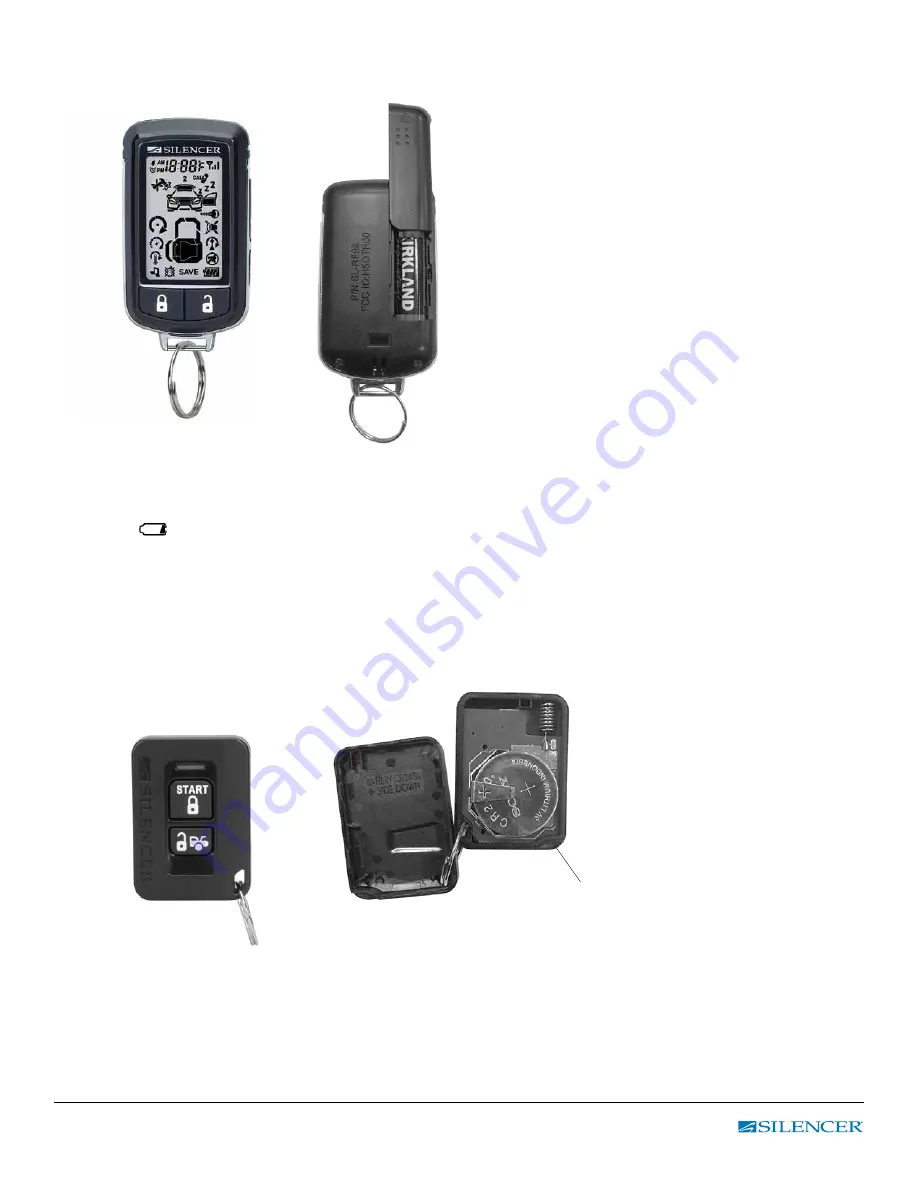
A. CHANGING THE BATTERIES

BATTERY REPLACEMENT: SLRF90
The Two-Way remote transmitter is powered by one “AAA” Battery

. When the power of the battery 

weakens a 

 icon shall be displayed on the LCD screen. When the old battery is replaced, there will be 

beep sounds to indicate the power is back up on the transmitter.

BATTERY REPLACEMENT: SLRF902  

One-way remote is powered by one CR2450 Battery. 

Coin Slot to Open

Summary of Contents for 55SL

Page 1: ...USERS MANUAL This unit is designed for professional installation only For Warranty Information Please visit our website at www magnadyne com ...

Page 2: ...ransmitter is powered by one AAA Battery When the power of the battery weakens a icon shall be displayed on the LCD screen When the old battery is replaced there will be beep sounds to indicate the power is back up on the transmitter BATTERY REPLACEMENT SLRF902 One way remote is powered by one CR2450 Battery Coin Slot to Open ...

Page 3: ...ol System trigger 0 00 Parking Meter Reminder when time is up for parking 12 00 Time Monitor Low Battery You have to replace battery of remote control Alarm Clock Power Save battery icon full bar flash SAVE Melody Mode Remote Control alerting user through melody sound Vibration Mode Remote Control vibrates when the system is triggered Engine Cranking Your vehicle engine Cranking by remote control ...

Page 4: ... System Two Steps Door optional Press twice within 3 seconds Trunk Release Channel 3 Press and hold for 3 seconds Activate or Turn Off The Remote Start Press button once Press Twice if set to start safety mode Switch Code for 2nd Car Operation For SL 91 remote transmitter only D CHIRP INDICATORS PARKING LIGHT Chirp Function Parking light Function 1 chirp Lock 1 flash Lock 2 chirps Unlock 2 flashes...

Page 5: ... the transmitter and buttons at the same time This will lock or unlock your security system No chirp sound will be heard and lock unlock confirmation will be through the vehicles parking lights only F ACTIVE UNLOCK 1 Press button on the transmitter 2 The horn will chirp twice and the parking lights will flash twice indicating that the security system is now disarmed The vehicle s doors will unlock...

Page 6: ...c mode the normal function of this transmitter button will be disabled The transmitter and buttons can be used to lock and unlock the door if the option is installed However once the button is pressed the vehicle s starter disable device where installed will be disengaged allowing the vehicle to start 3 To stop the alarm press the trunk button on the remote control If the button is not pressed the...

Page 7: ...is in any gear other then PARK or NEUTRAL PROGRAMMABLE SAFETY START Child safety mode By default your Silencer remote starter is programmed to start stop after pressing the button 1 time This default setting can be re programmed to require 2 presses of the button to remote start stop the vehicle This setting is known as Child Safety Mode Contact your installer to reprogram this feature if needed B...

Page 8: ...m trigger 8 The vehicle refused to start running after 3 unsuccessful attempts ANTENNA The long range antenna should be located somewhere on the windshield of the vehicle This antenna also contains a blue status LED as well as the Valet Button Switch TRANSMITTER PROGRAMMING Enter 1 Turn the Ignition switch OFF ON 3 TIMES and stay in ON position Within 15 seconds 2 Push the Valet switch 3 times and...

Page 9: ...he alarm arm and bypass the Shock Sensor Press and release the F button a 2nd time 1 beep 1 2 icon On Press button to enable the alarm arm with Hidden Alarm Function Press and release the F button a 3rd time 1 beep 1 3 icon On With the ignition key in the on position press the button to activate the anti car jacking functions Note The anti carjacking feature must be programmed on at installation f...

Page 10: ... button a 5th time 1 beep 2 5 No Setting No Setting Available EXIT Press hold F button for 2 sec or wait for 5 sec for automatic exit 1 beep Confirm Exit Table 3 LCD Programming ENTER Press hold F button until 2 beeps are heard and then release 1 The LCD will display 2 1 Press the button twice to enter Clock Setting Mode 21 1 The LCD will display the clock and the hours will be flashing 12 00 2 Pr...

Page 11: ... is flashing Press button or Press button Press button confirm its selection move to the minutes setting Adjust Parking Meter countdown minutes from 0 to 59 0 30 30 is flashing Press button or Press button Press button confirm its selection move to next option On Off setting Select Parking meter countdown Enable or Disable ON or OFF Press button Enable or Press button Disable Press button confirm ...

Page 12: ...lay 21 7 Default is OFF 3 SEC or 5 SEC or OFF Press 1 time 3 sec Press 2 times 5 sec Press 3 times OFF 8th Transmitter Button Lock 21 8 Default is OFF Flashing Press button Enable Icon flashing or Press button Disable Icon not displayed Note Once the button lock feature is active you must re enter programming mode to turn it off Press hold F button until 2 beeps are heard then release You will aut...

Page 13: ...hing Press button to enable Timer Start mode Icon On Enable Icon Off Disable E TIMER START Timer Start Your Silencer System can be programmed to start and run the engine every 3 2 hours depending on the initial setup programming Default timing is 3 hours IMPORTANT Timer Start should be used only in open areas never start and run the vehicle in an enclosed space such as a garage or carport TIMER ST...

Page 14: ... hold F button until 4 beeps heard release F button F Button LCD display Button Press and hold the F Button until 4 beeps sounded 3 1 Press hold button for 2 seconds to return all settings back to default 1 chip to confirm EXIT Press hold F button for 2 sec or wait for 5 sec for automatic exit 1 beep Confirm Exit ...

Page 15: ...anty Magnadyne Corporation or its authorized agents shall not be liable to anyone for consequential or incidental damages or claims that may arise due to failure of product to operate properly except those accorded by law Magnadyne s or its authorized agents liability to the repair replacement of the product as stated above if all conditions of the warranty are met No expressed warranty or implied...

Page 16: ...Magnadyne Corporation 1111 W Victoria Street Compton CA 90220 800 340 3200 Please visit our website at www magnadyne com Made in Taiwan All Rights Reserved ...

Reviews: