background image

6.14 OPTIONS

From the initial screen press MENU and then F3 to enable the function.
There are 5 machine option windows to select by pressing F1.

Hold down F4 to retrieve the original parameters set by Silca S.p.A.

Machine parameters/options that can be forced to the original manufacturer’s value:
Rapid speed:    

4000

Measuring unit: millimetres
Date  format:  


DD/MM/YY

Time  format:  


0-24

Keypad inversion:  

NO

Quick menu:   

NO 

Use Tracer Tower:  

YES

Make preselection:  

ALL

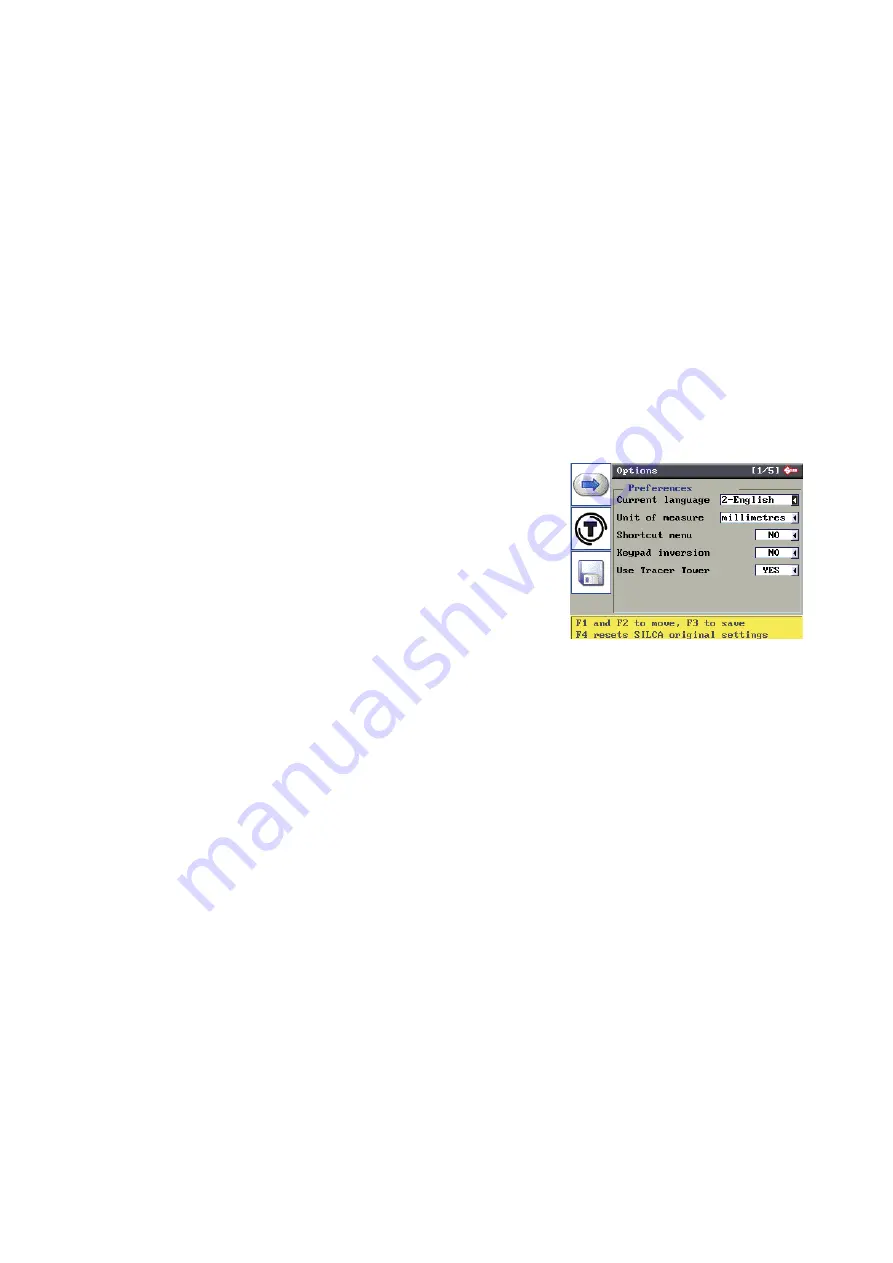
6.14.1  MACHINE OPTIONS [PAGE 1/5]

The display shows: Preferences

Current language: 

use the arrow keys (r/h-l/h) to select the 

required language, then press ENTER to confirm.

Measuring unit:

 use the arrow keys (r/h-l/h) to select the 

required measuring unit (mm=millimetres, inch.=inches), 

then press ENTER to confirm.

Quick menu: 

if enabled (=YES) used in heavy operating 

flows to skip some of the steps and speed up the required 

procedure.

Keypad inversion:

 function normally disabled: use the 

arrow keys (r/h-l/h) to select your choice (YES or NO) then 

press ENTER to confirm.

This operation is used to invert the function of the 

alphanumerical keys.

“Keypad inversion” disabled:
to digit number 3: press 3/K
to digit letter K: press SHIFT + 3/K
“Keypad inversion” enabled:
to digit number 3: press SHIFT + 3/K
to digit letter K: press 3/K

Use Tracer Tower: 

•  if the Tracer Tower is enabled (=YES) the program will 

always give instructions to position the Tracer when 

necessary and will oblige the user to employ the tracer 

point only in special cases of exceptional sizes that cannot 

be managed. 

•  if the Tracer Tower is disabled (=NO) the program will 

check that it is in the up position (safe) and will give 

instructions to fit the appropriate tracer point for the type 

of key.

F1

F2

F3

Operating manual

TRIAX PRO

Copyright Silca 2016

68

Summary of Contents for Triax Pro

Page 1: ...Operating Manual Original Instructions D446001XA vers 1 0 EN...

Page 2: ...ety This document or any of its parts cannot be copied altered or reproduced without written authorization from the Manufacturer Keep the manual and look after it for the entire life cycle of the mach...

Page 3: ...TRACK TYPE KEYS 19 4 2 1 1 Fitting the key 19 4 2 1 2 Removing fitting the jaws on clamp R29 20 4 2 2 R28 clamp for ENGRAVING keys and medals 21 4 3 FITTING THE CLAMP TO THE MACHINE 22 4 4 USING THE C...

Page 4: ...PLATES 50 6 9 MACHINE DATA UPDATE 52 6 9 1 Machine software 52 6 9 2 USER series 52 6 9 3 User engraving templates 53 6 10 USER DATA BACKUP RESTORE 54 6 11 UTP UPDATE AND CLOCK SYNCHRONISING 55 6 11 1...

Page 5: ...ENT AND TIGHTENING 84 8 8 CHECKING AND REPLACING FUSES 85 8 9 KEYPAD DISPLAY REPLACEMENT 87 8 10 SENSOR REPLACEMENT 88 8 10 1 REPLACING SENSOR FOR LOWER AXIS Y 88 8 10 2 REPLACING SENSOR FOR VERTICAL...

Page 6: ......

Page 7: ...its contents acquired by those who will use it MANUFACTURER ID TRIAX PRO has an ID plate on the back of the machine showing its serial number see chap 9 DISPOSAL HOW TO APPLY FOR AFTER SALES SERVICE...

Page 8: ...locks System lock Means the set of information pertaining to the key to be cut E g see examples in symbol table below Each dot represents one cut the number of dots corresponds to the number of cuts o...

Page 9: ...KEY TERMINOLOGY software SSN Silca Serial Number SSN Silca Serial Number Fig 3 Fig 4 A C B D Side A 1st flat side Side B 1st back Side C 2nd flat side Side D 2nd back ATTENTION anodised aluminium dim...

Page 10: ...o della chiave R Indica che la fila principale di pistoncini sul lato Destro della chiave P Numero di pistoncini perni per ogni asse fila T Numero di tracce di tipo Laser W Numero di lamelle pf Esempi...

Page 11: ...not clean with compressed air Obligation to read the manual Symbol on UTP version Electrical voltage hazard This sign highlights the electrocution hazard from direct indirect contact with electrical v...

Page 12: ...ed and applied many technical solutions that allow its key cutting machines to optimize the quality of the cut keys To ensure these results over time observe the following instructions Observe the pro...

Page 13: ...X PRO machine has residual risks in the highlighted area Fig 5 SAFETY REGULATIONS Always disconnect the machine when it is not in use or when maintenance is to be carried out Periodically check the el...

Page 14: ...button L IN OUT port M B axis N upper axis connector O USB port for PC P serial port for PC Q USB PEN holder R tool holder S clamp knob T vertical carriage U lamp V safety shield W vacuum system conne...

Page 15: ...227ZR 4 mm hex key 2 5 mm T shaped hex key 4 Amp delayed fuse D908726ZR Z4 serial test receptacle D916661ZR SILCA ENGRAVING PROGRAM CD 6 3 Amp delayed fuse D910652ZR Calibration template Z5 Adhesive t...

Page 16: ...ble R29 provided with 01J 02J jaws for copying dimple laser keys R28 for engraving Runs lower axis Y 57 mm upper axis X 32 mm vertical axis Z 30 mm Dimensions width 450 mm depth 600 mm height 510 mm w...

Page 17: ...a special message on the machine display To activate the work cycle close the shield and press the START key on the machine keypad Emergency Stop In the event of malfunctioning or a hazard for the op...

Page 18: ...over The machine is secured to the base with screw brackets that stop the load from sliding during transport which could damage the safety shield in particular When the packing is closed it is held by...

Page 19: ...he feet 6 Check the contents of the packing 1 TRIAX PRO key cutting machine 1 Machine documentation operating manual spare parts list expert guide and warranty form 1 Power lead 1 Tool box 2 3 MACHINE...

Page 20: ...circulation are not advisable The optimum environmental conditions for the machine are temperature 10 C to 40 C relative humidity approx 60 3 3 POSITIONING Follow the procedure described below 1 Plac...

Page 21: ...n 3 5 SEPARATE PARTS The separately packed parts must be installed on the key cutting machine by the purchaser as follows 3 5 1 Power cable Connect the key cutting machine power cable to the electrici...

Page 22: ...materials wood paper plastic ceramics The maximum dimensions of the subject to be engraved are 38x40 mm see Fig 24 4 1 REGULATION AND USE ATTENTION to ensure that the Z axis works properly the calibr...

Page 23: ...R29 and R28 loosen the handle A6 by one turn and pull the anatomical grip A8 towards the operator to release the clamp so that it can slide from side to side release the anatomical grip A8 and move th...

Page 24: ...01J A8 A6 02J R29 position R28 position Fig 15 R29 position CUTTING R29 position R28 position Fig 16 R28 position ENGRAVING Operating manual TRIAX PRO Copyright Silca 2016 18...

Page 25: ...are positioned up against the clamp Stop 0 Fig 17 and the others tip stops are positioned referring to one of the grooves 1 2 3 as shown on the machine di splay Use the bar provided for this operatio...

Page 26: ...ur ngers to pull the jaw to be removed out towards the operator Fig 21 4 Carefully clean the seat of the jaw on the clamp 5 Clean the jaw before tting into the clamp 6 Fit the jaw up against the stop...

Page 27: ...s on the R28 clamp there are positions numbered 0 to 8 which are used as a reference and aid the operator in positioning the key or medal to be engraved Cutter to use for engraving W146 ATTENTION keys...

Page 28: ...l guide To fit the clamp to the machine insert the clamp into the dovetail guide push all the way in and lock by turning the handle A9 The instructions refer exclusively to the clamp provided To use a...

Page 29: ...is indicated by the letter W hard metal If the operator does not have the required tool s he may select a different one indicated by the letter W hard metal see Ch 6 5 2 indicated by the letter H HSS...

Page 30: ...To fit a tool raise the safety shield and proceed as follows CUTTER fit the tool into the spindle push all the way in and turn until it clicks into place on the anti rotation stop in the groove J on...

Page 31: ...chine off the USB PEN can be removed or inserted 2 With the key cutting machine on the USB PEN must be disabled This operation is possible from the main menu with numerical key 2 or from the sub menus...

Page 32: ...the machine functions contact a Silca distributor to purchase another UTP package Ch 6 14 2 UTP SETTINGS UTP Unlimited Token Plan is a special timed digital token that allows the machine to be used fr...

Page 33: ...the Operating Guide video screens once the data have been transmitted 6 1 MACHINE KEYPAD AND FUNCTION BUTTONS Fig 30 The MENU button shows a list of the main functions MENU is always active from any w...

Page 34: ...appears on the display The main screen shows the Function icons as well as the following data Name of key cutting machine Machine serial number SW version machine program version DB version Series dat...

Page 35: ...F3 F3 F4 F4 SEARCHES PC QUEUE ENGRAVING UPDATE CALIBRATION MAINTENANCE OPTIONS PROTECTED SSN Press the MENU button to view the whole list of the main functions in the machine program Operating manual...

Page 36: ...3 F4 F1 to change the search field possible search modes SSN Make Code Key blank Description F1 F2 F3 F4 F2 to enter List of Favorite Series A list of frequently used series from which to make a rapid...

Page 37: ...provided by SILCA The top window shows other information about the selected series Press ENTER to confirm and enter in the required Lock System SSN 6 3 2 SEARCH BY CODE KEY BLANK AND DESCRIPTION Enter...

Page 38: ...phics in Table 2 F1 Key decoding function F2 Engraving function F3 Indirect Code Entry if applicable F4 to access other Functions see Ch 6 5 F1 F2 F3 F4 F1 to add the system used to the Favorite Serie...

Page 39: ...top up against the STOP position Lower the shield and press START When decoding is finished the display will show a new window with 4 columns giving from left to right FUNCTION BUTTONS after Decoding...

Page 40: ...e cut Cuts Combination of cuts on the side and axis selected Cutter Cutter to use for cutting the side and axis selected Pieces Number of keys to be cut NOTE if the cutter and or clamp required are no...

Page 41: ...s shown Depth symbols and values Symbols for depths admitted with relative values 1 100 mm for the axis shown Pieces Number of keys to cut PROCEDURE for entering cuts With the cursor in the cut field...

Page 42: ...es and press ENTER F1 for Manual adjustments F2 for User parameters F3 for Code entry see Ch 6 5 F1 F2 F3 F4 INDICATIONS on display and key cutting PROCEDURE The code in use is shown next to the windo...

Page 43: ...USER PARAMETERS This function is used to select a clamp or cutter alternative to those provided by Silca It is also used to vary working speed option recommended for OEM users Not all Silca Serial Num...

Page 44: ...begin cutting When cutting is complete press F3 to enter a new code 6 5 4 DECODING DATA Function active after decoding Shows the data obtained from the last decoding operation 6 5 5 ENGRAVING FROM CUR...

Page 45: ...the SSN in use The same button can also be used to disconnect the current engraving template from the SSN in use F1 F2 F3 F4 A special icon indicates that an engraving template has been associated to...

Page 46: ...ate a Series from the list 6 5 7 VIEW SERIES AXIS PARAMETERS From the system in use access can be gained to the function with F2 The parameters relative to the cuts in the SSN in use are shown F1 F2 F...

Page 47: ...th the decoded key Example Enter SSN 681 Press ENTER Enter cutting data FAAFFF Press ENTER The Silca software calculates the validity of the data entered or decoded If there is an inconsistency the fo...

Page 48: ...may appear SSN not in the archive The message may appear when 1 The SSN entered is not in the Silca archive 2 The SSN entered is in the Silca archive but has not been enabled by the User SHIFT F3 to...

Page 49: ...ription of graphics To access protected data 1 apply to the manufacturer for authorization 2 communicate to Silca Key cutting machine serial number XXXXXXXXXXXXX Read the serial number on the ID plate...

Page 50: ...not fully completed due to an interruption F1 1 2 3 4 5 6 F2 The data received from the PC are presented in the form of a list for example 1 number of jobs received 2 cutting codes received Silca engr...

Page 51: ...RS The key cutting machine can be used without a PC but with certain limitations To make use of all the potential available it is advisable to use the special function included in the Triax Engraving...

Page 52: ...y blanks ready for use The following can be edited but not saved in the machine memory contents of the lines of text material thickness engraving depth X X Creation of User templates X Use of User tem...

Page 53: ...tance given in the set depth parameter A ELECTRIC CONTACT POSSIBLE on material to be engraved NOTE is better to set the thickness value slightly lower than nominal read by a centesimal gauge to assist...

Page 54: ...text area on the selected template The values shown cannot be edited for SILCA templates F1 F1 F2 F2 F3 F3 F4 F4 For user templates only the following values can be edited Dx X coordinate of the top...

Page 55: ...tween the 2 lines Press ENTER Side front 1 back 2 engraving side Reference reference for key engraving 0 Clamp name of clamp to use Cutter name of cutter to use Thickness key or medal thickness 100 mm...

Page 56: ...A 3 F1 F1 for counter function 3 F1 see Ch 6 8 5 1 a NOTE use only alphanumerical keys to edit the text F1 F2 F3 Up and down arrow keys to move the cursor between the 3 lines Press ENTER Side front 1...

Page 57: ...counter Check all the counter values then press STOP Prepare the key cutting machine for engraving in the way described on the display Press START to begin engraving Example With the Pieces value set...

Page 58: ...ys to select the required field 6 9 1 Machine software Check that the version on the USB PEN is more up to date than the version on the machine Press ENTER When the machine is being updated the displa...

Page 59: ...aving templates on the machine F1 F2 F3 F1 F1 F2 F2 F3 F3 ATTENTION When Engraving templates are downloaded from a USB PEN all the user engraving templates already on the machine are lost Only the use...

Page 60: ...odel Connect a PC serial or USB cable to the key cutting machine Select the communication port COM and click on TEST CONNECTION the machine serial number will appear in the Serial Number field A butto...

Page 61: ...do not turn the machine off during data transfer The machine must be on Connect a PC serial or USB cable to the key cutting machine Start the SRS program and select the machine model click on Next Cli...

Page 62: ...appear 2 Turn the machine off 3 Turn the machine on again and proceed with Date Time synchronisation SYNCHRONISATION PROCEDURE Connect a PC serial or USB cable to the key cutting machine Start the SR...

Page 63: ...ary to repeat one or all the calibration operations on the clamps in your possession This operation is semi automatic and requires careful attention to the instructions below These adjustments must be...

Page 64: ...sure tracer point U103 is fitted NOTE before proceeding to calibrate clamps with J jaws make sure the jaws are completely closed NOTE Carefully clean the clamp and calibration plate ATTENTION Eliminat...

Page 65: ...worn cutter is replaced press F1 to confirm replacement The set User Limit remains active and the counter starts again Note The User Limit can be varied and if applicable the type of material and key...

Page 66: ...F2 F3 F4 Positive value of Y takes cut closer to stop Negative value of Y takes cut away from stop Positive value of X moves cut to the right of the axis Negative value of X moves cut to the left of t...

Page 67: ...WER or a tracer point fitted in the place of the cutter Simply enable or disable the TRACER TOWER from the OPTIONS menu The TRACER TOWER must be CALIBRATED before use The TRACER TOWER calibration proc...

Page 68: ...ivation card to send to Silca if required F4 6 13 2 AXIS MOTORS TEST Follow the instructions on the display and check that the carriage for the axis in question moves X Y Z Axis B optional clamp R13 N...

Page 69: ...TOP and check on the display that the same circled button appears for each button pressed Press the STOP button last to quit the test 6 13 6 DISPLAY TEST Press ENTER a number of times to check that th...

Page 70: ...ell disk for Y G and Z L axes 4 Remove bottom plate 5 Remove the X axis carriage cover by loosening the 3 screws B5 and pull out in the direction given then remove the belt cover 6 Loosen the grub scr...

Page 71: ...all the way up to the mechanical stop Press ENTER Check that the template Z5 and calibration pin are in the position shown in Fig 33 Lower the safety shield and press START Fig 33 The machine takes t...

Page 72: ...rub screw H7 slowly move the rod H6 manually in both directions until you find the point at which it goes from OFF to ON Secure the rod by tightening the grub screw H7 Lower carriage Y sensor tip the...

Page 73: ...n ERRORS ALARMS that occur This information can be downloaded to an EVENT LOG file in the USB PEN by means of the EXPORT HISTORIC EVENTS function The EVENT LOG file can be sent to the After Sales Serv...

Page 74: ...enabled YES used in heavy operating flows to skip some of the steps and speed up the required procedure Keypad inversion function normally disabled use the arrow keys r h l h to select your choice YES...

Page 75: ...cut keys operational for decoding and engraving only Note when the UTP has expired to continue using all the machine functions contact a Silca distributor to purchase another UTP package F1 F2 F3 F1 F...

Page 76: ...selection 193 total number of makes 4 193 partial number of makes selected by user The standard machine setup enables searches through all makes as soon as one is selected F1 F2 F3 F4 6 14 5 MACHINE O...

Page 77: ...clamp calibration plate In the standard mode this check takes place for each single key to be cut Enabling OEM mode arrow keys to change YES NO ENTER to confirm Plate contact every xxx keys cut enter...

Page 78: ...otected again Use the arrow keys up and down to select the protected system already enabled F1 to protect the SSN again F1 The display shows another message requiring confirmation of removal STOP to q...

Page 79: ...ust be calibrated This operation must be performed before using the series Press ENTER to consult the series data but without cutting the keys ATTENTION The jaw is not calibrated By pressing ENTER you...

Page 80: ...erved for engraving See row The OPTIONS menu can be used to choose which makes of cylinders to search through for a lock system SSN by key blank code description etc If by mistake all the makes are di...

Page 81: ...SENCE OR USE OF MOTORIZED CLAMP IMPORTANT To install a motorized clamp for example the R13 tilting clamp follow the instructions on the display To proceed with the selected operation you must 1 Instal...

Page 82: ...nstallation and stop lever position A wrong operation has been performed in one of the machine calibration procedures Machine zeros Clamp calibration Detection of cutting decoding plate with a clamp d...

Page 83: ...caused it and advise After Sales Service ERROR 43 INTERNAL ERROR Error in searching data or in cutting calculation See code An error has occurred in calculating the engraving path Make a note of the...

Page 84: ...tlet see Ch 8 3 TROUBLE SHOOTING ALARM 2 I O POWER ALARM Check F4 fuse Indicates a short circuit on the port IN OUT see Ch 8 3 TROUBLE SHOOTING ALARM 3 DIGITAL OUTLET PROTECTION ALARM Switch off the m...

Page 85: ...speed not detected motor locked See operating manual Cause Short circuit on spindle motor or board power loss Driver damaged Check AZ motor board connectors Effect Free running motor does not reach t...

Page 86: ...necessary replace parts subjected to wear and substitute electric electronic parts fuses circuit boards etc when they are not working properly Parts can be replaced by the operator observing the inst...

Page 87: ...able between the keypad display unit and circuit board is not properly inserted into the relative connectors c keypad faulty d control circuit board faulty When decoding or calibrat ing the tracer poi...

Page 88: ...limit switch Use tests 6 and 9 to check the photocell sensor Check fuse F4 on the circuit board Control circuit board faulty The Z axis carriage moves upwards and knocks against the machine limit swi...

Page 89: ...hine 5 Lower the lever A and lower the safety shield V 6 Raise lever A again 7 Remove the belt cover C2 A V Fig 35 Fig 36 8 5 ACCESS TO REAR COMPARTMENT To access the rear compartment follow the instr...

Page 90: ...Fig 38 8 7 BELT REPLACEMENT AND TIGHTENING 1 Switch off the machine and disconnect the power lead 2 Gain access to the upper compartment Ch 8 4 Tightening increase tension on the belt by loosening the...

Page 91: ...replace if necessary Fig 40 3 fuses F2 F3 F4 F2 6 3 Amps delayed Protect the step motors and their electronic controls 32V d c F3 4 Amps delayed Protect the logic circuits for controlling the micropr...

Page 92: ...rd transformer Situated in the bottom of the base F5 Fig 42 2 fuses F6 F7 1 fuse F6 8 Amps delayed Protects motor power 1 fuse F7 1 Amps delayed Protects the motor circuit board Situated on the motor...

Page 93: ...and remove the display stand 3 Detach the cable and earth wire from the keypad 4 Loosen the keypad fixing nuts and remove the keypad from its stand 5 Fit the new keypad display by repeating the opera...

Page 94: ...ircuit board ATTENTION DO NOT LOOSEN SCREW E4 7 Loosen the nut E3 unscrew the sensor from the plate and remove Fig 47 8 Loosen the 3 screws E1 and remove the lower carriage front cover Fig 48 9 Place...

Page 95: ...ircuit board 5 Loosen the nut G1 unscrew the sensor from the plate and remove 6 Place the new sensor G2 in position screw down until it almost touches the pin G4 and secure with the nut G1 7 Connect t...

Page 96: ...sconnect the sensor connector H4 6 Loosen the grub screw H5 with the allen wrench provided 7 Remove the faulty sensor H3 and place the new sensor in position until it almost touches the pin below H6 a...

Page 97: ...artment Ch 8 5 3 Loosen the 2 photocell fixing screws I1 and remove 4 Disconnect the photocell cable I2 5 Connect the cable to the new photocell 6 Place the photocell in position and secure with the s...

Page 98: ...photocell cable H6 and sensor cable H3 5 Loosen the screw H8 6 Loosen the 2 screws H7 on the photocell support and pull out of carriage 7 Place the new board in position on the carriage and tighten t...

Page 99: ...sen the 2 photocell fixing screws J2 and remove 6 Place the new photocell in position and secure with the screws J2 connect the two cables J3 7 Replace the microswitch support plate and secure with th...

Page 100: ...ry out the calibration operations see MACHINE ZEROS CLAMP AUTOMATIC CALIBRATION OF TRACER TOWER DEVICE N1 Fig 60 8 13 MOTOR CIRCUIT BOARD REPLACEMENT 1 Switch off the machine and disconnect the power...

Page 101: ...al Inlets Cover Micro test is successful If not check that the cam J6 makes the two microswitches click If necessary regulate the cam as follows 5 Remove the belt cover and lower the safety shield V 6...

Page 102: ...ked SX on the left and the wire marked DX on the right 7 Replace the microswitch support plate with the screws J1 without tightening them 8 Adjust the position of the plate so that when the safety shi...

Page 103: ...f the machine and disconnect the power lead 2 Gain access to the bottom compartment see Ch 8 6 3 Use pliers with insulated tips to grip the battery and pull it out taking care to push towards the pres...

Page 104: ...t the end of its useful life and replace it with an equivalent product designed for the same use In this latter case the user may ask the manufacturer to collect the existing equipment c by the manufa...

Page 105: ...ended by Silca On the back cover of the manual there is a list of the manufacturer s addresses the following page lists the addresses of specialized Service Centres 10 1 HOW TO APPLY FOR AFTER SALES S...

Page 106: ......

Page 107: ...TRIAX PRO ELECTRICAL DIAGRAMS SCHEMI ELETTRICI ELEKTRISCHE SCHALTPLANE SCHEMAS ELECTRIQUE ESQUEMAS ALAMBRICOS ESQUEMAS EL CTRICOS ELEKTRISCHE TEKENINGEN Appendix Allegato 1 Copyright Silca 2016 1...

Page 108: ...Appendix Allegato 1 TRIAX PRO Copyright Silca 2016 2...

Page 109: ...Appendix Allegato 1 TRIAX PRO Copyright Silca 2016 3...

Page 110: ...Appendix Allegato 1 TRIAX PRO Copyright Silca 2016 4...

Page 111: ...Appendix Allegato 1 TRIAX PRO Copyright Silca 2016 5...

Page 112: ...Appendix Allegato 1 TRIAX PRO Copyright Silca 2016 6...

Page 113: ...Machines and with the EN ISO 12100 2010 EN ISO 13849 1 2008 EN ISO 13849 2 2012 Standards European Union DIRECTIVE 2004 108 CE Electromagnetic Compatibility and with the EN 55022 2010 EN 55032 2012 EN...

Page 114: ...SILCA S p A Via Podgora 20 Z I 31029 VITTORIO VENETO TV Tel 0438 9136 Fax 0438 913800 E mail silca silca it www silca biz Members of the Kaba Group...

Reviews: