background image

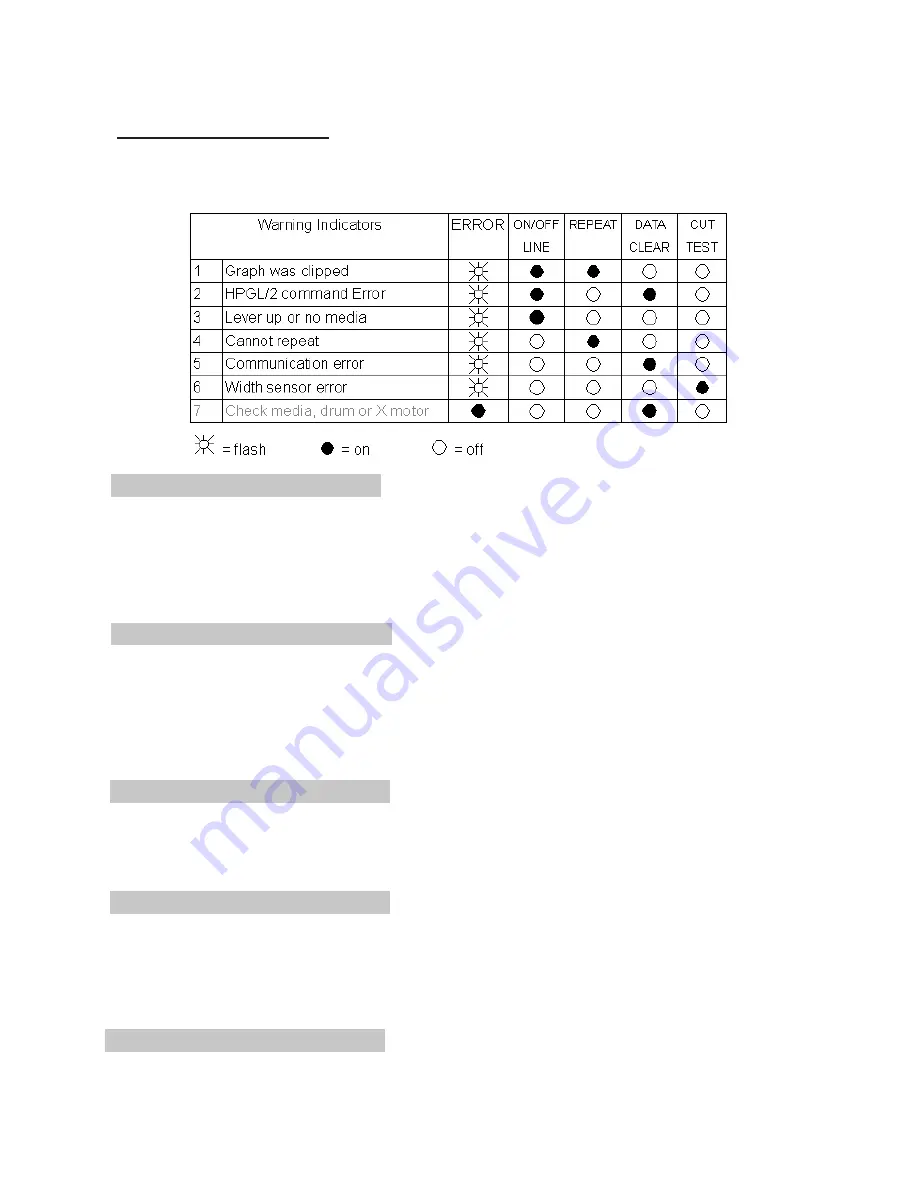
6.2.1  Warning Indicators

When the ERROR LED flashes (as shown below), take the necessary actions according to the following 

instructions. When the problems are solved, the ERROR LED will turn off automatically. Pressing the 

ON/OFF LINE button can also turn off the ERROR LED.

Warning 1  The graph is clipped

This condition indicates that the cutting graph is bigger than the cutting area. 
You can solve the problem by:

1.  Reload a wider or longer media. 

2.  Move the pinch rollers to widen the cutting area. 

3.  Re-scale the graph to a smaller size. Then send the cutting job again from your  


computer to the cutting plotter.

Warning 2 HPGL/2 command error

If the cutting plotter cannot recognize the commands from your computer, please check the commands 

applied to your cutting plotter in the HP-GL/2 or HPGL commands. Then send the same job to the cutting 

plotter again.
If that doesn’t solve the problem, please contact your local dealer.

Warning 3 Lever up or no media   

Check that you have lowered the lever down and make sure that you load the media before cutting.

Warning 4 Cannot repeat cutting

There are two possibilities: 

1.  There is no data in the buffer: please send the job again from your computer; 

2.  The buffer is full: please send the same job from your computer again. 
Under both conditions, press the ON/OFF LINE key to clear the warning message.

Warning 5 Communication error

Check that the serial/USB/parallel cable has been connected to the cutting plotter and computer  

properly. 
If so, then check whether the interface settings are correct. Check that the communication settings in 

your PC are the same as the ones on your cutting plotter (for example – 9600bps, no parity, 8 bits, 1 

stop bit. Then, press ON/OFF Line key to switch back to On Line mode. 

Warning 6 Width sensor error

Check that the pinch rollers are positioned above the grid drum and reload the media again.

6-2

Summary of Contents for Bobcat BA-60

Page 1: ...BOBCAT Desktop Vinyl Cutter Users Manual...

Page 2: ...On 3 8 3 6 On Off Line Key 3 8 3 7 Pause Key 3 8 3 8 Repeat Key 3 9 3 9 Data Clear Key 3 9 3 10 Origin Setting 3 9 3 11 Tracking Performance 3 10 3 12 Cut Test 3 11 3 13 When Completing the Cutting J...

Page 3: ...power cable to be bent Do not connect the power cable to a branch outlet or an extension cable There is danger of overheating Always put the pinch rollers within position of the white marks Thanks fo...

Page 4: ...CHAPTER 1 Parts Names and Functions 1 1 Front View and Back View 1 1...

Page 5: ...Hand Side Figure 1 4 4 Parallel Interface Connector Centronics Used to connect the cutting plotter to a computer through a parallel interface cable 5 Cutting Force Control Slider Set the blade force...

Page 6: ...Humidity 30 to 70 Make sure that there is an adequate space around the cutting plotter so that ventilation is not obstructed Avoid unnecessary vibrations and set up your cutting plotter on a level su...

Page 7: ...of its life Please replace with a new blade 1 The tip of blade is broken 2 Cutting traces are not as good as they were 3 Uncut area remains the same even the blade force has been raised signi cantly F...

Page 8: ...tment screw clockwise or count clockwise Figure 3 1 3 1 Figure 3 1 3 1 3 2 Tips The proper length means the blade s length is about 0 1mm more than lm s thickness For example if the thickness of lm is...

Page 9: ...media on the platen and slide it under the pinch rollers from either the front side or the backside of the cutting plotter The alignment rulers on the platen extension will help you to adjust the medi...

Page 10: ...ily and correctly Figure 3 2 2 1 Figure 3 2 2 1 Push the lever backward to lower down the pinch rollers Turn on the power and the carriage will measure the size of the media automatically After sizing...

Page 11: ...Switch Function Switch Down Switch Up Default Value SW 1 3 Offset Value Please refer to SW 1 3 0 275 mm SW 4 Media Weight Light Heavy Light Media SW 5 Quality Draft Fine Fine SW 6 Smooth Enable Disabl...

Page 12: ...ting quality smooth setting SW 7 AUTO UNROLL Unroll the heavy media at least 50 cm when the next point of movement is located beyond the unrolled position If the media type is single this function wil...

Page 13: ...3 4 Control Panel 3 7...

Page 14: ...LINE key to valid the new settings and to continue cutting Terminate the cutting clear the data in the buffer 1 Press the ON OFF LINE or PAUSE key 2 Then press the DATA CLEAR key Off line When the ma...

Page 15: ...EPEAT LED lights 3 9 Data Clear Key The purpose of the DATA CLEAR key is to clear the data in the buffer memory The DATA CLEAR key can only works under the pause or off line condition The DATA CLEAR L...

Page 16: ...media loading procedures described as followed 1 If the media length is less than 4 mm leave a margin of 0 5mm 15mm on the left and right edges of the media see Figure 3 11 1 3 11 1 2 If the media len...

Page 17: ...se the force gradually by moving the slider until an optimum force is obtained to cut through the media When the cutting test is completed a square cut out appears If the square can be easily peeled o...

Page 18: ...lotter and the host computer Figure 4 1 2 Set up the output port LPT1 or LPT2 from your software package 3 Send the data to your cutting plotter directly Or use DOS commands like TYPE or PRINT to outp...

Page 19: ...tool carriage rail Use a vacuum cleaner to clean any accumulated dirt and media residue beneath the pinch roller housing Clean the platen paper sensors and the pinch rollers with a water rinsed cloth...

Page 20: ...otter doesn t plot please check the following items rst Is the power cord plugged in properly Is the power cord connected to the power connector properly Is the power switch turned on properly Solutio...

Page 21: ...cutting plotter again If that doesn t solve the problem please contact your local dealer Warning 3 Lever up or no media Check that you have lowered the lever down and make sure that you load the medi...

Page 22: ...tes that there might be a problem on the X axis Please check that the drums are working normally and see that the media is well loaded Then turn on the power and reboot the cutting plotter Error 4 Che...

Page 23: ...6 3 Cutting plotter Quality Problems 6 4...

Page 24: ...Rollers 2 Motor DC Servo Control Cutting Force 0 300 g Max Cutting Speed Up to 600 mm sec 23 62 ips Memory 16MB 4MB in buffer Interfaces USB 1 1 Parallel Centronics Serial RS 232C Commands HP GL HP GL...

Page 25: ...d vinyl The blade is 45 with Red Cap 0 25 mm offset ZZ00221A GCB 360SB For cutting re ective vinyl cardboard sandblast ock and stencil sharp edge The blade is 60 with Green Cap 0 50 mm blade offset ZZ...

Page 26: ...om the computer Press ON OFF LINE key the LED above the key turns off 5 On line condition The cutting plotter is ready to receive data from computer Press ON OFF LINE key the LED above the key lights...

Reviews: