Version 03/2010, Rev. 1.7 of 27/01/2012
Translation of the original operating manual
Operating Manual
Refrigerated Centrifuge
2-16KC
from Serial No. 134226
Please retain for later use!
Page 1: ...Version 03 2010 Rev 1 7 of 27 01 2012 Translation of the original operating manual Operating Manual Refrigerated Centrifuge 2 16KC from Serial No 134226 Please retain for later use...
Page 2: ......
Page 3: ...by Sigma Laborzentrifugen GmbH An der Unteren S se 50 37520 Osterode am Harz Germany Phone 49 0 55 22 50 07 0 Fax 49 0 55 22 50 07 12 E mail info sigma zentrifugen de For service please use our servic...
Page 4: ......
Page 5: ...or 15 3 4 Operating Personnel 15 3 5 Informal Safety Instructions 15 3 6 Safety Instructions 16 3 6 1 Electrical Safety 16 3 6 2 Mechanical Safety 16 3 6 3 Fire Prevention 17 3 6 4 Chemical and Biolog...
Page 6: ...s 26 6 3 Spincontrol Comfort 27 6 3 1 Operating Panel 27 6 3 2 Centrifuge Display 27 6 3 3 Manual Mode 28 6 3 3 1 Starting a Centrifugation Run 28 6 3 3 2 Interrupting a Centrifugation Run 28 6 3 3 3...
Page 7: ...f defective parts 51 9 Disposal 52 9 1 Disposal of the Centrifuge 52 9 2 Disposal of the Packaging 52 10 Technical Data 53 10 1 Ambient Conditions 53 11 Appendix 54 11 1 Suitable Accessories 54 11 2 M...
Page 8: ......
Page 9: ...driven machines that separate liquids from solid matter liquid mixtures or solid mixtures by centrifugal force They are solely intended for this purpose Any other use beyond this area of application...
Page 10: ...ibutet or communicated in any othe way neither in full nor in parts Non compliance may be prosecuted under criminal law 1 5 Standards and Regulations EC Declaration of Conformity page 69 1 6 Scope of...
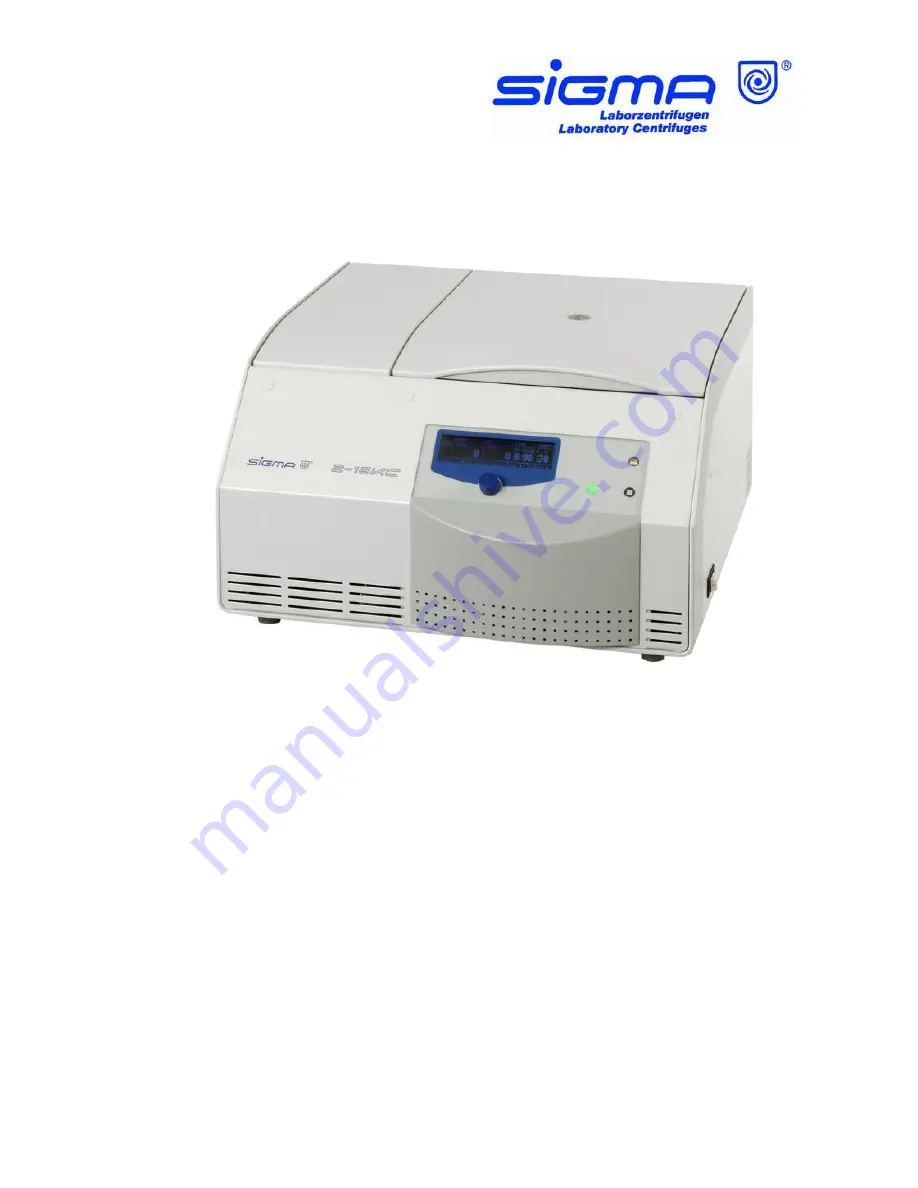
Page 11: ...g manual 2 Design of the Centrifuge 2 1 Overview 1 Lid 2 Function knob 3 Display 4 Lid key 5 Stop key 6 Start key 7 Mains power switch Fig 2 1 Total view of the centrifuge 8 Name plate see chapter 2 2...
Page 12: ...rer and registered office 2 Type name 3 Serial number 4 Max speed 5 Kinetic energy 6 Max density 7 Nominal voltage 8 Input fuse 9 Symbol for special disposal see chapter 9 10 CE mark in accordance wit...
Page 13: ...Ein Netzverbindung On Power Marche mise sous tension O Aus Netzverbindung Off Power Arr t mise hors tension Schutzleiteranschluss Protective earth ground Liaison la terre Erde Earth ground Terre Netzs...
Page 14: ...endangering injuries This symbol stands for a direct hazard to the life and health of persons due to electrical voltage Non observance of these symbols causes serious health problems up to life endan...
Page 15: ...s intended see chapter 1 2 Intended Use page 9 of this Operating Manual take measures for the safe opening of centrifuges 3 4 Operating Personnel Persons operating the unit must be familiar with the f...
Page 16: ...when the rotor is in motion Do not use the centrifuge if it was installed incorrectly Do not use the centrifuge without panels Do not use the centrifuge if the rotors and inserts show signs of corros...
Page 17: ...used in the centrifuge it is in the responsibility of the user to ensure that all necessary safety regulations guidelines precautions and practices are adhered to accordingly Spin infectious material...
Page 18: ...fitted see 6 2 2 Installation of Rotors and Accessories Observe the instructions on the installation of accessories see 6 2 2 3 The rotor must be loaded symmetrically at equal weights If liquids with...
Page 19: ...ge can only be started when the lid is properly closed The electrical lock must be locked The lid can only be opened when the rotor has stopped If the lid is opened by way of the emergency release sys...
Page 20: ...e inadmissible imbalance range If the rotor is loaded unevenly the drive will be switched off in the acceleration phase or during the run 3 8 Measures in the Event of Hazards and Accidents If an emerg...
Page 21: ...ut any problems Store the centrifuge only in dry rooms The storage temperature must be above 20 C If you would like to store it for more than one year or if you intend to ship it overseas please conta...
Page 22: ...ntrifuge always reach under the centrifuge from the side The centrifuge weighs approx 60 kg Retain the packaging for any possible future transport of the centrifuge 5 2 Transport Safety Device The tra...
Page 23: ...even surface Attention During transport from cold to warmer places condensational water will collect inside the centrifuge It is important to allow sufficient time for drying min 24 h before the cent...
Page 24: ...hold your fingers between the lid and the housing when closing the lid Risk of crushing 6 2 2 Installation of Rotors and Accessories 6 2 2 1 Installation of the Rotor Open the centrifuge lid by pressi...
Page 25: ...lid after loosening the rotor tie down screw Follow the safety instructions and hazard warnings in chapter 3 1 Rotor tie down screw 2 Lid 3 Lid seals Fig 6 1 Angel rotor with a hermetically sealed li...
Page 26: ...Loading the edges of a bucket only is not permissible 6 2 2 5 Tubes Load the tubes outside of the centrifuge Liquids in the buckets or multiple carriers cause corrosion Fill the tubes carefully and a...
Page 27: ...centrifuge is started directly via the operating panel When the centrifuge is switched on all of the operating keys and displays will be illuminated for a short time It is now ready for operation 6 3...
Page 28: ...arting a new centrifugation run 6 3 3 3 Interrupting a Deceleration Process Press the start key during a deceleration process in order to interrupt it and to restart the centrifuge 6 3 3 4 Selection D...
Page 29: ...eed Relative Centrifugal Force RCF The relative centrifugal force is the acceleration that the sample is subjected to The set value of this parameter is displayed in the upper section of this field wi...
Page 30: ...be displayed After the start of the centrifuge the elapsed time will be displayed Fig 6 10 Display of a continuous run Deactivate the continuous run by pressing the stop key or by entering a specific...
Page 31: ...ng used Fig 6 13 Calling up the rotor selection list Selection and change of the rotor number on a rotor selection list Select the double arrow next to the rotor selection list and confirm the entry A...
Page 32: ...f there are no rotor bucket combinations a message will be displayed This prevents the maximum permissible speed from being exceeded 6 3 3 6 Parameter Menu For information on how to set the parameters...
Page 33: ...will not fall below 0 C if it is at a standstill Rapid cooling program RAPID TEMP Precooling at a standstill may distort the measurement results and subsequently cause increased wear of the mechanica...
Page 34: ...e rotor is at a standstill When the lid is open the cooling is not active Samples may warm up 6 3 3 7 Configuration Menu In the configuration mode the default settings can be customised and the data c...
Page 35: ...size Speed enlarged zoomed The RCF display is eliminated RCF enlarged zoomed The speed display is eliminated Select the Display field in the configuration overview and confirm the selection The displ...
Page 36: ...sion number of cycles the total runtime as well as software version and date In the menus Cycles Info and Sensor the values can neither be entered nor changed Reset This function resets the centrifuge...
Page 37: ...selection The curve that is created will be displayed together with the maximum curve speed Fig 6 19 Time value input into interval no 2 Activate the time display of the second interval and enter the...
Page 38: ...t speed for the centrifugation run The sum of the intervals corresponds to the set time of the centri fugation run The last speed checkpoint of an interval equals 0 6 3 3 9 Modification of the Contras...
Page 39: ...Mode A program includes all of the data that are required for a centrifugation run Attention Temperature profiles cannot be created With a program certain sedimentation results can be repeated under...
Page 40: ...he program selection list and confirm the selection An overview of all of the programs that have already been saved will be displayed The current setting will be displayed under Select a program and c...
Page 41: ...of the programs that have already been saved will be displayed Select the program that is to be deleted and confirm the selection A dialog box will be displayed Select DELETE and confirm the selectio...
Page 42: ...lid Centrifuge cannot be started Start key LED is not illuminated Several Power off on If the error occurs again contact service Centrifuge cannot be started Lid key LED flashes The lid lock is not cl...
Page 43: ...with a screw driver see fig 7 2 First pull the red string to release the mechanism and then unlock the lid lock by pulling the white string Then reinsert the plug and quit the error message by switchi...
Page 44: ...refrigerated centrifuges allow to slow down power off on allow to cool down provide better ventilation 46 49 Imbalance error allow to slow down power off eliminate the imbalance 50 59 Lid error press...
Page 45: ...t SIGMA Laborzentrifugen GmbH An der Unteren S se 50 37520 Osterode Germany Tel 49 0 55 22 50 07 84 25 Fax 49 0 55 22 50 07 94 25 E mail service sigma zentrifugen de outside Germany contact our agency...
Page 46: ...agents with abrasive particles Do not expose the centrifuge and rotors to intensive UV radiation or thermal stress e g by heat generators 8 1 Maintenance 8 1 1 Centrifuge Disconnect the power cord fr...
Page 47: ...c radioactive or pathogenic contamination Dry the accessories with a soft cloth or in a drying chamber at approx 50 C 8 1 2 1 Plastic Accessories The chemical resistance of plastic decreases with risi...
Page 48: ...all glass particles e g with a vacuum cleaner Replace the rubber cushions since even thorough cleaning will not remove all glass particles Glass particles will damage the surface coating e g anodizin...
Page 49: ...or drugstores The centrifuges and the accessories consist of various materials A possible incompatibility must be considered Before using cleaning or decontamination agents that were not recommended b...
Page 50: ...made of polyallomer and polycarbonate 115 118 30 40 Fig 8 1 Autoclaving table 8 3 Service In the event of service work that requires the removal of the panels there is a risk of electric shock or mech...
Page 51: ...ough we exercise great care during the production of our products it may be necessary to return a unit or accessory to the manufacturer In order to ensure the quick and economical processing of return...
Page 52: ...charge If an order is placed these charges will be offset The unit must be packaged in a transport safe manner Please use the original packaging if at all possible If the product is dispatched to us...
Page 53: ...40 C 20 to 60 C 50 Physical data Height mm Height with opened lid mm Width mm Depth mm Weight kg EMC as per EN 61326 Noise level dBA 320 700 550 570 60 Class B 65 at max speed Fig 10 1 Technical Data...
Page 54: ...aluminium lid no 17851 radius max 7 8 cm radius min 2 2 cm angle 30 Attention Rotors from batch no 201 00 can be operated with lid rotors of older batches e g 15 00 or 99 must be inserted only withou...
Page 55: ...t rotor 4 x 100 ml complete no 11192 incl 2 sets bucket no 13097 and 4 glass tubes 100 ml no 15100 radius max 13 5 cm radius min 5 cm 5 000 3 773 11191 Swing out rotor 16 x 15 ml complete no 11192 inc...
Page 56: ...arrier for 4 round bottom tubes 10 15 ml max 16 2 17 5 x 80 110 mm e g no 15000 15010 15015 15024 15039 1 set 2 pcs 14031 Round carrier for 1 round bottom tube 25 30 ml max 25 3 30 x 70 105 mm e g no...
Page 57: ...10 ml 16 1 x 81 1 mm incl screw cap suitable for 12141 13059 15000 Polyfluor tube 10 ml 16 1 x 81 1 mm incl screw cap suitable for 12141 13059 15039 Polypropylene Co Polymer PPCO tube 10 ml 16 1 x 81...
Page 58: ...ml max 4 000 x g 24 x 100 mm suitable for 13022 14031 17925 15026 Centrifuge glass tube 27 ml max 4 000 x g 24 x 100 mm graduated 2 up to 25 ml in 0 5 ml increments suitable for 13022 14031 17925 150...
Page 59: ...epresentation of the Rotors The graphical representation of the rotors shows the maximum and minimum radii of the accessories used If necessary the values must be manually calculated see 11 4 1 RCF pa...
Page 60: ...ration curves and are assigned the same numbers An exception is curve 0 It decelerates brakeless In general the runtime until the set speed is reached depends on the moment of inertia of the rotor Lin...
Page 61: ...are inverted images of the acceleration curves and are assigned the same numbers Quadratic slope curves 10 19 Curve 19 is a special case compared to the other curves The centrifuge accelerates with ma...
Page 62: ...pecified independently They are interrelated via the following formula RCF 11 18 x 10 6 x r x n2 If two values are given the third value is determined by the equation If then the speed or the rotation...
Page 63: ...2 16KC Appendix Version 03 2010 Rev 1 7 of 27 01 2012 63 Translation of the original operating manual Fig 11 7 Speed Gravitational Field Diagram...
Page 64: ...15P 1 15PK 12124 5 years 20x 1 15 1 15K 1 15P 1 15PK 12126 5 years 20x 1 15 1 15K 1 15P 1 15PK 9100 15 000 4 15C 4K15C 4 16 4 16K 6 15 6K15 6 16 6 16K without engraving only spincontrol professional...
Page 65: ...100 3 4 4 1 4 4 2 1 1 Antimony trichloride SbCl3 90 1 4 1 4 1 1 1 4 Benzaldehyde C7H6O 100 1 3 4 1 1 3 4 4 1 1 Benzene C6H6 100 3 2 4 1 3 4 4 1 1 Boric acid H3BO3 aqueous 1 3 1 2 1 1 1 Butyl acrylate...
Page 66: ...ogen chloride HCl 5 1 4 1 4 1 1 1 1 4 Hydrogen chloride HCl concentrat ed 1 4 4 4 1 1 2 3 1 4 Hydrogen peroxide H2O2 3 1 3 1 1 1 1 1 1 3 Hydrogen peroxide H2O2 30 1 4 1 4 1 1 1 1 3 Hydrogen sulfide H2...
Page 67: ...ate AgNO3 100 1 1 1 1 1 1 1 1 1 4 Sodium bisulfite NaHSO3 10 1 1 2 4 1 1 1 Sodium carbonate Na2CO3 10 1 1 1 1 1 1 3 Sodium chloride NaCl 30 1 1 1 1 1 1 1 1 1 3 Sodium hydroxide NaOH 30 1 1 4 1 1 1 1 1...
Page 68: ......
Page 69: ...EC Declaration of Conformity...
Page 70: ......
Page 71: ...Carrier 26 48 49 Centrifugation curves 38 Centrifugation with different tube sizes 25 Centrifugation with low capacity 25 Centrifuge cannot be started 42 Centrifuge decelerates during operation 42 Ce...
Page 72: ...ife and health 14 Disinfectants 49 Display continuous run 30 Disposal of the centrifuge 52 Disposal of the packaging 52 Documentation 10 Drive problem 42 EC Declaration of Conformity 69 EEPROM error 4...
Page 73: ...otors and accessories 18 24 Installation of the rotors 24 Installation site 23 Instructions on saftety and hazards 26 Intended use 9 Interrupting a centrifugation run 28 Interrupting a deceleration pr...
Page 74: ...ing the lid 24 Operating panel 27 Operating personnel 15 Operating voltage 23 Operational safety 47 Overseas shipping 21 Packaging 22 Parameter 27 32 62 Parameter error 44 Parameter menu 32 Pathogenic...
Page 75: ...er parts 16 50 Runtime 30 39 Safety area 18 Safety class 23 Safety distance 18 23 Safety instructions 9 24 25 Safety instructions for centrifugation 18 Safety conscious work 15 Saving a program 40 Sco...
Page 76: ...table accessories 25 54 Supply voltage 23 Swing out rotor 25 Switching the centrifuge OFF 41 Switching the centrifuge ON 24 System check 19 System error 42 44 Table of rotors and accessories with a di...
Page 77: ...itch Total view of the centrifuge 8 Name plate 9 Mains power input 10 Equipotential bonding screw Rear view of the centrifuge 1 Before the initial start up please ensure that your centrifuge is proper...
Page 78: ...and to quit the modification mode SET and the selected area will be deactivated Program Mode Select the program field PROG and confirm the selection Turn the knob As a result all of the programs that...