
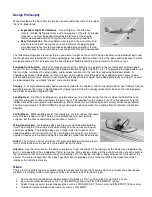


.
WING CONSTRUCTION
Building The Wing Panels
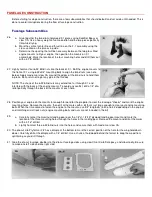
Before beginning wing construction, carefully splice together the Left Wing Panel plans so that the "X" and "Y" indicators
meet. Use a straightedge to double check the alignment of the plans before taping them at the seam. Tape or pin the
plans to your building board and protect them with a layer of waxed paper. Build each wing half separately.
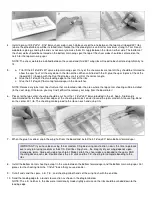
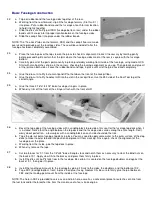
1.
a. Pin the 3/16"x3/8"x30" spruce main wing spar in place on the plan. Be careful not to place pins where they will
interfere with wing ribs which will be added later.
b. Pin the 1/16"x1-1/2"x30" balsa bottom trailing edge sheeting in place.
c. Use about three wing ribs to accurately position the 3/16"sq. x30" balsa rear spar, then pin the spar in place.
2.
a. Glue eight W-2 wing ribs to the spars and trailing edge sheeting.
b. Place scraps of 1/16" balsa near the main spar to accurately space the W-1 wing ribs up from the building board.
(The spacing is required for the center sheeting to be added later.)
c. Use the dihedral guage side of the die-cut Dual Tool to set the root W-1 rib at the proper dihedral angle before
gluing it in place. Add the two remaining W-1 ribs.
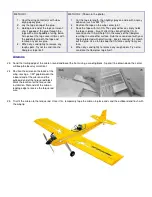
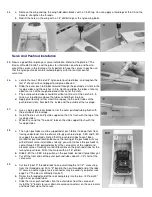
3.
a. Glue the 1/4"sq.x30" balsa trailing edge to the top of the L.E. sheeting and the ends of the wing ribs.
b. Remove the pins in the bottom L.E. sheeting and re-pin the back of the wing through the trailing edge stick that you
just installed.
c. Add the 1/16"x1-1/4"x30" top trailing edge sheeting. For this step it is recommended that you use Sig-Bond
(aliphatic resin) along the back edge of the sheeting that glues to the trailing edge. That will make the joint easier to
sand when you reach Step 11. Use thin CA to tack the front edge of the sheeting to the wing ribs.
Summary of Contents for Four-Star 40 SIGRC44
Page 1: ......